Simple Security System with Bird Bot
Connect two micro:bits and an ultrasonic distance sensor to detect movement and immediately show an alert on the other
Written By: Cherie Tan
Difficulty
Easy
Steps
17
Ever seen a trip-wire alarm system found in the movies? Perhaps you've built a basic trip-wire alarm system by following our Laser Head Sensor with micro:bit guide.
In this guide, we'll create a simpler security system with the Bird Bot. The Bird Bot will first stand idle at one spot, then if it detects movement with its ultrasonic distance sensor, it will send an alert message to another micro:bit, start flashing its LEDs red and ring its alarm.
Complete this guide to create a prototype for a security system with the Bird Bot.
The ultrasonic distance sensor is triggered to send out regular pulses. If an echo is received within the programmed distance, for instance, 15cm from it, then it can note this as movement.
In this guide, we'll prototype a simple security system with the Bird Bot by combining the ultrasonic distance sensor, a buzzer module, and the micro:bit. The Bird Bot will first stand idle at one spot. If it detects movement within 15cm from where it is at using its ultrasonic distance sensor, it will:
1. Sound its alarm
2. Start to move around while avoiding obstacles
3. Begin to flash its lights red
4. Send an alert to a second micro:bit via bluetooth that there is a security issue
1. Sound its alarm
2. Start to move around while avoiding obstacles
3. Begin to flash its lights red
4. Send an alert to a second micro:bit via bluetooth that there is a security issue
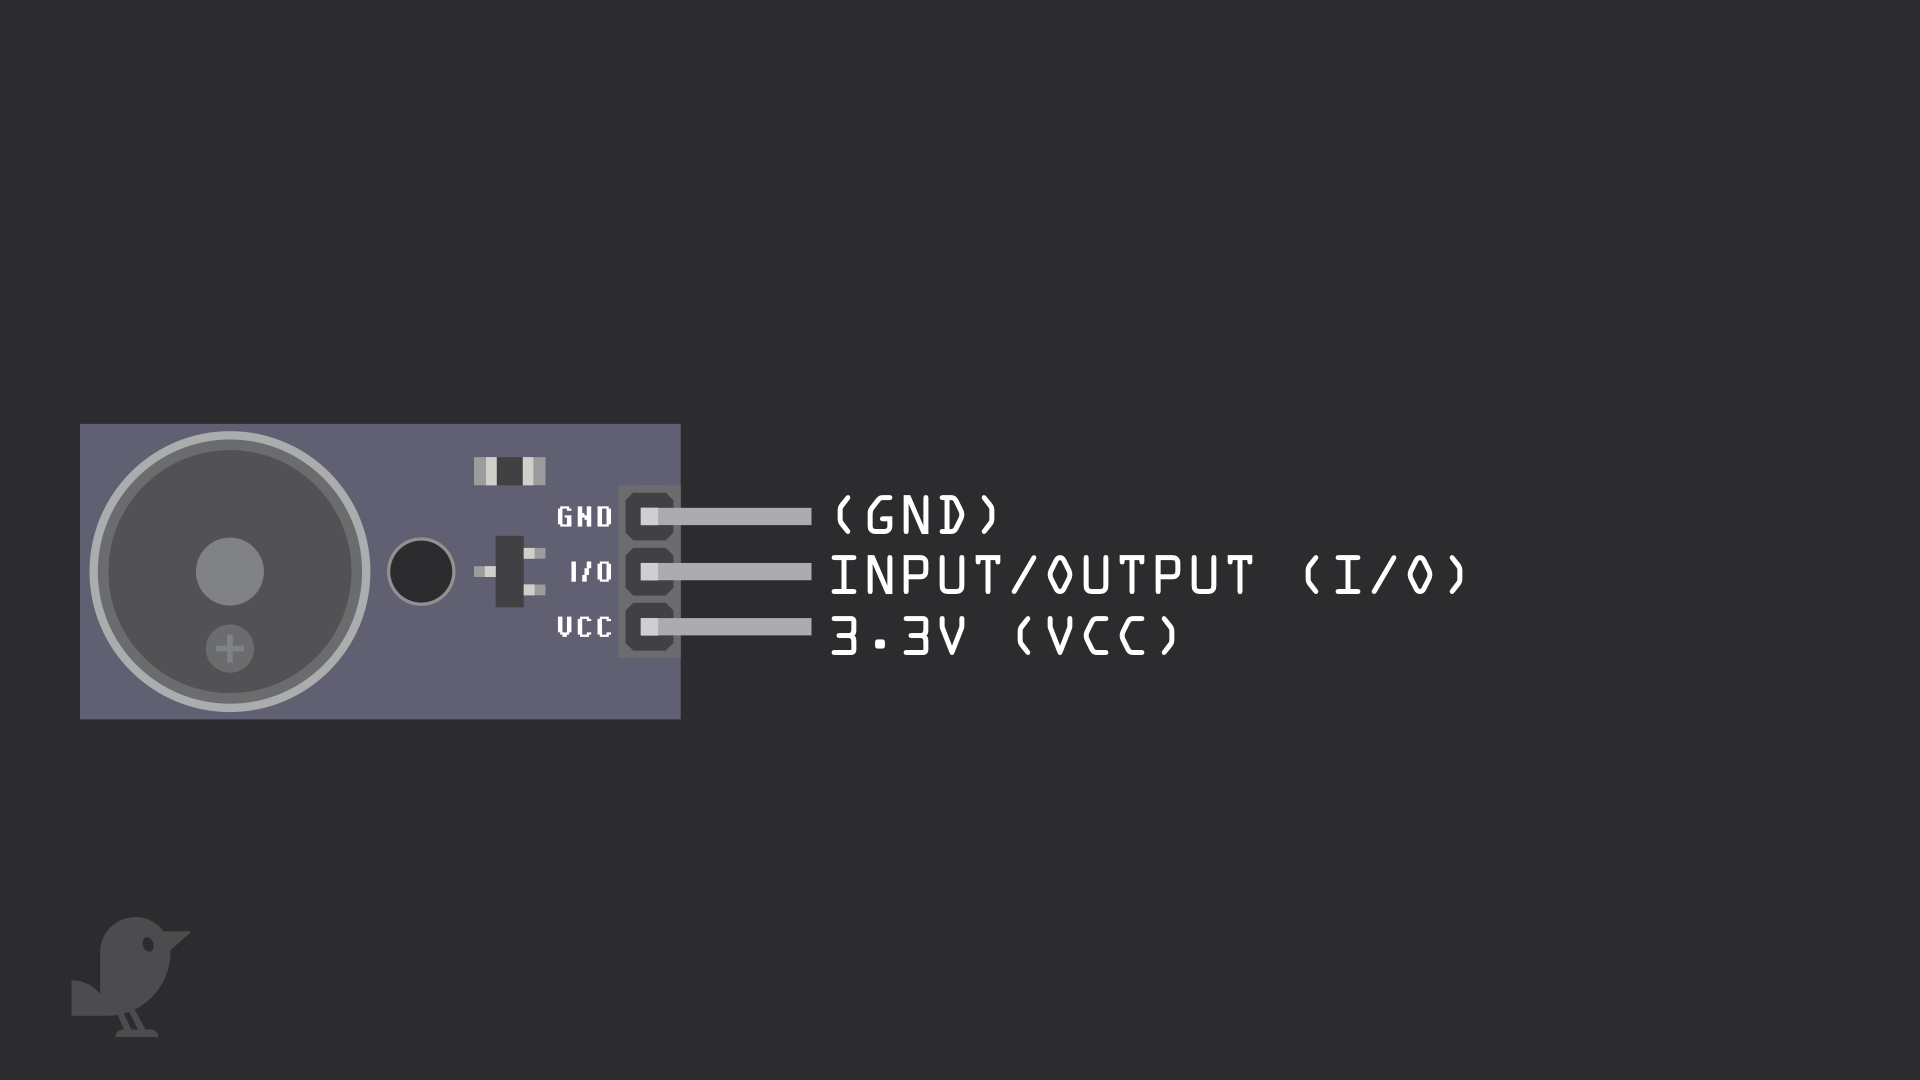
The buzzer module has three pins:
3.3V: While 'VCC' stands for Voltage Common Collector, we'll connect the VCC pin to 3.3V on the micro:bit
I/O: Input/Output
GND: Ground
3.3V: While 'VCC' stands for Voltage Common Collector, we'll connect the VCC pin to 3.3V on the micro:bit
I/O: Input/Output
GND: Ground
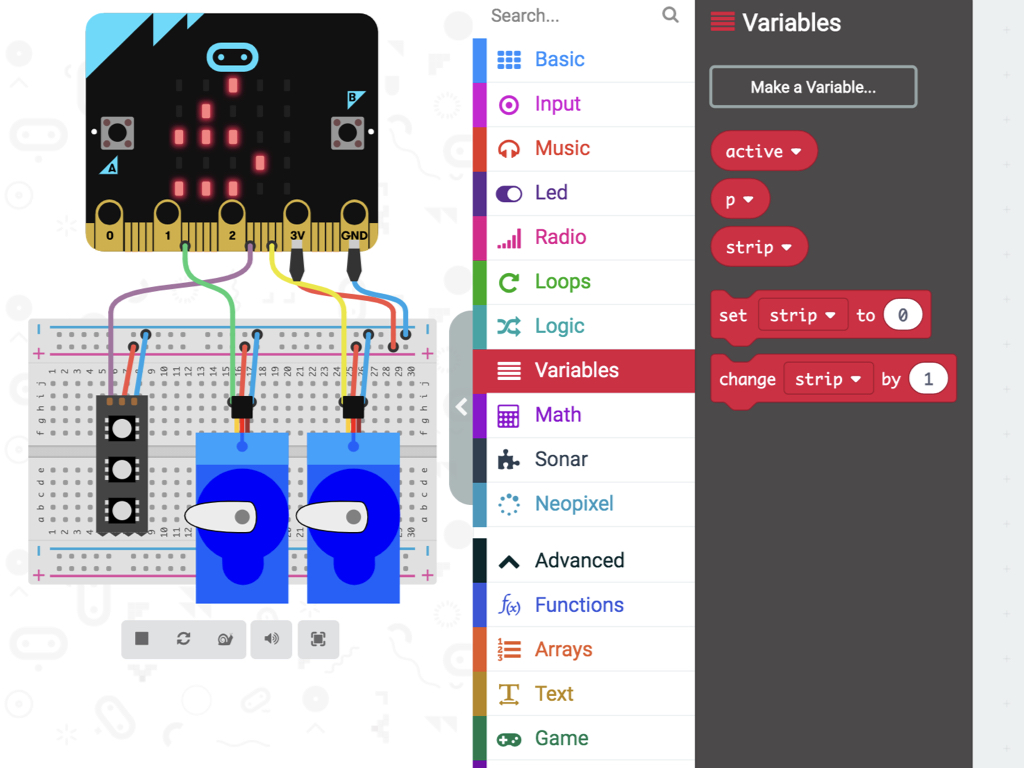
Connect the buzzer module to the Bird Bot as such:
VCC to 3.3V
GND to GND
I/O to P0
VCC to 3.3V
GND to GND
I/O to P0
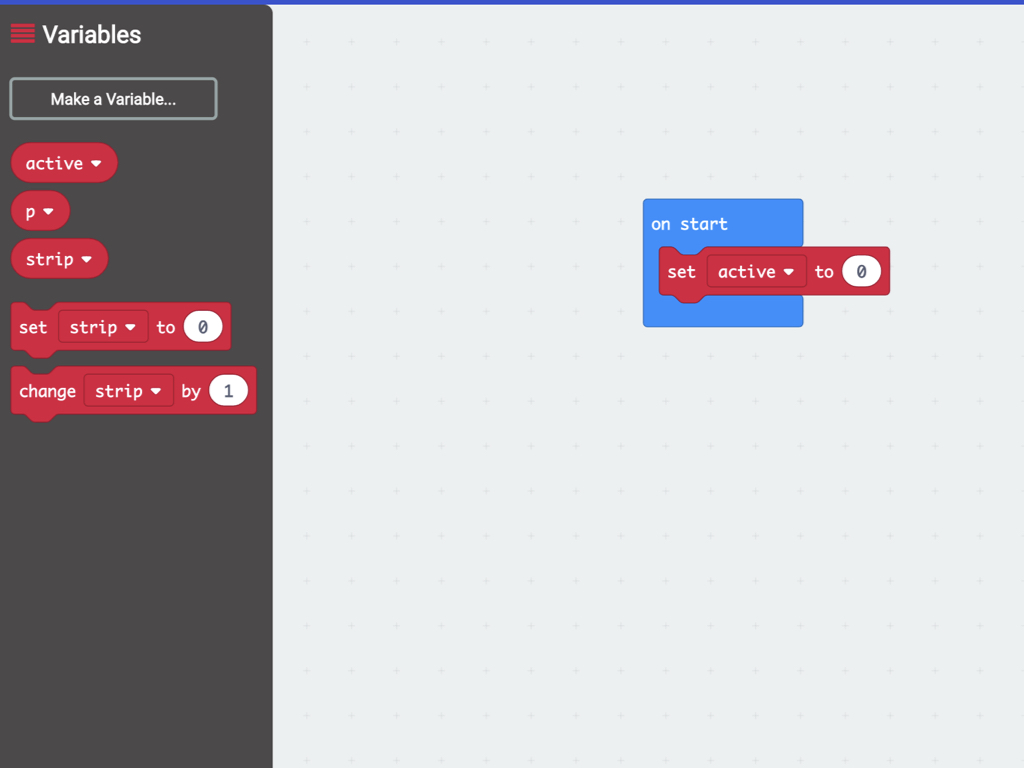
After opening up the MakeCode editor, the first thing to do is to click on the Variables category.
Click on Make a Variable...
Name this variable, active
Click and drag an active block into on start
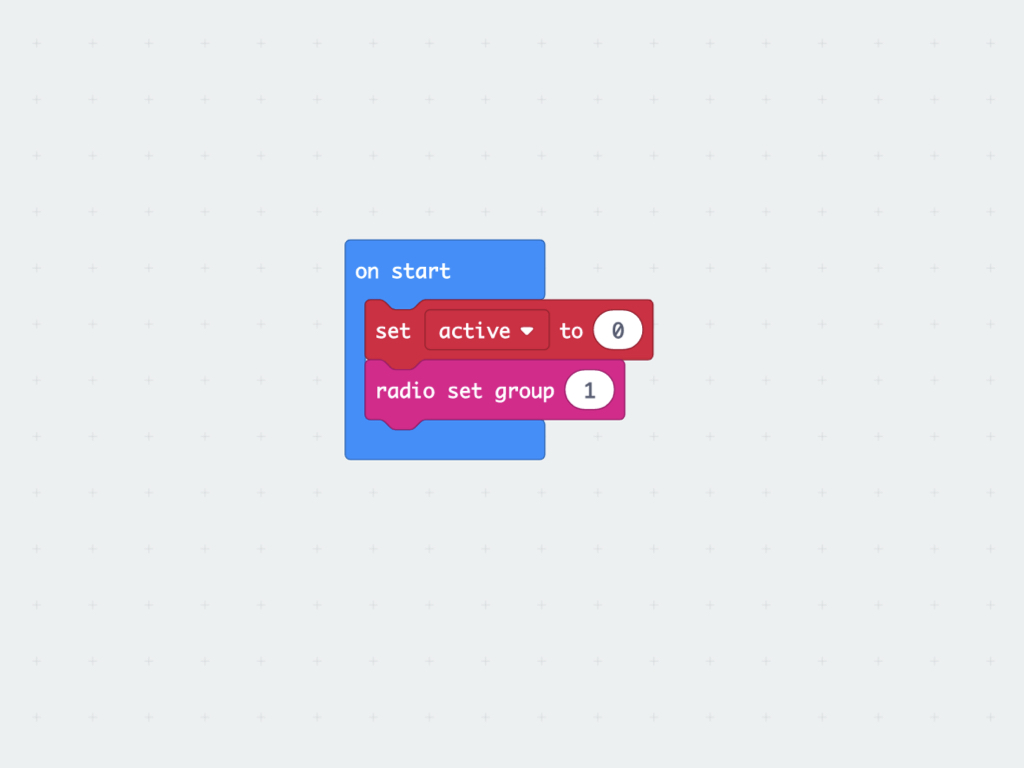
Next, from Radio, click and drag out a radio set group block into on start
Set radio set group to 1
let p = 0;
function turnRight () {
    basic.showArrow(ArrowNames.East);
    pins.digitalWritePin(DigitalPin.P16, 1);
    pins.servoWritePin(AnalogPin.P16, 0);
    basic.pause(100);
    basic.clearScreen();
}
function forward () {
    basic.showArrow(ArrowNames.North);
    pins.digitalWritePin(DigitalPin.P8, 1);
    pins.servoWritePin(AnalogPin.P8, 180);
    pins.digitalWritePin(DigitalPin.P16, 1);
    pins.servoWritePin(AnalogPin.P16, 0);
    basic.clearScreen();
}
function turnLeft () {
    basic.showArrow(ArrowNames.West);
    pins.digitalWritePin(DigitalPin.P8, 1);
    pins.servoWritePin(AnalogPin.P8, 180);
    basic.pause(100);
    basic.clearScreen();
}
function backward () {
    basic.showArrow(ArrowNames.South);
    pins.digitalWritePin(DigitalPin.P8, 1);
    pins.servoWritePin(AnalogPin.P8, 0);
    pins.digitalWritePin(DigitalPin.P16, 1);
    pins.servoWritePin(AnalogPin.P16, 180);
    basic.clearScreen();
}
function stop () {
    pins.digitalWritePin(DigitalPin.P16, 0);
    pins.digitalWritePin(DigitalPin.P8, 0);
}
basic.forever(function () {
    p = sonar.ping(
    DigitalPin.P14,
    DigitalPin.P15,
    PingUnit.Centimeters
    )
    basic.showNumber(p);
    if (p <= 5) {
        stop();
        basic.pause(200);
        backward();
        basic.pause(200);
    } else {
        if (p < 15) {
            if (Math.randomRange(0, 99) < 45) {
                turnLeft();
                basic.pause(200);
            } else {
                turnRight();
                basic.pause(200);
            }
        } else {
            forward();
            basic.pause(200);
            stop();
            basic.pause(200);
        }
    }
})
We will use the obstacle avoidance functionality in our next program, so go ahead and copy and paste this into the Javascript interface of the new project.
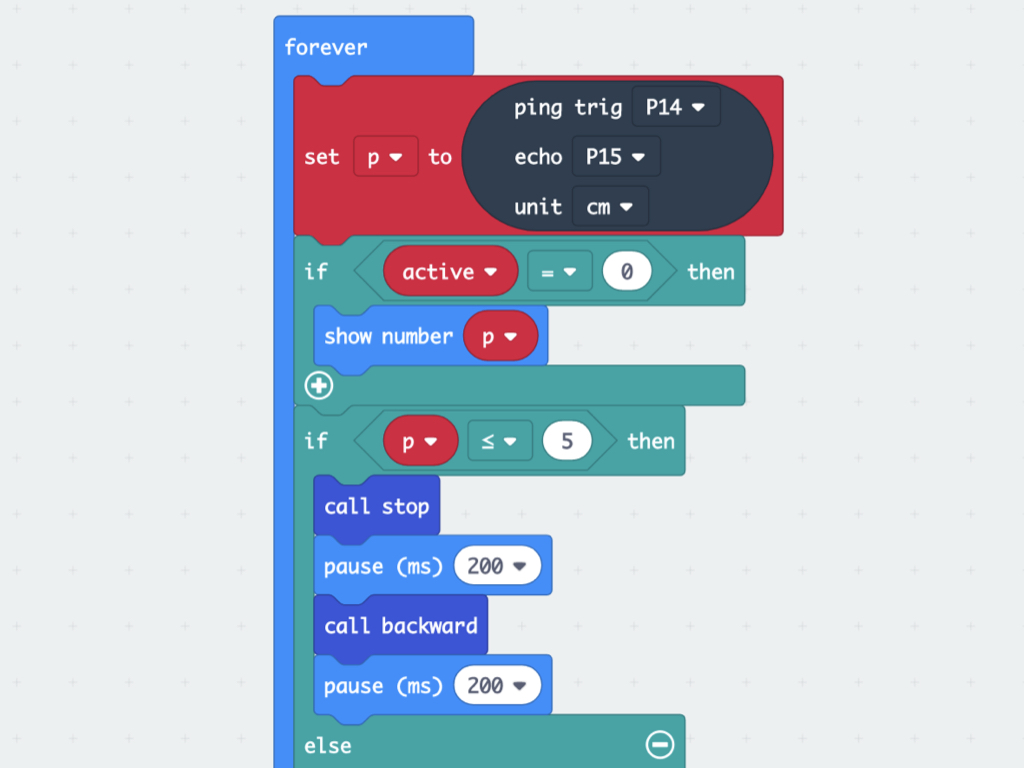
Attach show number p to if active = 0 then
From Logic, click and drag out a if ... then block
From Variables, click and drag out an active block
Next, get out a 0 = 0 block from the Logic category under Comparison
With these blocks, create a new condition if active = 0 then
Get a show number block from Basic and attach a p block from Variables into it
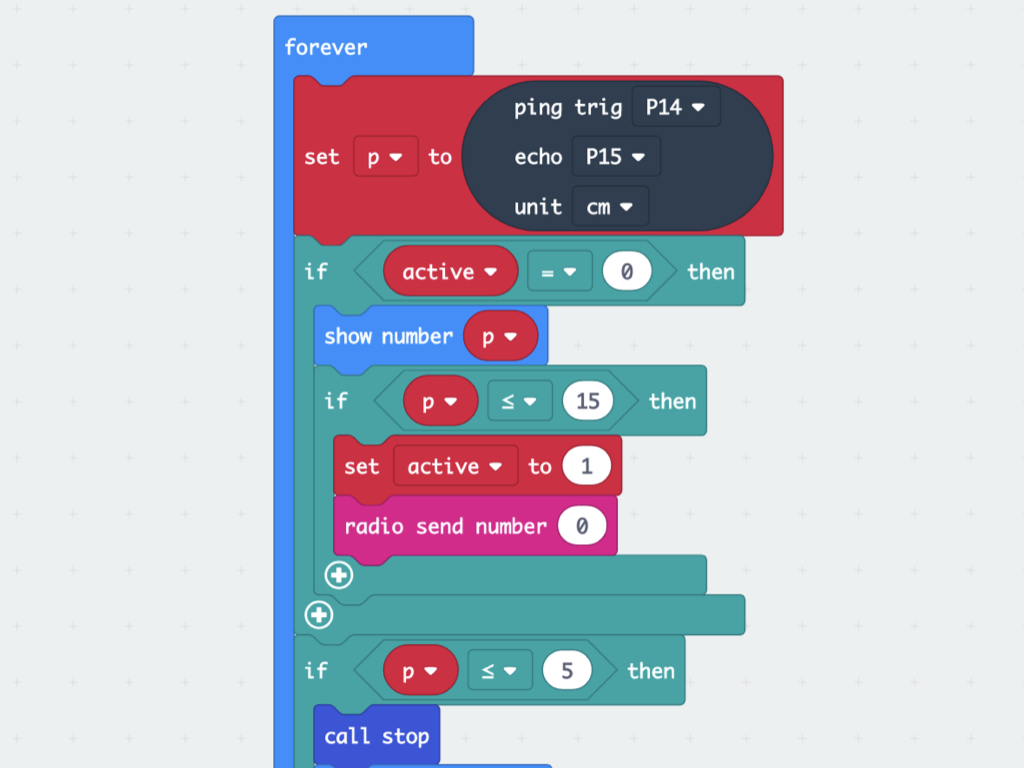
Next, create another condition if p < = 15 then
The variable, active that we had created before will be used to check to see if the Bird Bot should be set to active. If it is set to active then that means its ultrasonic distance sensor has detected movement, and will alert the second micro:bit. But first, simply add a set active to 1 block within it.
Next, add a radio send number block.
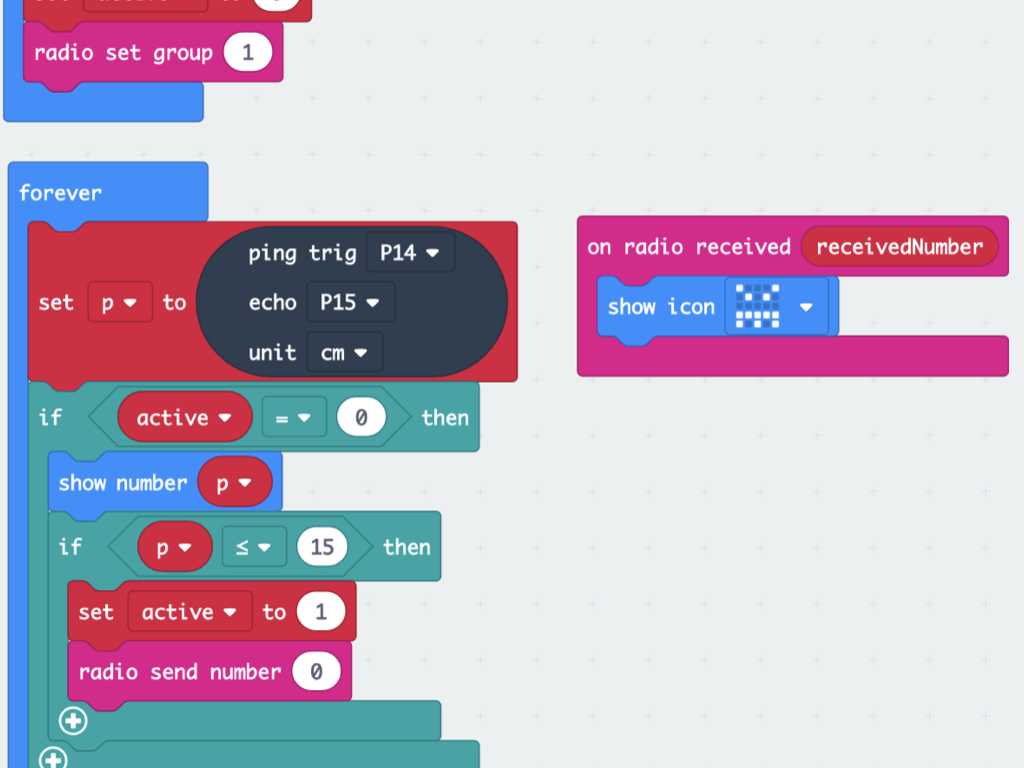
The next block of code is only necessary for the second micro:bit, but you may also leave it on the program for the first micro:bit.
But so that the second micro:bit will only show an alert message, make sure the forever block is not uploaded to it and only to the first micro:bit.
But so that the second micro:bit will only show an alert message, make sure the forever block is not uploaded to it and only to the first micro:bit.
Now that the first micro:bit has been programmed to send out a number 0 when it detects movement, we need to get the second micro:bit to display the alert message. To do so, simply use a on radio received receivedNumber block.
Add a show icon block to it!
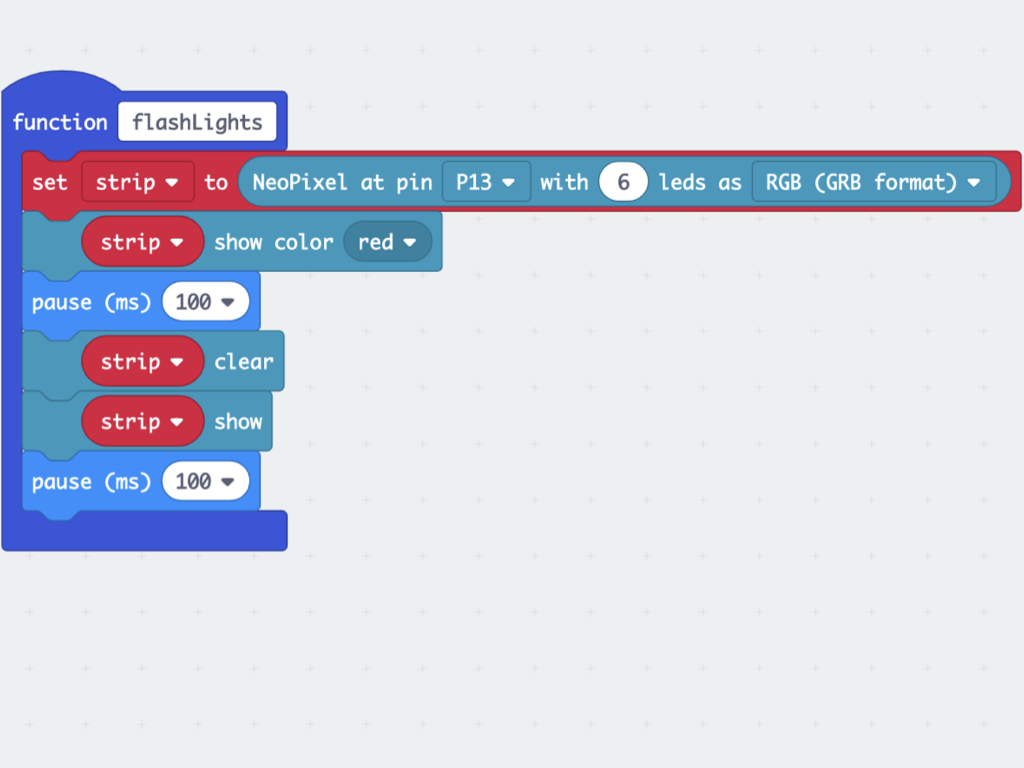
In Neopixels, click and drag out a set strip to NeoPixel at pin P0 with 24 leds as RGB (GRB format) block
Click on the Javascript button to use the interface, and manually set the pin to P13 and the led count to 6.
Next, the Bird Bot will not only send an alert message out via Bluetooth, it will also flash its lights red. So create a new function and name it flashLights.
Add a strip show color block and set this to red.
For it to blink, we'll need to add strip clear and strip show as well as pause (ms) blocks in between.
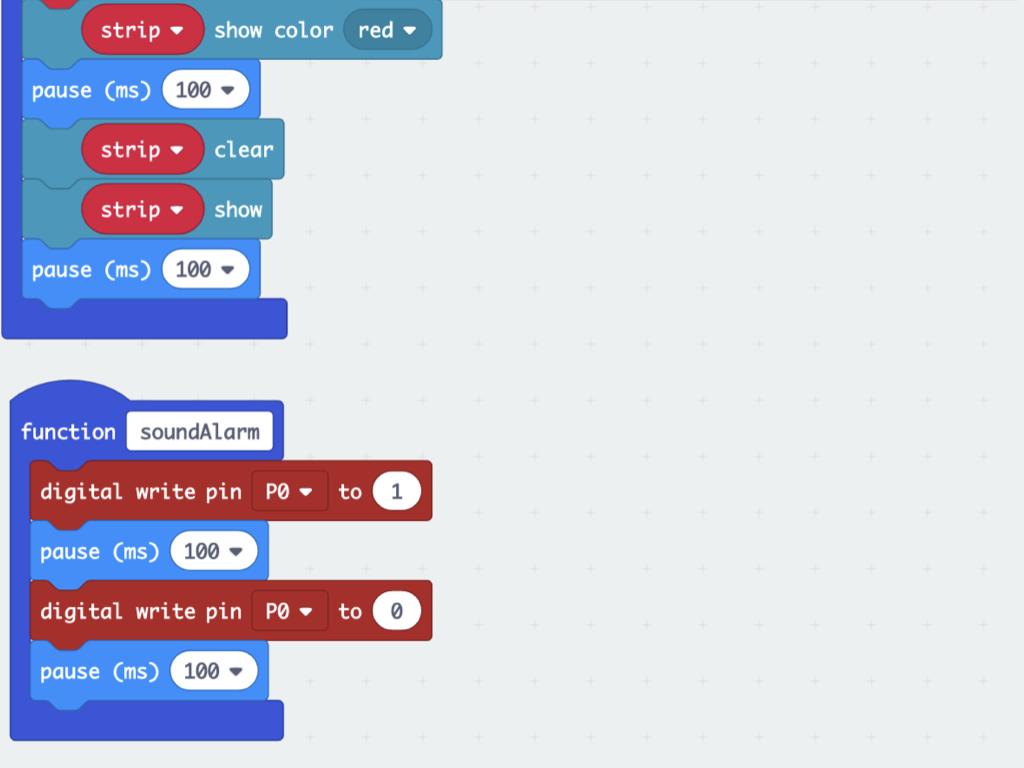
The next thing the Bird Bot will do when it senses an intruder, is to sound its alarm. Just as we did in Robot Alarm Clock with Bird Bot, create another function and name it soundAlarm.
Using digital write pin ... to ... blocks, we can turn the buzzer module on and off. For a longer beeping sound, change the value of the pause (ms) blocks to a larger value.
Set pin P0 to 1 to turn the buzzer off, and set it to 0 to turn the buzzer on. This is because this particular buzzer module's pin is an 'active low'.
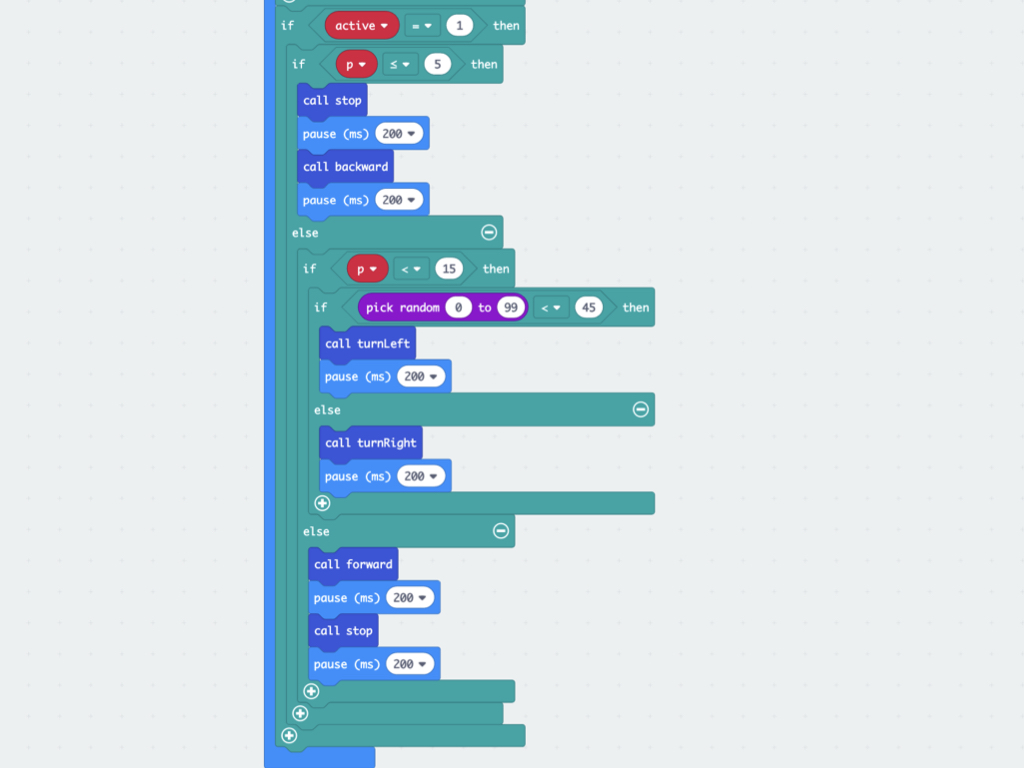
Create a new condition: if active = 1 then
Place the existing chunk of code for the obstacle avoidance functionality into this condition.
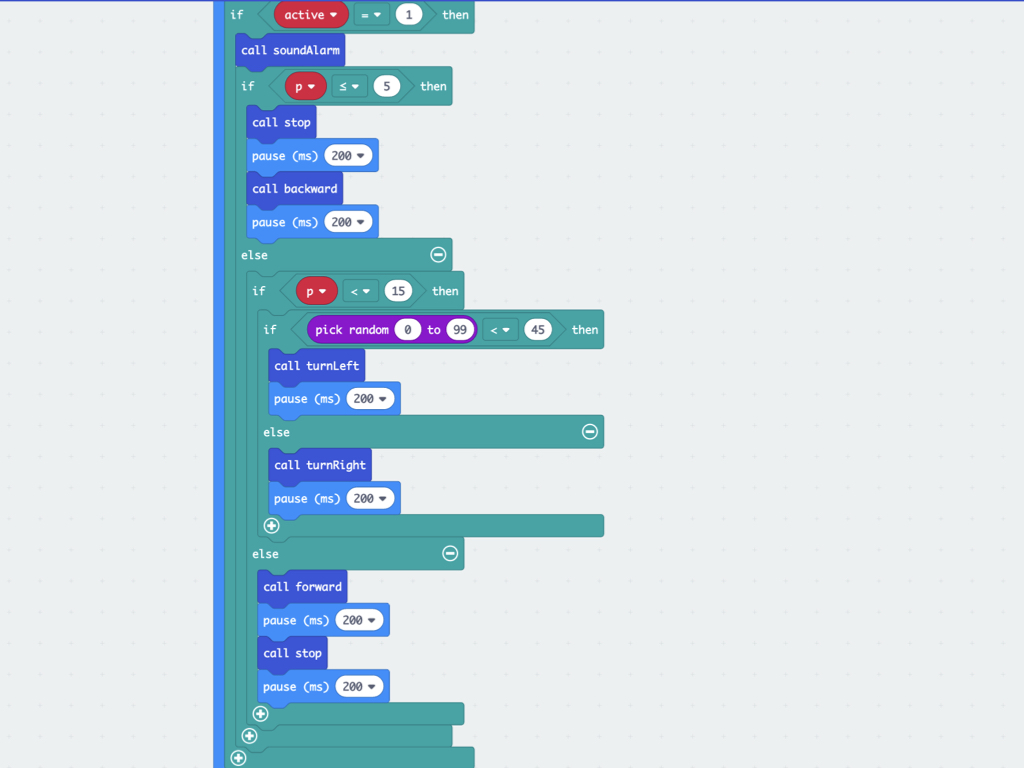
Previously, we've created functions for turning the Bird Bot's alarm sound on, as well as its lights on and off. But we have not yet called these functions in our program. From Functions, click and drag out a call soundAlarm block into if active = 1 then.
function forward () {
    basic.showArrow(ArrowNames.North);
    pins.digitalWritePin(DigitalPin.P8, 1);
    pins.servoWritePin(AnalogPin.P8, 180);
    pins.digitalWritePin(DigitalPin.P16, 1);
    pins.servoWritePin(AnalogPin.P16, 0);
    basic.clearScreen();
}
function backward () {
    basic.showArrow(ArrowNames.South);
    pins.digitalWritePin(DigitalPin.P8, 1);
    pins.servoWritePin(AnalogPin.P8, 0);
    pins.digitalWritePin(DigitalPin.P16, 1);
    pins.servoWritePin(AnalogPin.P16, 180);
    basic.clearScreen();
}
function turnLeft() {
    basic.showArrow(ArrowNames.West);
    pins.digitalWritePin(DigitalPin.P8, 1);
    pins.servoWritePin(AnalogPin.P8, 180);
    basic.pause(100);
    basic.clearScreen();
}
function turnRight() {
    basic.showArrow(ArrowNames.East);
    pins.digitalWritePin(DigitalPin.P16, 1);
    pins.servoWritePin(AnalogPin.P16, 0);
    basic.pause(100);
    basic.clearScreen();
}
function stop() {
    pins.digitalWritePin(DigitalPin.P16, 0);
    pins.digitalWritePin(DigitalPin.P8, 0);
}

function flashLights() {
    strip = neopixel.create(DigitalPin.P13, 6, NeoPixelMode.RGB);
    strip.showColor(neopixel.colors(NeoPixelColors.Red));
    basic.pause(100);
    strip.clear();
    strip.show();
    basic.pause(100);
}
function soundAlarm() {
    pins.digitalWritePin(DigitalPin.P0, 1);
    basic.pause(100);
    pins.digitalWritePin(DigitalPin.P0, 0);
    basic.pause(100);
}

radio.onReceivedNumber(function (receivedNumber) {
    basic.showIcon(IconNames.Angry);
})
let p = 0;
let strip: neopixel.Strip = null;
let active = 0;
radio.setGroup(1);
basic.forever(function () {
    p = sonar.ping(
    DigitalPin.P14,
    DigitalPin.P15,
    PingUnit.Centimeters
    )
    if (active == 0) {
        basic.showNumber(p);
        if (p <= 15) {
            active = 1;
            radio.sendNumber(0);
        }
    }
    if (active == 1) {
        soundAlarm();
        flashLights();
        if (p <= 5) {
            stop();
            basic.pause(200);
            backward();
            basic.pause(200);
        } else {
            if (p < 15) {
                if (Math.randomRange(0, 99) < 45) {
                    turnLeft();
                    basic.pause(200);
                } else {
                    turnRight();
                    basic.pause(200);
                }
            } else {
                forward();
                basic.pause(200);
                stop();
                basic.pause(200);
            }
        }
    }
})
Once complete, the code should look like this in Javascript. Feel free to grab the complete code on the left and paste into the Javascript interface.
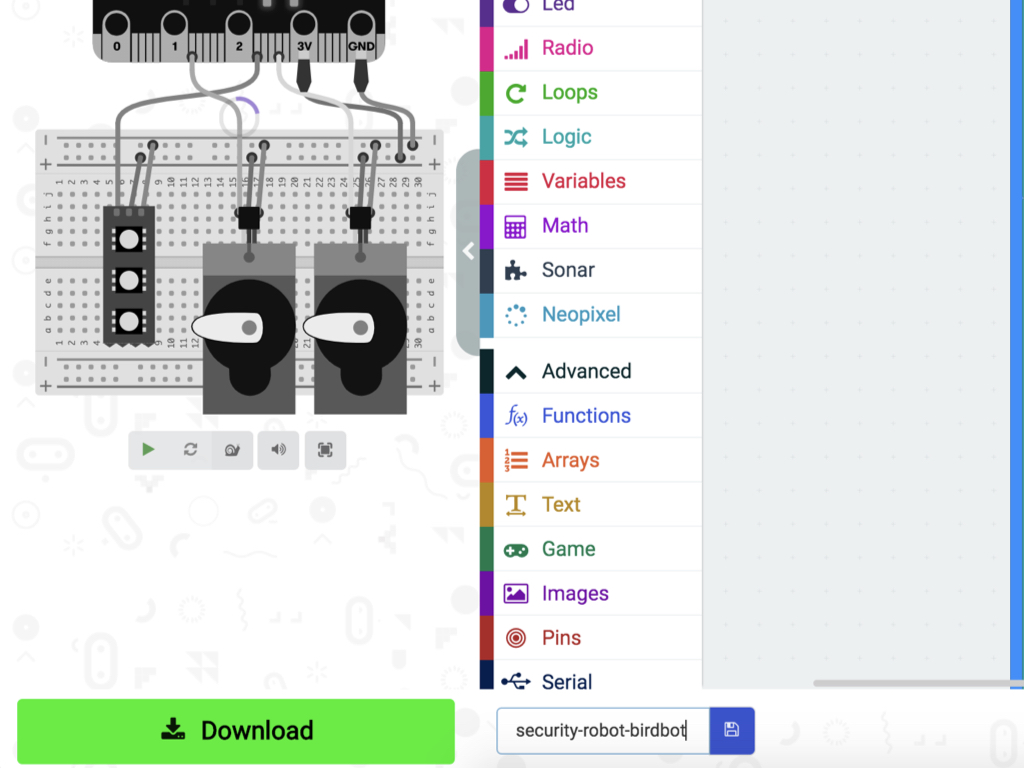
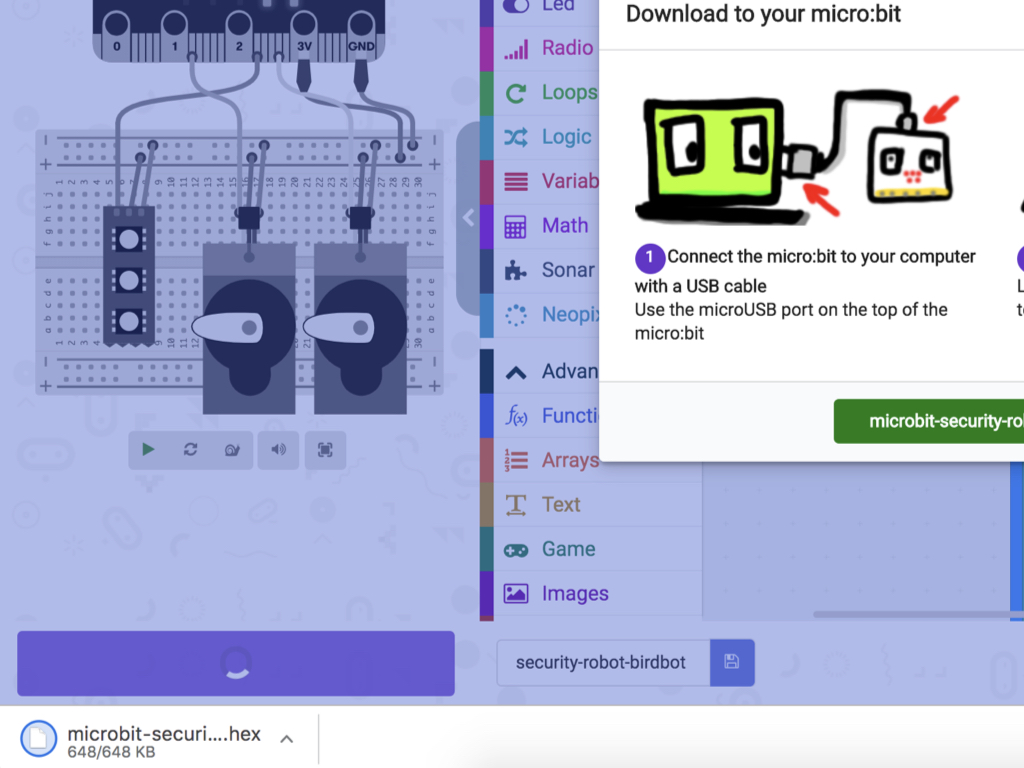
To upload the code to the Bird Bot, first connect the micro:bit to the computer via microUSB cable.
Click on the Download button and the hex file will be automatically downloaded to your 'Downloads' folder.
Drag and drop the downloaded microbit-security-robot-birdbot.hex file to the MICROBIT drive.
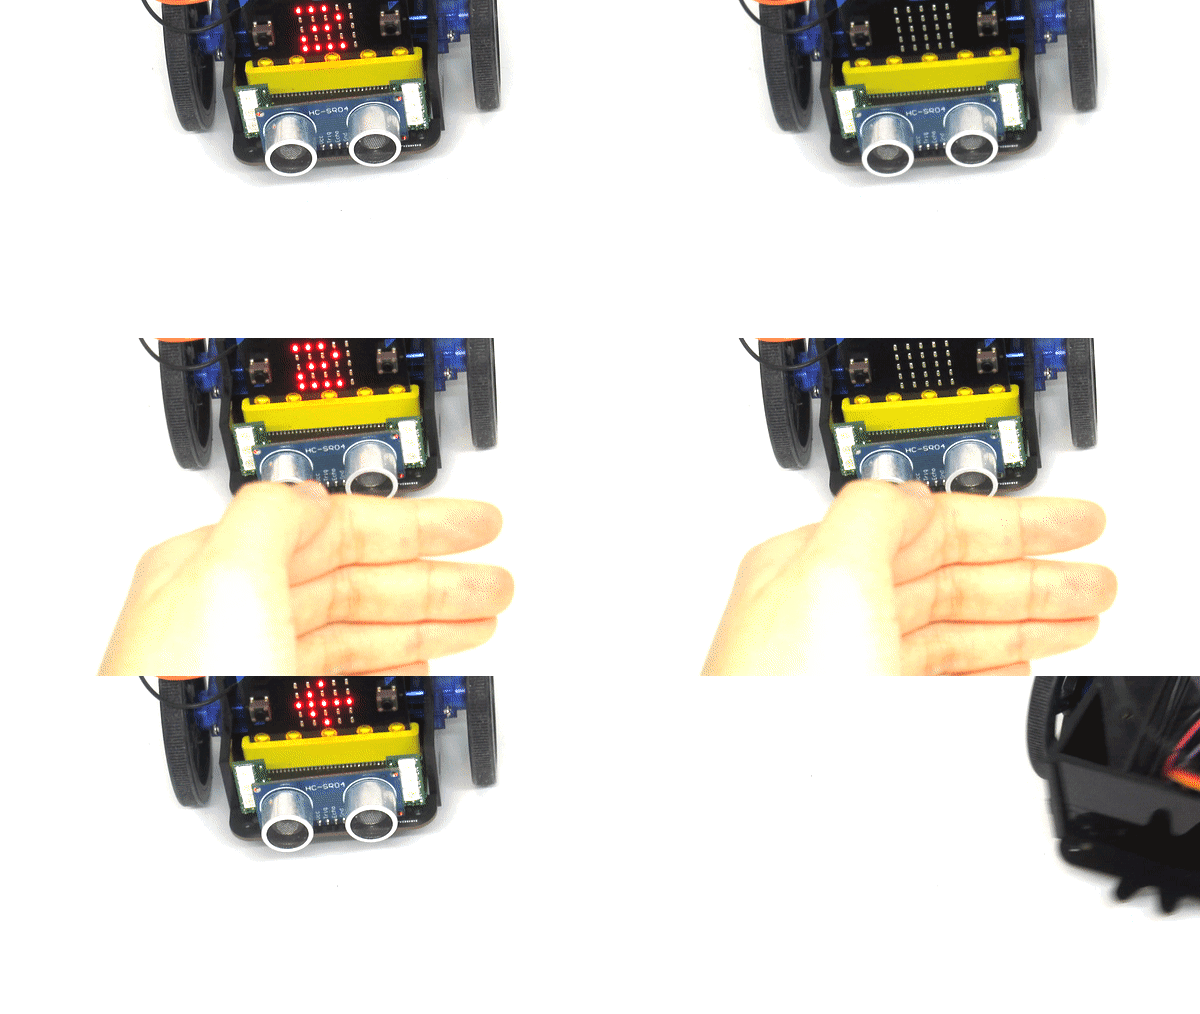
Set the Bird Bot in position and power it up with 3 x AAA batteries. It will stand still and display the distance from an object in centimetres along its LED matrix. Place a hand in front of it and it will detect the movement. Then as we programmed it to, it will send an alert message to the second micro:bit, start moving, sounding its alarm and flashing red.
As an optional step, you might want to add a laser sensor and a light sensor to create a trip-wire alarm system. The idea is similar to that shown in our Laser Head Sensor with micro:bit guide.
Check out the guides over at https://www.littlebird.com.au/a/how-to/#micro-bit to learn even more!

