LEDs with EagLED
Written By: Cherie Tan

Difficulty
Easy
Steps
7
The EagLED is an e-textile development kit that comes with a set of LEDs.
In this guide, you will get started with making the LEDs blink and fade!
Complete this guide to get familiar with the EagLED and its LEDs.

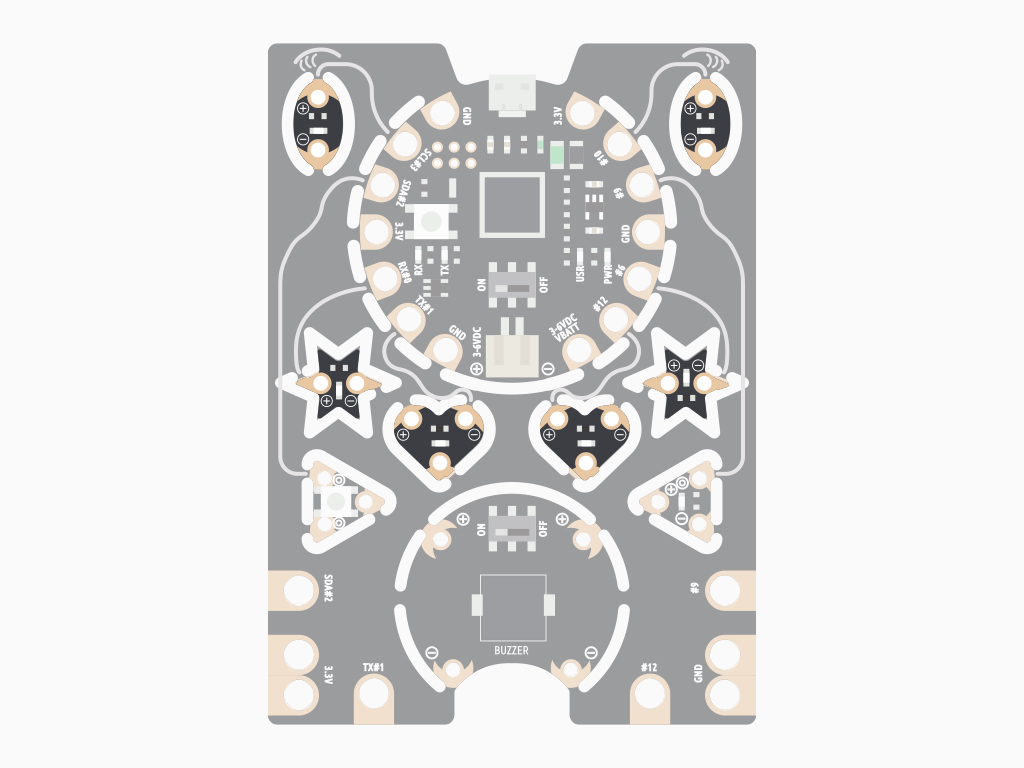
There are six LEDs on the EagLED.
They can be programmed using the Arduino IDE. By default when they are not snipped out, they can be programmed by using the following pin numbers:
left eye - Pin 3
right eye - Pin 10
left star - Pin 0
right star - Pin 6
left heart - Pin 1
right heart - Pin 12
left eye - Pin 3
right eye - Pin 10
left star - Pin 0
right star - Pin 6
left heart - Pin 1
right heart - Pin 12
const int LED = 10;
To get started, declare a variable with the name 'LED'
With the const keyword, which stands for constant. This is a variable qualifier, which modifies the behaviour of the variable. Specifically, 'const' makes the variable 'read-only'.
With a data type int which means integer data type. With a value of '10'. This value is used to indicate which pin the LED is connected to. In this example, we started with Pin 10, which will control the right eye-shaped LED.
void setup() {
  pinMode(LED, OUTPUT);
}
Next, use a function called pinMode( ) to set the pin as an OUTPUT. Otherwise it will default to an input.
void loop() {
  digitalWrite(LED, HIGH);
  delay (500);
  digitalWrite(LED, LOW);
  delay (500);
}
Next we do what’s called a digitalWrite to LED and send it HIGH to turn it on.
Wait half a second, before using another digitalWrite to the 'LED' and send it LOW to turn it off.
Wait half a second, and loop around forever.
Wait half a second, before using another digitalWrite to the 'LED' and send it LOW to turn it off.
Wait half a second, and loop around forever.
const int LED = 10;

void setup() {
  pinMode(LED, OUTPUT);
}

void loop() {
  digitalWrite(LED, HIGH);
  delay (500);
  digitalWrite(LED, LOW);
  delay (500);
}
Now open up the Arduino IDE and upload this code to the EagLED
Click on the 'Verify' button in the Arduino IDE
Then click on the 'Upload' button next to it. Once done, the eye-shaped (right) LED will start to blink!
The best way to get started with the EagLED is to make it do something. Let’s make one of those LEDs blink! First, make sure your EagLED is connected to the computer.
const int leftEye = 3;
const int rightEye = 10;

void setup() {
  pinMode(leftEye, OUTPUT);
  pinMode(rightEye, OUTPUT);
}

void loop() {
  digitalWrite(leftEye, HIGH);
  digitalWrite(rightEye, HIGH);
  delay(500);
  digitalWrite(leftEye, LOW);
  digitalWrite(rightEye, LOW);
  delay(500);
}
How to get more than one LED to blink? Upload this code to the EagLED. First, click on the 'Verify' button in the Arduino IDE.
Then click on the 'Upload' button next to it. Both eye-shaped LEDs will start to blink!
const int leftEye = 3;
const int rightEye = 10;

void setup() {
  // nothing happens in setup
}

void loop() {
  // fade in from min to max in increments of 5 points:
  for (int fadeValue = 0 ; fadeValue <= 255; fadeValue += 5) {
    // sets the value (range from 0 to 255):
    analogWrite(leftEye, fadeValue);
    analogWrite(rightEye, fadeValue);
    // wait for 30 milliseconds to see the dimming effect
    delay(30);
  }

  // fade out from max to min in increments of 5 points:
  for (int fadeValue = 255 ; fadeValue >= 0; fadeValue -= 5) {
    // sets the value (range from 0 to 255):
    analogWrite(leftEye, fadeValue);
    analogWrite(rightEye, fadeValue);
    // wait for 30 milliseconds to see the dimming effect
    delay(30);
  }
}
Upload this code to the EagLED. Click on the 'Verify' button in the Arduino IDE.
Then click on the 'Upload' button next to it.
The eye-shaped LEDs should now have a dimming effect, fade in and out. Note: We used the analogWrite() function here.
It writes an analog value to a pin, so it can be used to light an LED at varying brightness.
It isn't necessary to use pinMode() to set the pin as an OUTPUT here. This is because the analogWrite() function automatically sets the pin to OUTPUT when it is called.
It writes an analog value to a pin, so it can be used to light an LED at varying brightness.
It isn't necessary to use pinMode() to set the pin as an OUTPUT here. This is because the analogWrite() function automatically sets the pin to OUTPUT when it is called.