Introduction to Object-oriented Programming with MakeCode Arcade
Learn the basics of OOP to start making games with the Javascript interface!
Written By: Cherie Tan
Difficulty
Medium
Steps
17
So far, you've probably coded a game in MakeCode Arcade using the Blocks interface. However, there are limitations to using it. For example, wouldn't it be useful if we could create more player characters by re-using certain blocks, which will limit errors and needless duplication? With classes, we can! However, at this time of writing, there are no blocks with the category 'Class'. We can overcome this problem by using Javascript interface!
In this guide, we'll teach you the basics about object-oriented programming and how to implement it using the Javascript interface.
Complete this guide to start creating more efficiently-made and complex MakeCode Arcade games.
In this guide, we'll teach you the basics about object-oriented programming and how to implement it using the Javascript interface.
Complete this guide to start creating more efficiently-made and complex MakeCode Arcade games.
So far in our guides, we've showed you how to create games using the Blocks interface. However, there are limitations to using it. For example, in our 2D Side-scrolling Platformer, wouldn't it be useful if we could create more player characters by re-using certain blocks, which will limit errors and needless duplication? With classes, we can! However, at this time of writing, there are no blocks that will allow us to easily create classes.
We can overcome this problem by using the Javascript interface! As mentioned in our Get Started with MakeCode Arcade guide, there is a Javascript interface in the MakeCode Arcade editor which supports Static TypeScript, a kind of Javascript optimised for compilation on microcontrollers.
We can overcome this problem by using the Javascript interface! As mentioned in our Get Started with MakeCode Arcade guide, there is a Javascript interface in the MakeCode Arcade editor which supports Static TypeScript, a kind of Javascript optimised for compilation on microcontrollers.
In this guide, we will show you how to use variables, functions, and classes with Javascript in MakeCode Arcade. We'll also walk you through on object-oriented programming (OOP).

TypeScript is a programming language that was developed and is maintained by Microsoft.
The MakeCode Arcade editor uses Javascript as well as Static TypeScript, which is a superset of Javascript with added extra features such as object oriented programming. What's object oriented programming? We'll get to that in a bit!
In short, it provides us with an easier way to develop larger applications, and in our case, this could mean more efficiently-made complex games in MakeCode Arcade.
The basic idea of object-oriented programming is that we use objects to model real-world things. These are things we may want to represent inside our program. Take a look around you, and you may notice that there are many objects of the same kind, for example, a pencil and a pen are both the same kind, stationery. Another example: a bus and a train are both objects of the same kind, vehicle. Likewise, our player character #1 and player character #2 are of the same kind, a human character perhaps.
All objects have a state and behaviour. For example, a dog may have certain states such as its name, colour, breed, hunger level, etc. It may have behaviours such as barking, tail-wagging, or fetching. Coming back to our player character example, it may have states such as player position, lives, energy level, etc. It may have behaviours such as idle, jump, run, etc.
Complex games are challenging to write and maintain, and once our code reaches a certain size, it is easier to program and debug object-oriented ones than non-object oriented ones.
Here's another explanation. In the words of Steve Jobs during a Rolling Stones Interview (1994), when asked to explain in simple terms, what exactly is objected-oriented programming:
Objects are like people. They’re living, breathing things that have knowledge inside them about how to do things and have memory inside them so they can remember things. And rather than interacting with them at a very low level, you interact with them at a very high level of abstraction, like we’re doing right here.
Objects are like people. They’re living, breathing things that have knowledge inside them about how to do things and have memory inside them so they can remember things. And rather than interacting with them at a very low level, you interact with them at a very high level of abstraction, like we’re doing right here.
Here’s an example: If I’m your laundry object, you can give me your dirty clothes and send me a message that says, “Can you get my clothes laundered, please.” I happen to know where the best laundry place in San Francisco is. And I speak English, and I have dollars in my pockets. So I go out and hail a taxicab and tell the driver to take me to this place in San Francisco. I go get your clothes laundered, I jump back in the cab, I get back here. I give you your clean clothes and say, “Here are your clean clothes.”
You have no idea how I did that. You have no knowledge of the laundry place. Maybe you speak French, and you can’t even hail a taxi. You can’t pay for one, you don’t have dollars in your pocket. Yet I knew how to do all of that. And you didn’t have to know any of it. All that complexity was hidden inside of me, and we were able to interact at a very high level of abstraction. That’s what objects are. They encapsulate complexity, and the interfaces to that complexity are high level.
let wizard = sprites.create(img`
    . . . . . . f f f f . . . . . .
    . . . . f f f 2 2 f f f . . . .
    . . . f f f 2 2 2 2 f f f . . .
    . . f f f e e e e e e f f f . .
    . . f f e 2 2 2 2 2 2 e e f . .
    . . f e 2 f f f f f f 2 e f . .
    . . f f f f e e e e f f f f . .
    . f f e f b f 4 4 f b f e f f .
    . f e e 4 1 f d d f 1 4 e e f .
    . . f e e d d d d d d e e f . .
    . . . f e e 4 4 4 4 e e f . . .
    . . e 4 f 2 2 2 2 2 2 f 4 e . .
    . . 4 d f 2 2 2 2 2 2 f d 4 . .
    . . 4 4 f 4 4 5 5 4 4 f 4 4 . .
    . . . . . f f f f f f . . . . .
    . . . . . f f . . f f . . . . .
`)

let warrior = sprites.create(img`
    . . . . . . 5 . 5 . . . . . . .
    . . . . . f 5 5 5 f f . . . . .
    . . . . f 1 5 2 5 1 6 f . . . .
    . . . f 1 6 6 6 6 6 1 6 f . . .
    . . . f 6 6 f f f f 6 1 f . . .
    . . . f 6 f f d d f f 6 f . . .
    . . f 6 f d f d d f d f 6 f . .
    . . f 6 f d 3 d d 3 d f 6 f . .
    . . f 6 6 f d d d d f 6 6 f . .
    . f 6 6 f 3 f f f f 3 f 6 6 f .
    . . f f d 3 5 3 3 5 3 d f f . .
    . . f d d f 3 5 5 3 f d d f . .
    . . . f f 3 3 3 3 3 3 f f . . .
    . . . f 3 3 5 3 3 5 3 3 f . . .
    . . . f f f f f f f f f f . . .
    . . . . . f f . . f f . . . . .
`)
Before we jump into using classes in MakeCode Arcade, let's take a look at how you can use variables and functions in Javascript. To declare a variable here, use the let keyword.
In traditional Javascript, the var keyword is used. But the var construct has some problems, which is why let statements were introduced.
function playerSelection() {
    game.showLongText("Player Selection");
    let wizard = sprites.create(img`
    . . . . . . f f f f . . . . . .
    . . . . f f f 2 2 f f f . . . .
    . . . f f f 2 2 2 2 f f f . . .
    . . f f f e e e e e e f f f . .
    . . f f e 2 2 2 2 2 2 e e f . .
    . . f e 2 f f f f f f 2 e f . .
    . . f f f f e e e e f f f f . .
    . f f e f b f 4 4 f b f e f f .
    . f e e 4 1 f d d f 1 4 e e f .
    . . f e e d d d d d d e e f . .
    . . . f e e 4 4 4 4 e e f . . .
    . . e 4 f 2 2 2 2 2 2 f 4 e . .
    . . 4 d f 2 2 2 2 2 2 f d 4 . .
    . . 4 4 f 4 4 5 5 4 4 f 4 4 . .
    . . . . . f f f f f f . . . . .
    . . . . . f f . . f f . . . . .
        `)

        let warrior = sprites.create(img`
    . . . . . . 5 . 5 . . . . . . .
    . . . . . f 5 5 5 f f . . . . .
    . . . . f 1 5 2 5 1 6 f . . . .
    . . . f 1 6 6 6 6 6 1 6 f . . .
    . . . f 6 6 f f f f 6 1 f . . .
    . . . f 6 f f d d f f 6 f . . .
    . . f 6 f d f d d f d f 6 f . .
    . . f 6 f d 3 d d 3 d f 6 f . .
    . . f 6 6 f d d d d f 6 6 f . .
    . f 6 6 f 3 f f f f 3 f 6 6 f .
    . . f f d 3 5 3 3 5 3 d f f . .
    . . f d d f 3 5 5 3 f d d f . .
    . . . f f 3 3 3 3 3 3 f f . . .
    . . . f 3 3 5 3 3 5 3 3 f . . .
    . . . f f f f f f f f f f . . .
    . . . . . f f . . f f . . . . .
        `)
    scene.setBackgroundColor(9);
}

function createLevel (num: number) {
    levelTileMaps = [img`
        . . . . . . . . . . . . . . . . . . . . . . . . . . . . . . . .
        . . . . . . . . . . . . . . . . . . . . . . . . . . . . . . . .
        . . . . . . . . . . . . . . . . . . . . . . . . . . . . . . . .
        . . . . . . . . . . . . . . . . . . . . . . . . . . . . . . . .
        . . . . . . . 6 . . . . . 6 . . . . . . . . 6 6 . . . . 6 . . .
        . . . . 6 . . 6 6 . . . 6 6 6 6 . . . . . 6 6 6 6 . . . 6 . . .
        8 8 8 8 8 8 8 8 8 8 8 8 8 8 8 8 8 8 8 8 8 8 8 8 8 8 8 8 8 8 8 8
        . . . . . . . . . . . . . . . . . . . . . . . . . . . . . . . .
   `, img`
        . . . . . . . . . . . . . . . . . . . . . . . . . . 6 6 6 6 6 6
        . . . . . . . . . . . . . . . . . . . . . . . . . . . . . . . 6
        . . . . . . . . . . . 6 . . . . . . . . . . 6 . . . . . . . . 6
        . . . . . . . 6 . . 6 6 . 6 . . . . . 6 . . 6 . . . 6 . . . . 6
        . . . . . . 6 6 . 6 6 6 6 6 6 . . . 6 6 6 . 6 6 . 6 6 . . . . 6
        . . . . . 6 6 6 6 6 6 6 6 6 6 6 . 6 6 6 6 6 6 6 6 6 6 . . . . 6
        8 8 8 8 8 8 8 8 8 8 8 8 8 8 8 8 8 8 8 8 8 8 8 8 8 8 8 8 8 8 8 8
        . . . . . . . . . . . . . . . . . . . . . . . . . . . . . . . .
   `, img`
        . . 6 6 6 6 6 6 6 6 6 6 6 6 6 6 6 6 6 6 . . . . . . . . 6 . . .
        . . . . . . . . . . . . . . . . . . . . . . . . . . . . . . . .
        . . . . . . . . . . . . . . . . . . . . . . . . . . . . . . . .
        . . . . . . . . . . . . . . 6 . . . . . . . . . . . 6 . 6 . . .
        . . . . 6 6 6 6 . . . . . 6 6 6 . . . . . . 6 6 . . . 6 6 . . .
        . . . 6 6 6 6 6 6 . . . 6 6 6 6 6 6 6 6 6 6 6 6 6 . . . 6 . . .
        8 8 8 8 8 8 8 8 8 8 8 8 8 8 8 8 8 8 8 8 8 8 8 8 8 8 8 8 8 8 8 8
        . . . . . . . . . . . . . . . . . . . . . . . . . . . . . . . .
   `, img`
        . . . . . . . . . . . . . 6 6 6 6 . . . . . . . . . . . . . . 6
        . . . . . . . . . . . . . . 6 6 . . . . . . . . . . . . . . . 6
        . . . . . . . . . . . . . . . 6 . . . . . . . . 6 . . . 6 6 6 6
        . . . . . . . . . . . . . . . 6 . . . . . 6 . 6 6 . . . . . . 6
        . . . . . 6 6 6 6 6 6 . . . . . . . . . 6 6 6 6 6 . . . . . . 6
        . . . . 6 6 6 6 6 6 6 6 6 . . . . . . 6 6 6 6 6 6 6 . . . . . 6
        8 8 8 8 8 8 8 8 8 8 8 8 8 8 8 8 8 8 8 8 8 8 8 8 8 8 8 8 8 8 8 8
        . . . . . . . . . . . . . . . . . . . . . . . . . . . . . . . .
    `]
    scene.setTileMap(levelTileMaps[num])
    scene.setTile(8, img`
        c c c c c c c c c c c c c c c c
        b b b b b b b b b b b b b b b b
        b b b b b b b b b b b b b b b b
        b b b b b b b b b b b b b b b b
        b b b b b b b b b b b b b b b b
        b b b b b b b b b b b b b b b b
        b b b b b b b b b b b b b b b b
        b b b b b b b b b b b b b b b b
        b b b b b b b b b b b b b b b b
        a b b b b b b b b b b b b b b b
        a a b b b b b b a b b b b a a b
        c c a a c c c c c a b b a c c c
        f f c c f f f f f f c c f f f f
        f f f f f f f f f f f f f f f f
        f f f f f f f f f f f f f f f f
        f f f f f f f f f f f f f f f f
    `, true)
    scene.setTile(6, img`
        . . f c c c c c c c c c c f . .
        . c 5 5 5 5 5 5 5 5 5 5 5 5 c .
        f 5 6 6 6 6 6 6 6 6 6 6 6 6 6 f
        c 5 6 6 6 6 6 6 6 6 6 6 6 6 f c
        c 5 6 6 6 6 6 6 6 6 6 6 6 6 f c
        c 5 6 6 6 6 6 6 6 6 6 6 6 6 f c
        c 5 6 6 6 6 6 6 6 6 6 6 6 6 f c
        c 5 6 6 6 6 6 6 6 6 6 6 6 6 f c
        c 5 6 6 6 6 6 6 6 6 6 6 6 6 f c
        c 5 6 6 6 6 6 6 6 6 6 6 6 6 f c
        c 5 6 6 6 6 6 6 6 6 6 6 6 6 f c
        c 5 6 6 6 6 6 6 6 6 6 6 6 6 f c
        c 5 6 6 6 6 6 6 6 6 6 6 6 6 f c
        f 5 6 6 6 6 6 6 6 6 6 6 6 6 f f
        . c f f f f f f f f f f f f c .
        . . . c c c c c c c c c c . . .
    `, true)
    character.setPosition(25, 88)
    clearItems()
    generateCoins()
    generateItems()
    generateEnemies()
}
Just as we've created functions using the Blocks interface, we can do the same over in the Javascript interface. To create a function, first use the function keyword followed by its name.
In this example, our second function createLevel accepts one argument, num, based on the number type.
In TypeScript, the number of arguments given to a function has to match the number of parameters the function expects. You must also specify a type for each function parameter. The type could be a boolean, number, string, array, etc. For more information, check out the Types section in the Microsoft MakeCode Arcade documentation.
Parameters may also be optional. To make a parameter optional, simply add a ? to the end of the parameter. This optional parameter should be set as the last argument in a function, for example:
function playerSelection() {
    game.showLongText("Player Selection");
    let wizard = sprites.create(img`
    . . . . . . f f f f . . . . . .
    . . . . f f f 2 2 f f f . . . .
    . . . f f f 2 2 2 2 f f f . . .
    . . f f f e e e e e e f f f . .
    . . f f e 2 2 2 2 2 2 e e f . .
    . . f e 2 f f f f f f 2 e f . .
    . . f f f f e e e e f f f f . .
    . f f e f b f 4 4 f b f e f f .
    . f e e 4 1 f d d f 1 4 e e f .
    . . f e e d d d d d d e e f . .
    . . . f e e 4 4 4 4 e e f . . .
    . . e 4 f 2 2 2 2 2 2 f 4 e . .
    . . 4 d f 2 2 2 2 2 2 f d 4 . .
    . . 4 4 f 4 4 5 5 4 4 f 4 4 . .
    . . . . . f f f f f f . . . . .
    . . . . . f f . . f f . . . . .
        `)

        let warrior = sprites.create(img`
    . . . . . . 5 . 5 . . . . . . .
    . . . . . f 5 5 5 f f . . . . .
    . . . . f 1 5 2 5 1 6 f . . . .
    . . . f 1 6 6 6 6 6 1 6 f . . .
    . . . f 6 6 f f f f 6 1 f . . .
    . . . f 6 f f d d f f 6 f . . .
    . . f 6 f d f d d f d f 6 f . .
    . . f 6 f d 3 d d 3 d f 6 f . .
    . . f 6 6 f d d d d f 6 6 f . .
    . f 6 6 f 3 f f f f 3 f 6 6 f .
    . . f f d 3 5 3 3 5 3 d f f . .
    . . f d d f 3 5 5 3 f d d f . .
    . . . f f 3 3 3 3 3 3 f f . . .
    . . . f 3 3 5 3 3 5 3 3 f . . .
    . . . f f f f f f f f f f . . .
    . . . . . f f . . f f . . . . .
        `)
    scene.setBackgroundColor(9);
}

playerSelection();
Similar to the Blocks interface, we need to make a function call when wanting to actually run the code. Instead of using a 'call playerSelection' block, simply type the name of the function followed by ();
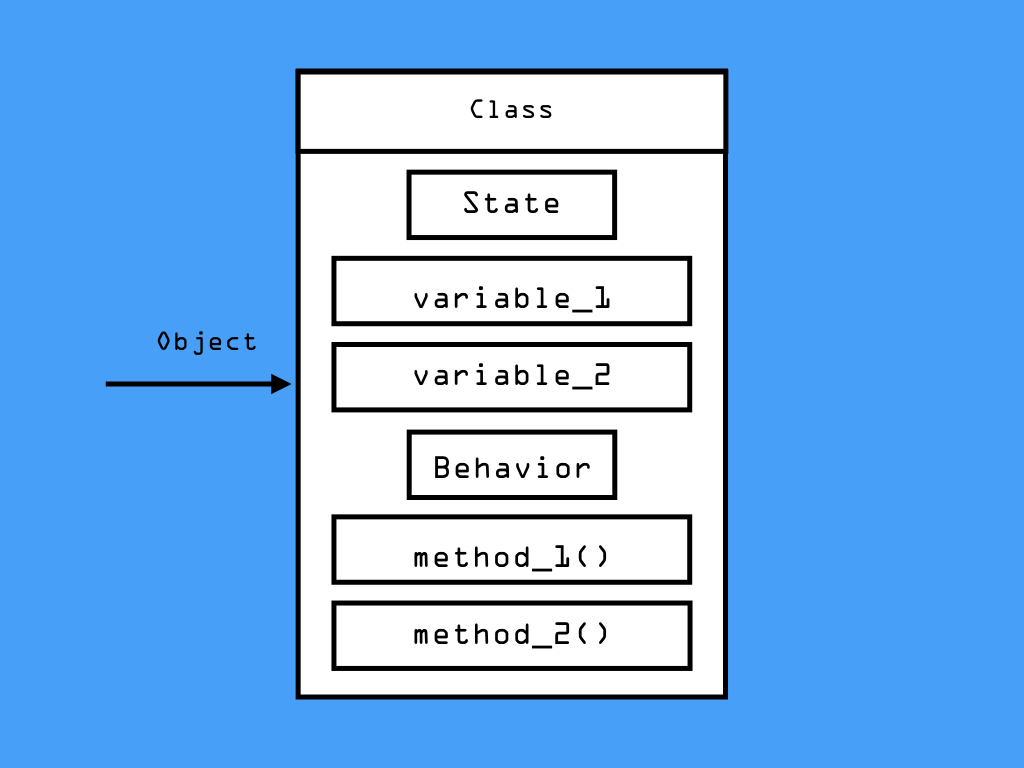
A class is a definition of objects of the same kind. You can think of it as a template or blueprint that defines and describes the states and behaviours common to all objects of the same kind.
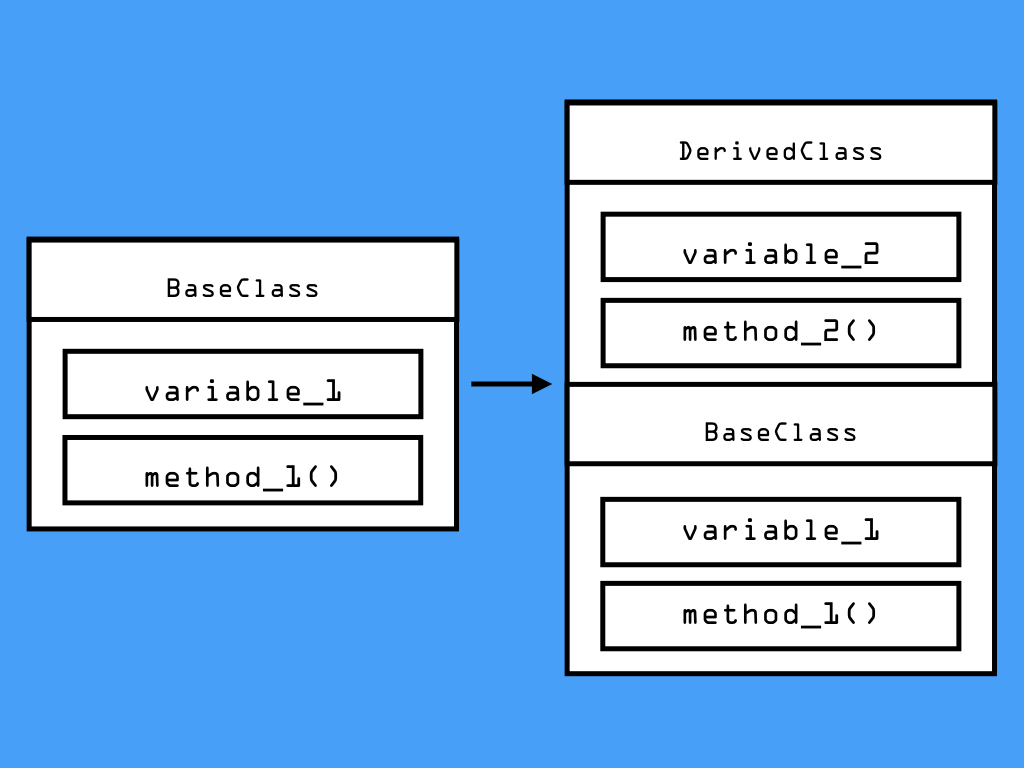
One of the most fundamental patterns in object-oriented programming is inheritance. Inheritance enables new classes to receive or inherit variables (states) and methods (behaviours) of existing classes. It is a way to express a relationship between classes.
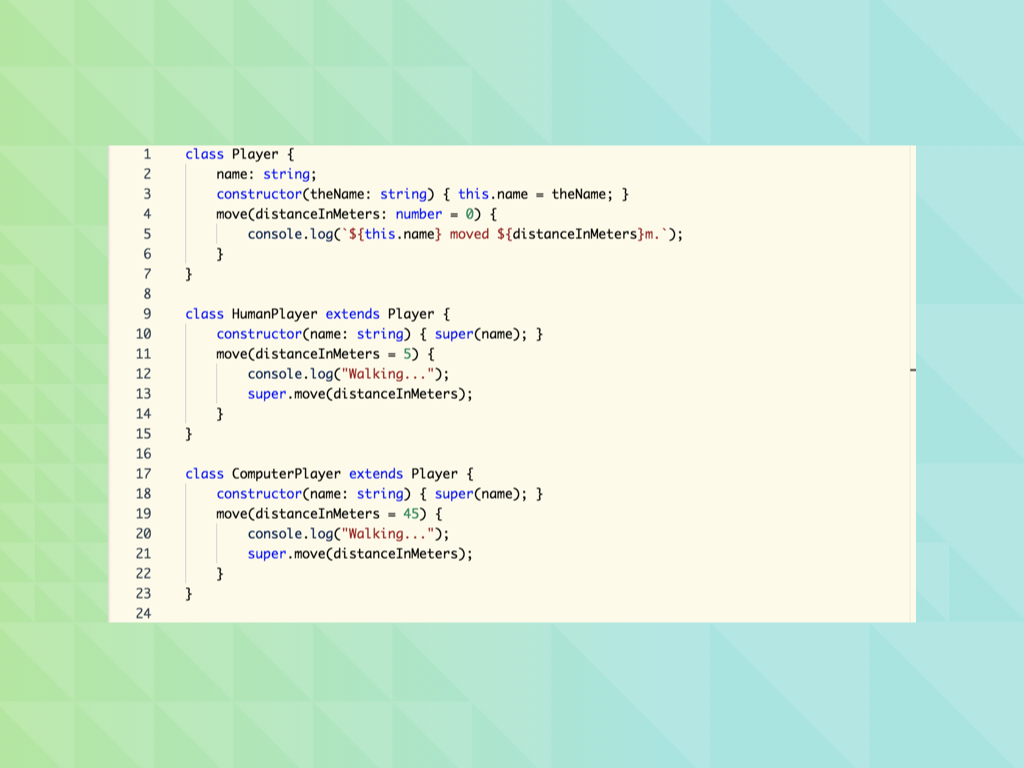
class Player {
    name: string;
    constructor(theName: string) { this.name = theName; }
    move(distanceInMeters: number = 0) {
        console.log(`${this.name} moved ${distanceInMeters}m.`);
    }
}

class HumanPlayer extends Player {
    constructor(name: string) { super(name); }
    move(distanceInMeters = 5) {
        console.log("Walking...");
        super.move(distanceInMeters);
    }
}

class ComputerPlayer extends Player {
    constructor(name: string) { super(name); }
    move(distanceInMeters = 45) {
        console.log("Walking...");
        super.move(distanceInMeters);
    }
}
In TypeScript, the extends keyword is used for the purpose of supporting a single inheritance. For example, say we have a Player class, and we create two new classes, HumanPlayer and ComputerPlayer. Both derived classes will inherit what is in the Player class by using the extends keyword.
One way to figure out if a relationship exists between a base class and a derived class, and whether inheritance should be used, is to use the is-a phrase. In this example, HumanPlayer is a Player and ComputerPlayer is a Player.
class Player {
    name: string;
    constructor(theName: string) { this.name = theName; }
    move(distanceInMeters: number = 0) {
        console.log(`${this.name} moved ${distanceInMeters}m.`);
    }
}

class HumanPlayer extends Player {
    constructor(name: string) { super(name); }
    move(distanceInMeters = 5) {
        console.log("Walking...");
        super.move(distanceInMeters);
    }
}

class ComputerPlayer extends Player {
    constructor(name: string) { super(name); }
    move(distanceInMeters = 45) {
        console.log("Walking...");
        super.move(distanceInMeters);
    }
}

let sam = new HumanPlayer("Sammy");
let opponent: Player = new ComputerPlayer("Opponent");

sam.move();
opponent.move(50);
A constructor is a special function of a class that is responsible for initialising the variables of the class. In TypeScript, this can be defined with the keyword constructor.
This gives us the ability to add code that is automatically run each time an instance of the class is made.
This gives us the ability to add code that is automatically run each time an instance of the class is made.
Derived classes that contain constructor functions must call super() which will execute the constructor function on the base class.

Click on Show console Simulator found on the left-hand side of the MakeCode Arcade editor to output the result.
Encapsulation is another key aspect of object-oriented programming. It enables us to perform what is called data hiding. That is to say, it ensures that an object's states and behaviours are hidden from the rest of the application.
It is necessary to hide a class's internal representation (its states and behaviours) so that it won't be changed by accident or on purpose by other code in the program. This will keep things much simpler.
class Player {
    public name: string;
    public constructor(theName: string) { this.name = theName; }
}

new Player("Tom").name;
In the previous examples, we were able to freely access members of a class that we declared throughout our program. This is because by default, all members of a class are set to public. That said, you may still mark a member public, so we could have written it this way as well.
class Player {
    private name: string;
    constructor(theName: string) { this.name = theName; }
}

new Player("Tom").name; // Error: 'name' is private;
To limit the access of a method so that it can only be called in the class itself, use the private modifier.
class Player {
    protected name: string;
    constructor(name: string) { this.name = name; }
}

class HumanPlayer extends Player {
    private role: string;

    constructor(name: string, role: string) {
        super(name);
        this.role = role;
    }

    public getOpeningSpeech() {
        return `Hello, my name is ${this.name} and I am a ${this.role}.`;
    }
}

let tim = new HumanPlayer("Tim", "Wizard");
console.log(tim.getOpeningSpeech()); // this will output 'Hello, my name is Tim and I am a Wizard'
console.log(tim.name); // error
The protected modifier acts like the private modifier, but members declared protected can also be accessed by instances of derived classes. So while we can't use the protected member, name from outside of Player, it can still be used from within an instance method of HumanPlayer -- in this case, getOpeningSpeech. This is because HumanPlayer derives from Player.
namespace SpriteKind {
    export const Warrior = SpriteKind.create()
    export const Wizard = SpriteKind.create()
    export const Boss = SpriteKind.create()
    export const Chest = SpriteKind.create()
    export const Sword = SpriteKind.create()
    export const Shield = SpriteKind.create()
    export const Wand = SpriteKind.create()
}

sprites.onOverlap(SpriteKind.Warrior, SpriteKind.Chest, function (mainSprite, hitSprite) {
    chestsCollected++;
    music.baDing.play();
    hitSprite.destroy();
})
As the code for our game becomes larger, it is important to make sure that it remains organised and easy to follow. One way of doing so is to use namespaces.
Namespaces allow code to be separated into discrete sections which allows for logical grouping of functionalities. For example, it can include classes, functions, and variables to support a single or a group of related functionalities.
Namespaces allow code to be separated into discrete sections which allows for logical grouping of functionalities. For example, it can include classes, functions, and variables to support a single or a group of related functionalities.
In this example, we've created a namespace called SpriteKind which contains all the arbitrary sprite kinds of our game.
By default, any variables declared inside of a namespace are only accessible within the namespace. This ensures encapsulation. For values that will be used outside the namespace, use the export keyword to make it accessible.
To reference it outside of the namespace, add the namespace followed by a dot like so:
SpriteKind.Warrior
To reference it outside of the namespace, add the namespace followed by a dot like so:
SpriteKind.Warrior