Indicator Lights with Bird Bot
Create indicator lights using the the WS2812B LED modules on the Bird Bot
Written By: Cherie Tan
Difficulty
Medium
Steps
17
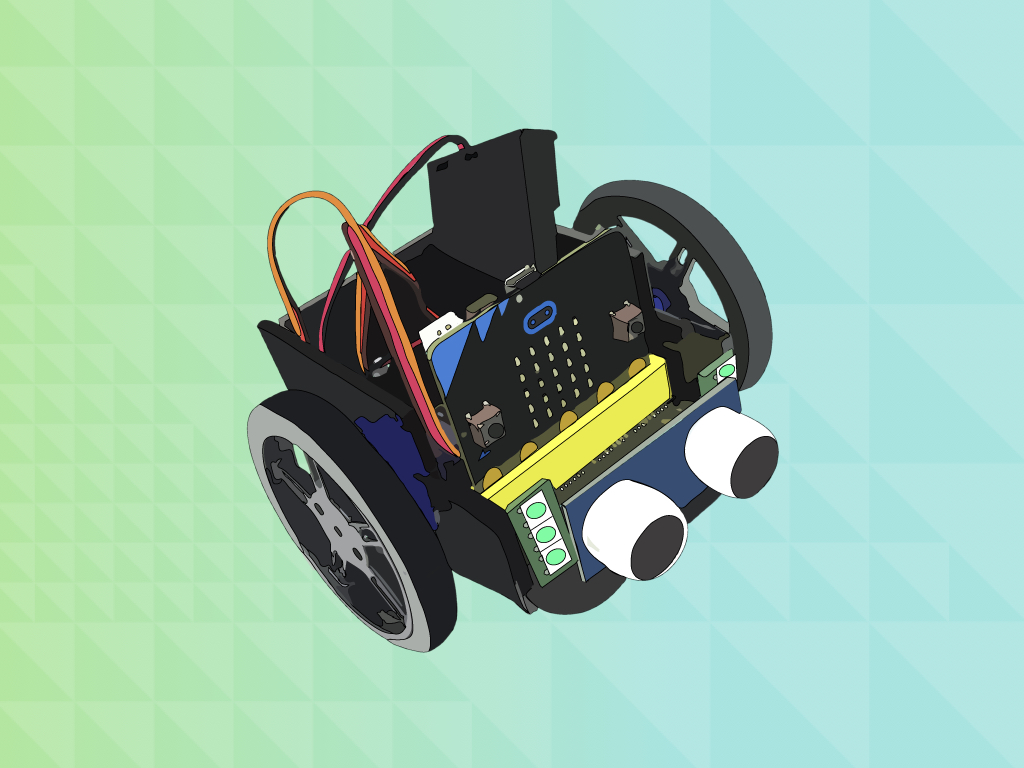
The motors on the Bird Bot enables it to move, and the ultrasonic distance sensor enables it to be on the look out for obstacles. It can also be controlled by Bluetooth with another micro:bit. We've even turned it into an autonomous robot alarm clock!
But what about those LED modules on the front of it? These will come in handy in this next guide! What happens when something bumps into the Bird Bot with no warning? What if it overturns by accident? We can program it to move out of the way, or play dead. While doing so, you'll be introduced to the WS2812B LED strips found on the front of the Bird Bot. Depending on its state, we can program it to be lit up in a variety of colours in MakeCode.
In this guide, learn to use the Bird Bot's L-LIGHT and R-LIGHT LED modules, in combination with the micro:bit's built-in accelerometer.
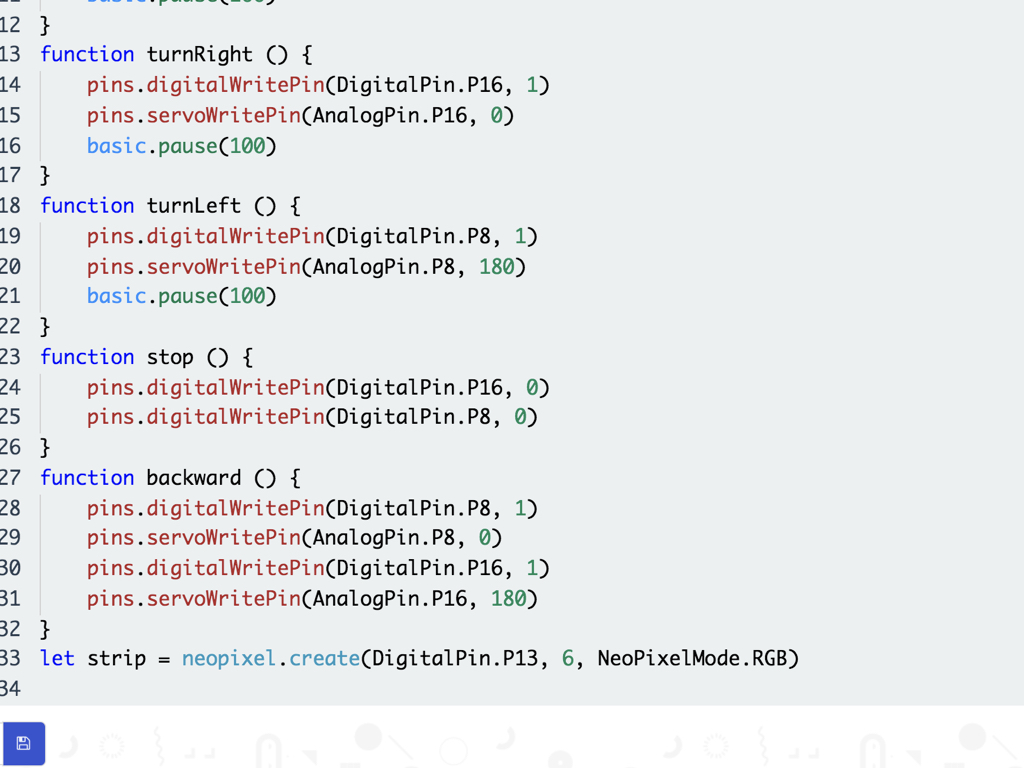
let p = 0;
function turnRight () {
    basic.showArrow(ArrowNames.East);
    pins.digitalWritePin(DigitalPin.P16, 1);
    pins.servoWritePin(AnalogPin.P16, 0);
    basic.pause(100);
    basic.clearScreen();
}
function forward () {
    basic.showArrow(ArrowNames.North);
    pins.digitalWritePin(DigitalPin.P8, 1);
    pins.servoWritePin(AnalogPin.P8, 180);
    pins.digitalWritePin(DigitalPin.P16, 1);
    pins.servoWritePin(AnalogPin.P16, 0);
    basic.clearScreen();
}
function turnLeft () {
    basic.showArrow(ArrowNames.West);
    pins.digitalWritePin(DigitalPin.P8, 1);
    pins.servoWritePin(AnalogPin.P8, 180);
    basic.pause(100);
    basic.clearScreen();
}
function backward () {
    basic.showArrow(ArrowNames.South);
    pins.digitalWritePin(DigitalPin.P8, 1);
    pins.servoWritePin(AnalogPin.P8, 0);
    pins.digitalWritePin(DigitalPin.P16, 1);
    pins.servoWritePin(AnalogPin.P16, 180);
    basic.clearScreen();
}
function stop () {
    pins.digitalWritePin(DigitalPin.P16, 0);
    pins.digitalWritePin(DigitalPin.P8, 0);
}
basic.forever(function () {
    p = sonar.ping(
    DigitalPin.P14,
    DigitalPin.P15,
    PingUnit.Centimeters
    )
    basic.showNumber(p);
    if (p <= 5) {
        stop();
        basic.pause(200);
        backward();
        basic.pause(200);
    } else {
        if (p < 15) {
            if (Math.randomRange(0, 99) < 45) {
                turnLeft();
                basic.pause(200);
            } else {
                turnRight();
                basic.pause(200);
            }
        } else {
            forward();
            basic.pause(200);
            stop();
            basic.pause(200);
        }
    }
})
We will re-use the code used in Obstacle Avoidance with Bird Bot. Copy and paste this into the Javascript interface in the new project.
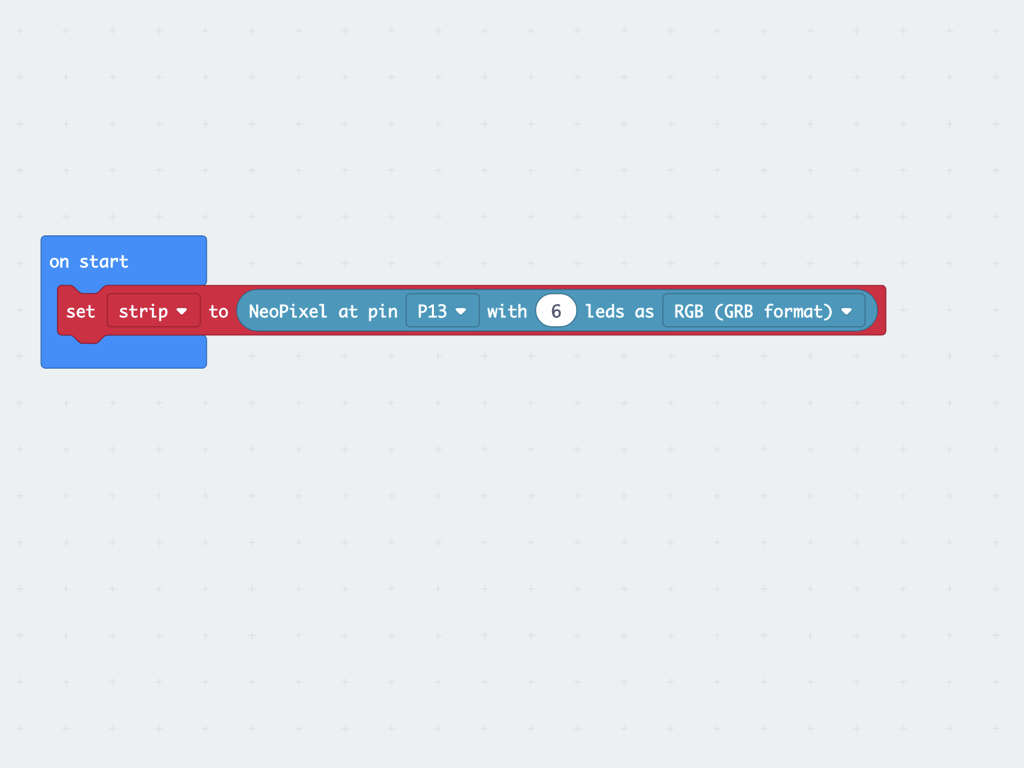
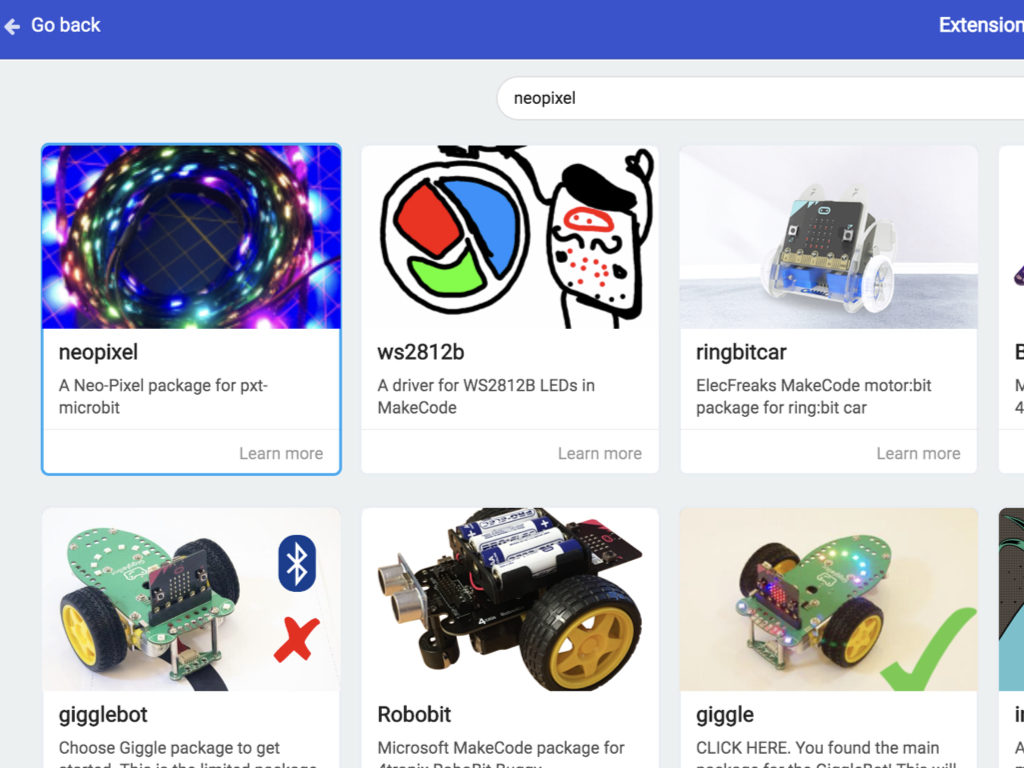
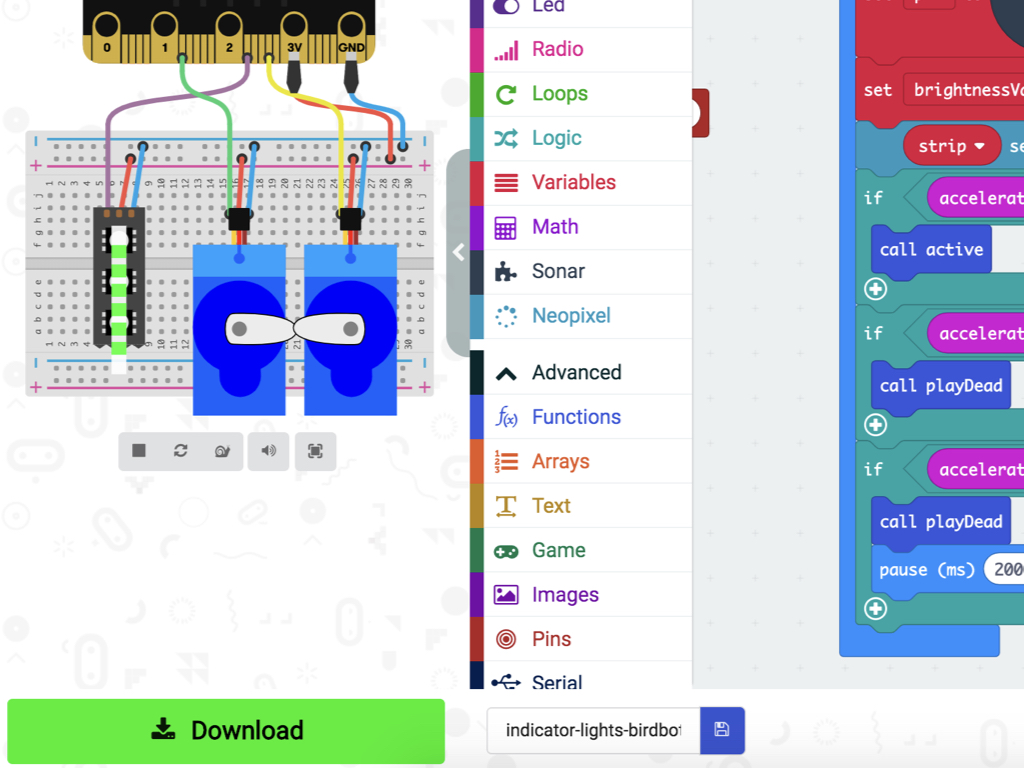
With the Neopixel extension added to the MakeCode editor, there should now be a new category called Neopixel. Click on that category then drag and drop a set strip to NeoPixel at pin P0 with ... leds as RGB (GRB format) into the editor.
Attach this block to on start
Click on the Javascript interface button then set neopixel.create to DigitalPin.P13
Set the second parameter to 6 as there are six LEDs connected to digital pin 13 on the Bird Bot (L-LIGHT and R-LIGHT)
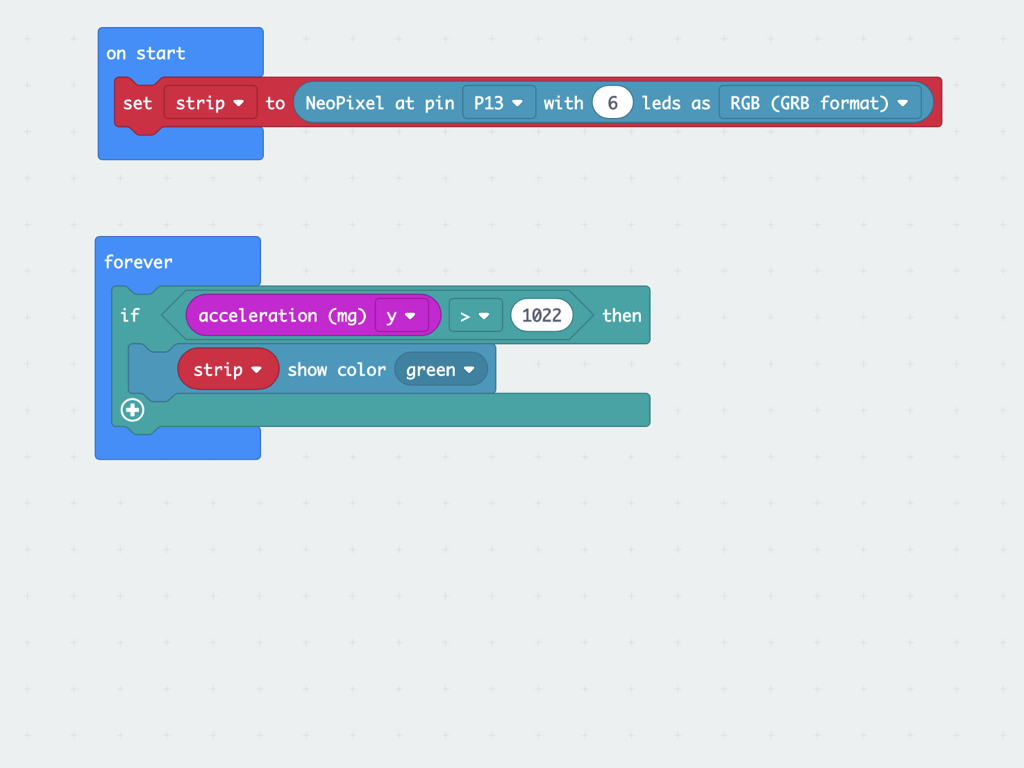
Let's now program the Bird Bot's indicator lights to shine green when it is upright. First, remove and set aside the existing blocks from the forever block
Create a new condition if acceleration (mg) y > 1022 then
From Neopixel, click and drag out a strip show color block
Set this colour to be green
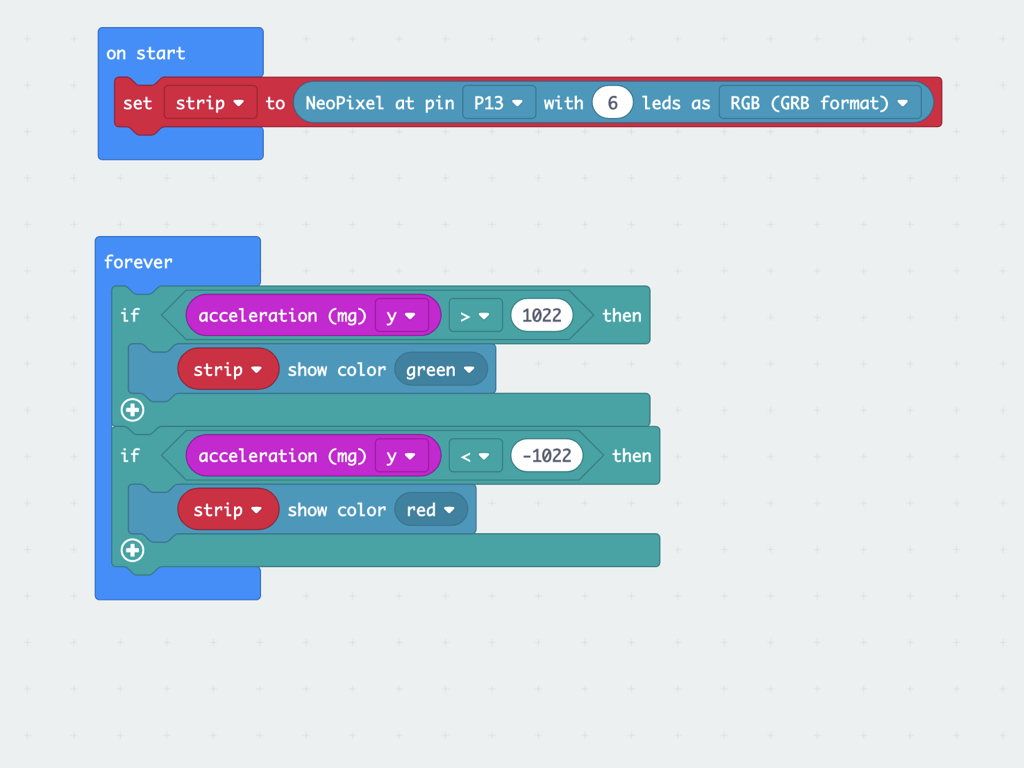
Next, let's detect whether the Bird Bot is overturned. From the Logic category, get out an if ... then ... block and create a second condition : if acceleration (mg) y < -1022 then
Then click and drag out another strip show color block
Set this strip show color block to red

Create a new function called active
Remember the code that was originally in the forever block that we transferred over from Obstacle Avoidance with Bird Bot? It was set aside before, now place that entire chunk of code into function active
Add a strip show color green block right at the start before the first if statement
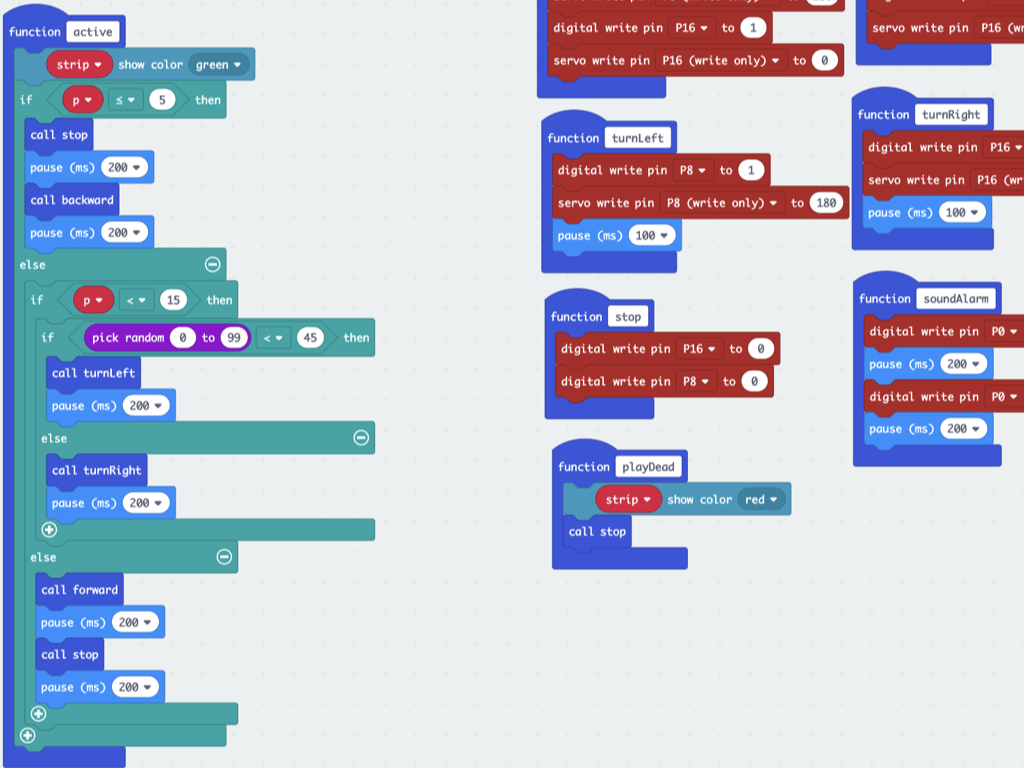
To get the Bird Bot to play dead when it is overturned, first, create a new function and name it playDead
Then click and drag out a strip show color block into the function
Set strip show color to red.
We've already got a function that was previously written to stop the motors of the Bird Bot. From Functions category, drag out a call stop block and attach it to function playDead as shown.
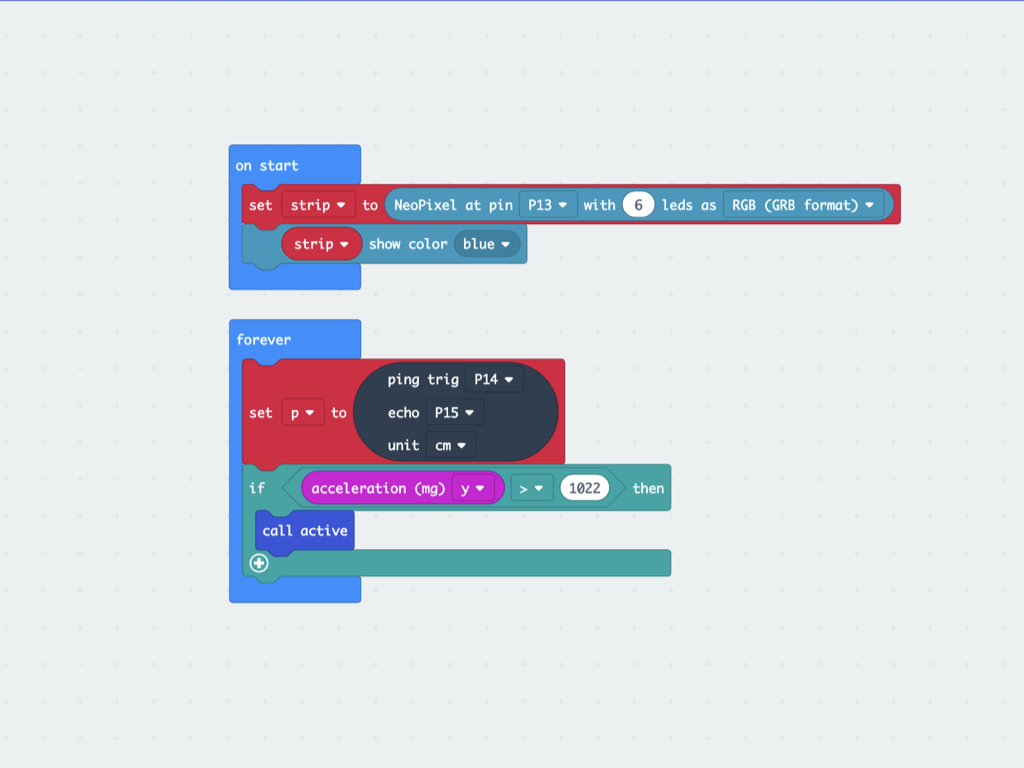
When the micro:bit's acceleration (mg) y value is > 1022, this indicates that it is upright. If so, get the Bird Bot's lights to turn green. So over in forever, replace the existing code with call active.

When the Bird Bot is overturned, the acceleration (mg) y value is < -1022. To get it to play dead, simply add a call playDead block to the condition.

What if the Bird Bot got smacked with no warning while it was already in motion? We can get it to play dead as well. Create a new condition: if acceleration (mg) x > 511 then
From Functions, click and drag out another call playDead block and attach it to this new condition
To get it to play dead for a couple of seconds, add a pause (ms) block right after
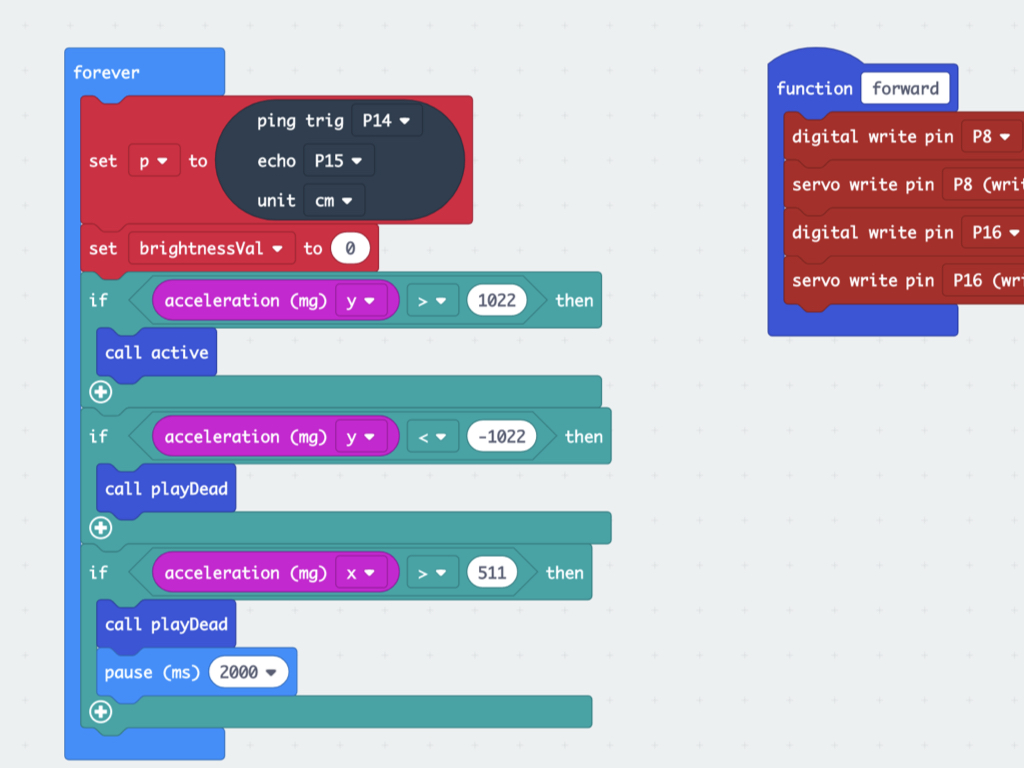
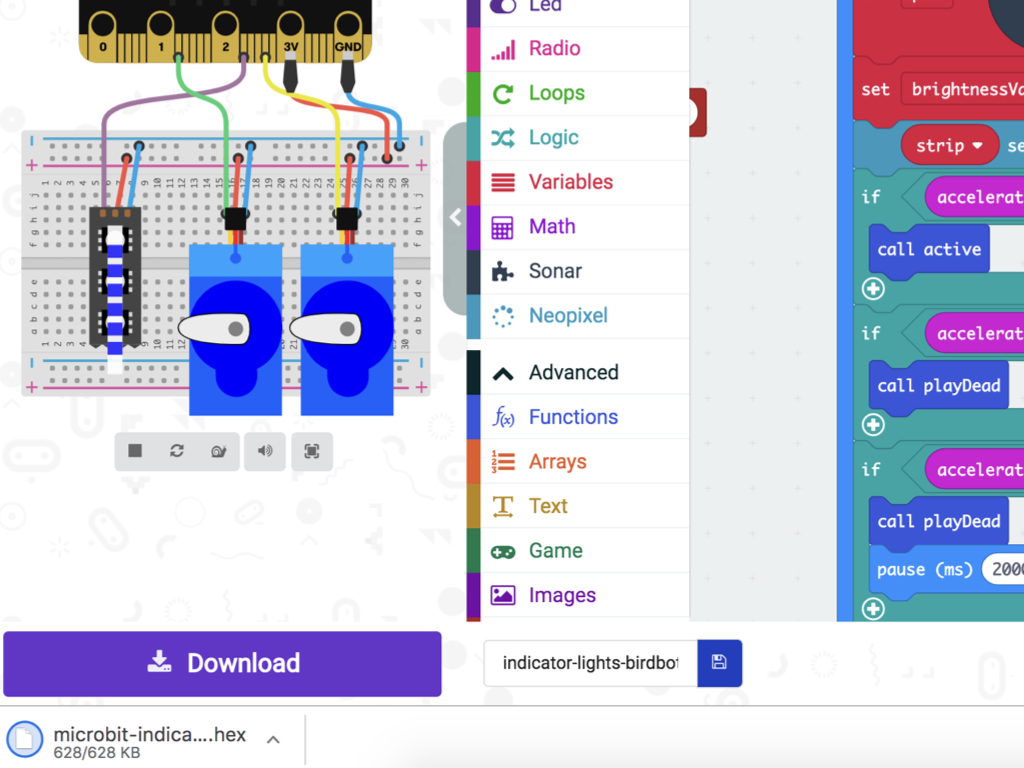
To conserve battery usage, the brightness of the LEDs can be adjusted. Create a new variable, brightnessVal.
Then from the Variables category, click and drag out a set ... to ... block.
Change it to set brightnessVal to 0.
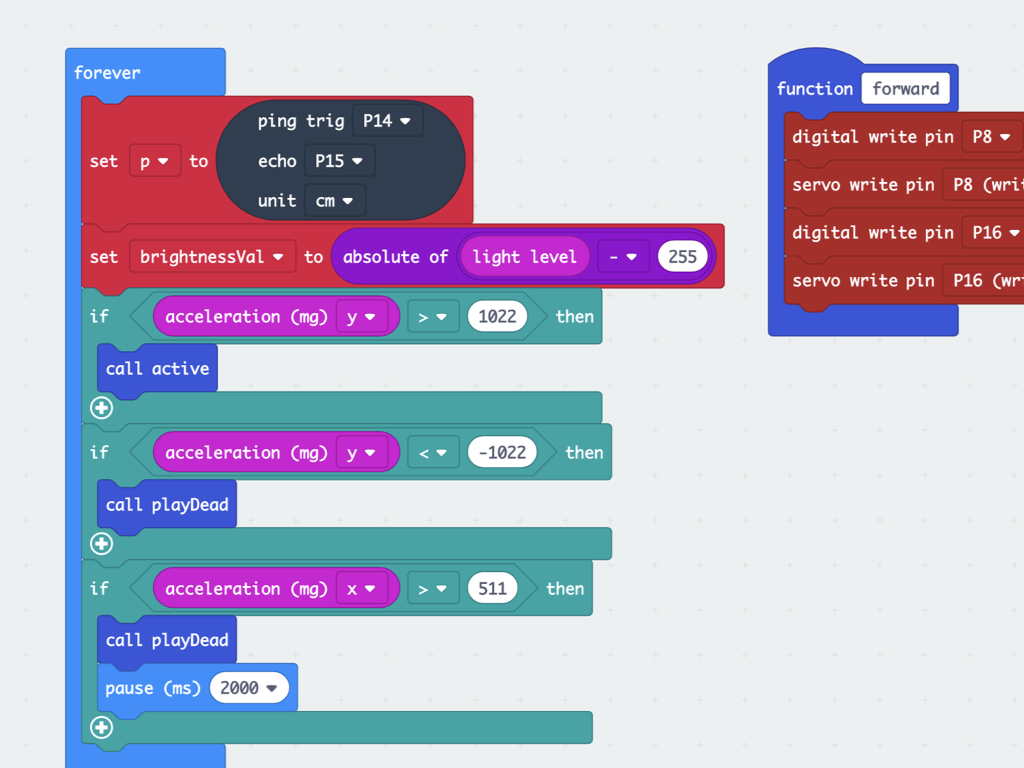
When it is daytime, there is less of a need for the LEDs to be shone brightly. So adjust the brightness of the LEDs based on the light level in the environment! In the Input category, click and drag the light level block over, and place it inside the placeholder of the set brightnessVal block.
If you uploaded the code as it is now, you may notice that the darker it is, the more dim the LEDs get. The brighter it is, the more intense the LEDs shine. That's not what we want! This is because the light level block returns a value from 0 to 255, where a higher value indicates higher levels of light. To get around this problem, use the absolute of block from the Math category.
Next, click and drag out a 0 - 0 block, where 0 are the placeholders.
Replace the placeholders so that it should now read set brightnessVal to absolute of light level - 255
If the light level was 0 then 0 - 255 = -255
But the absolute of -255 is 255, therefore the brightnessVal will be 255.
The opposite case is also true. For example, if the light level was 170 then:
170 - 255 = -85
The absolute value of -85 is 85.
So, the more light there is in the environment, the dimmer the LEDs will be. In dim surroundings, the LEDs will be shining bright!
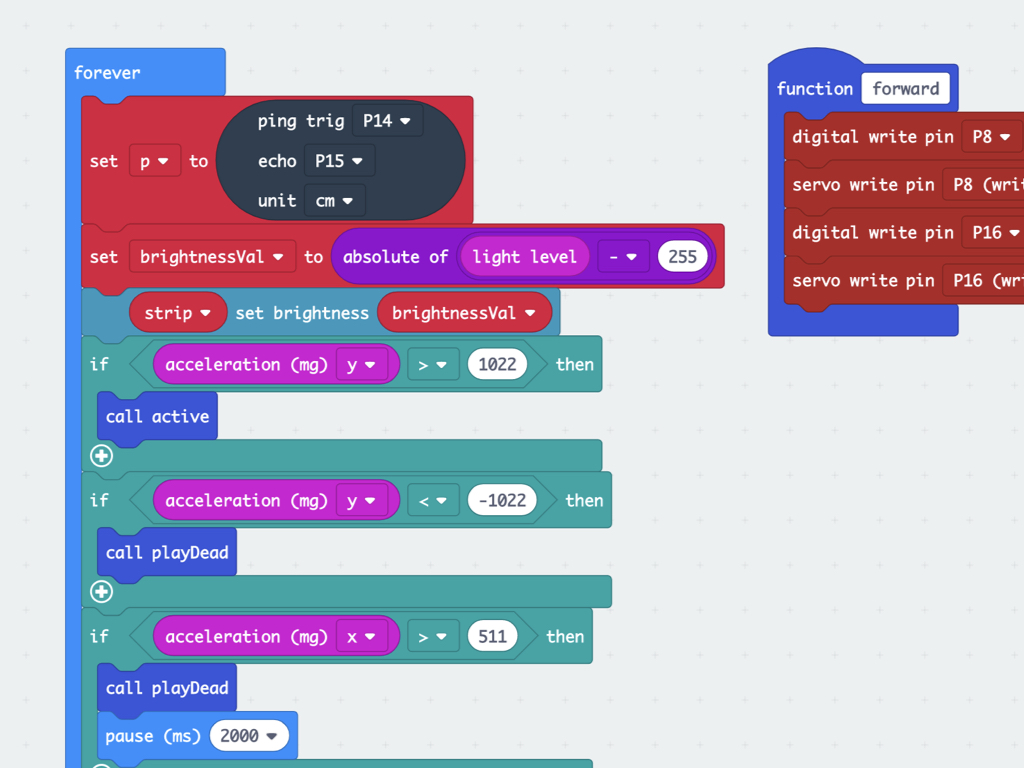
Finally, to set the LED strips to the value of brightnessVal, click and drag the strip set brightness block into the editor.
Place this block right after set brightnessVal to absolute of light level - 255
Place brightnessVal within the placeholder of strip set brightness block.
let brightnessVal = 0;
let p = 0;
let strip: neopixel.Strip = null;
strip = neopixel.create(DigitalPin.P13, 6, NeoPixelMode.RGB);
strip.showColor(neopixel.colors(NeoPixelColors.Blue));
basic.pause(1000);

function backward() {
    pins.digitalWritePin(DigitalPin.P8, 1);
    pins.servoWritePin(AnalogPin.P8, 0);
    pins.digitalWritePin(DigitalPin.P16, 1);
    pins.servoWritePin(AnalogPin.P16, 180);
}
function forward() {
    pins.digitalWritePin(DigitalPin.P8, 1);
    pins.servoWritePin(AnalogPin.P8, 180);
    pins.digitalWritePin(DigitalPin.P16, 1);
    pins.servoWritePin(AnalogPin.P16, 0);
}
function turnRight() {
    pins.digitalWritePin(DigitalPin.P16, 1);
    pins.servoWritePin(AnalogPin.P16, 0);
    basic.pause(100);
}
function turnLeft() {
    pins.digitalWritePin(DigitalPin.P8, 1);
    pins.servoWritePin(AnalogPin.P8, 180);
    basic.pause(100);
}

function stop() {
    pins.digitalWritePin(DigitalPin.P16, 0);
    pins.digitalWritePin(DigitalPin.P8, 0);
}
function playDead() {
    strip.showColor(neopixel.colors(NeoPixelColors.Red));
    stop();
}
function active() {
    strip.showColor(neopixel.colors(NeoPixelColors.Green));
    if (p <= 5) {
        stop();
        basic.pause(200);
        backward();
        basic.pause(200);
    } else {
        if (p < 15) {
            if (Math.randomRange(0, 99) < 45) {
                turnLeft();
                basic.pause(200);
            } else {
                turnRight();
                basic.pause(200);
            }
        } else {
            forward();
            basic.pause(200);
            stop();
            basic.pause(200);
        }
    }
}


basic.forever(function () {
    p = sonar.ping(
        DigitalPin.P14,
        DigitalPin.P15,
        PingUnit.Centimeters
    )
    brightnessVal = Math.abs(input.lightLevel() - 255);
    strip.setBrightness(brightnessVal);
    if (input.acceleration(Dimension.Y) > 1022) {
        active();
    }
    if (input.acceleration(Dimension.Y) < -1022) {
        playDead();
    }
    if (input.acceleration(Dimension.X) > 511) {
        playDead();
        basic.pause(2000);
    }
})
Feel free to grab the complete code on the left and paste into the Javascript interface.
To upload the code to the Bird Bot, first connect the micro:bit to the computer via microUSB cable.
Click on the Download button and the hex file will be automatically downloaded to your 'Downloads' folder.
Drag and drop the downloaded microbit-indicator-lights-birdbot.hex file to the MICROBIT drive.


Once the code is loaded on to the micro:bit and you have powered up the Bird Bot with 3 x AAA batteries, the robot should not do anything if it is turned over as it will be playing dead - the motors will be off. Once it is upright, it should run away! Give it a small smack or tap and it will also play dead.
Check out the guides over at https://www.littlebird.com.au/a/how-to/#micro-bit to learn even more!