Spider Invaders with MakeCode Arcade
Create the classic Space Invaders game with MakeCode Arcade
Written By: Cherie Tan
Difficulty
Medium
Steps
16
Space invaders is a classic arcade game. The player is constrained to the bottom of the screen, and can only move sideways as enemies come in swarms, from top to bottom. It was the first fixed shooter that set the stage for the shoot 'em up genre.
In this guide, we’ll show you how to make a variation of the Space Invaders game with Blocks in MakeCode Arcade. Learn about arrays, a basic data structure in programming, as well as how to add a splash screen, player lives, projectiles, music and sound effects.
Complete this guide to create your own version of the classic space invaders game!
Space Invaders is an arcade game created in 1978 by Tomohiro Nishikado in Japan. This arcade-style shooter was a challenging and addictive classic. The player is constrained to the bottom of the screen, and can only move sideways as enemies come in swarms, from top to bottom. It was the first fixed shooter that set the stage for the shoot 'em up genre.
In this guide, we'll create our own version of Space Invaders. You will also learn how to add a splash screen, player lives, projectiles, as well as music and sound effects.

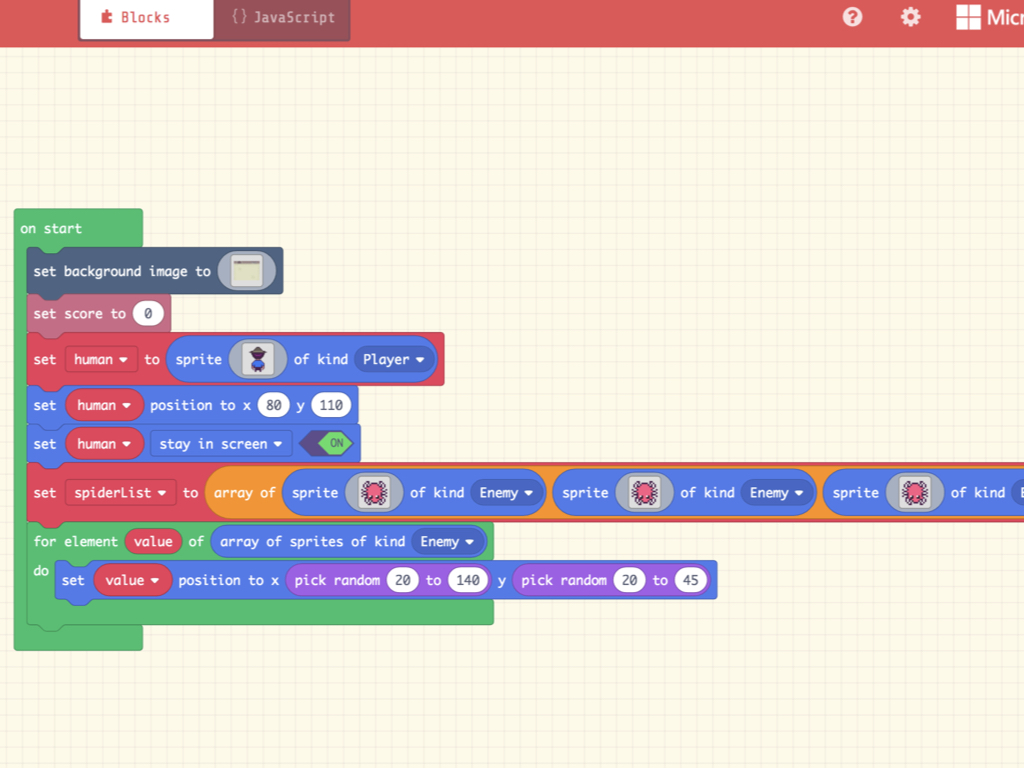
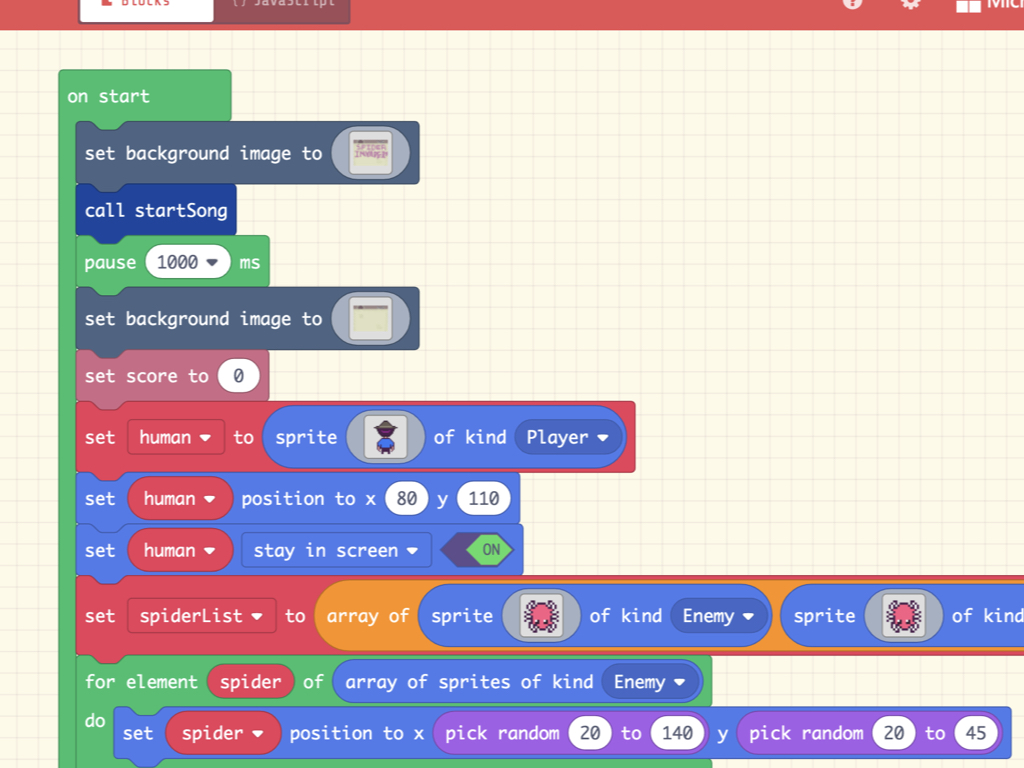
The on start block runs once when the game starts up. First, let's create a background image, so get out a set background image to ... block
Set the on start score to be zero.
Create a new sprite called human and assign it as a Player block.
Next, we want to generate enemy sprites on start and there are a few ways to do this. To create multiple enemy sprites at a time, we will use an array. From Arrays tab, get out a set ... to array of ... block.
An array is an ordered collection of items that can be numbers, booleans, strings, and in MakeCode Arcade, they can also be sprites. In most programming languages, arrays serve as some of the most basic data structures that can be used to keep track of sequences of data.
Arrays have a length which is the number of items they contain. You can keep track of where values are located within the array by knowing their position. You can also add and remove items at any place in the array.
Arrays have a length which is the number of items they contain. You can keep track of where values are located within the array by knowing their position. You can also add and remove items at any place in the array.
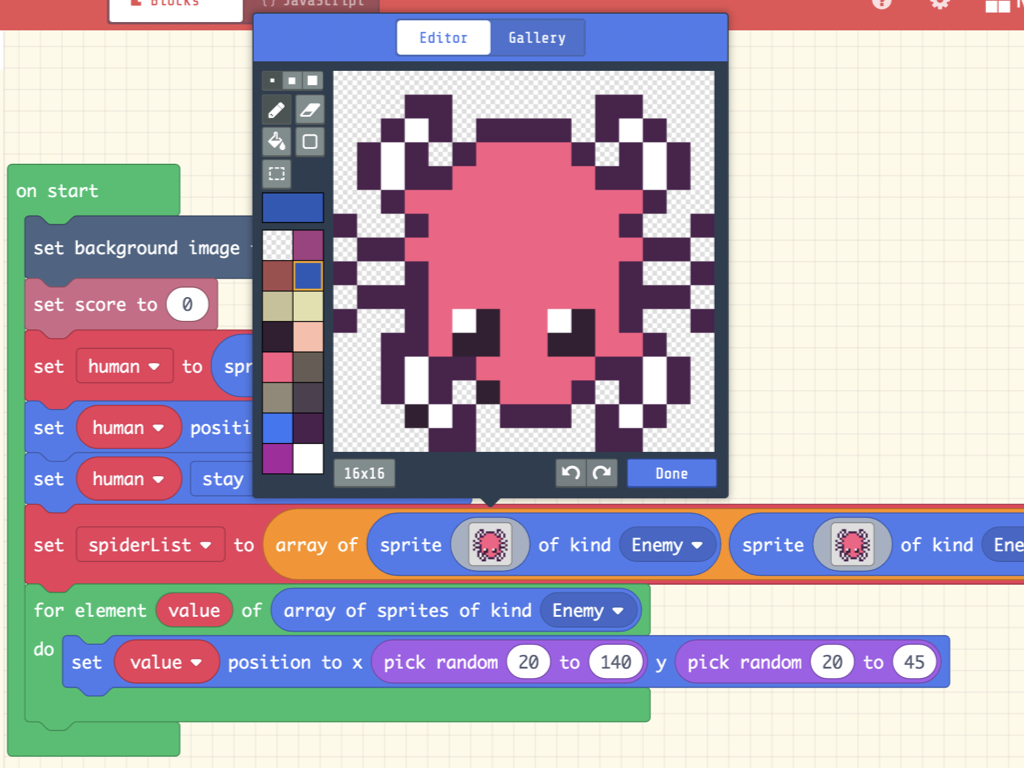
Place a sprite ... of kind Enemy block in it, then add four more sprite ... of kind Enemy blocks into the array.
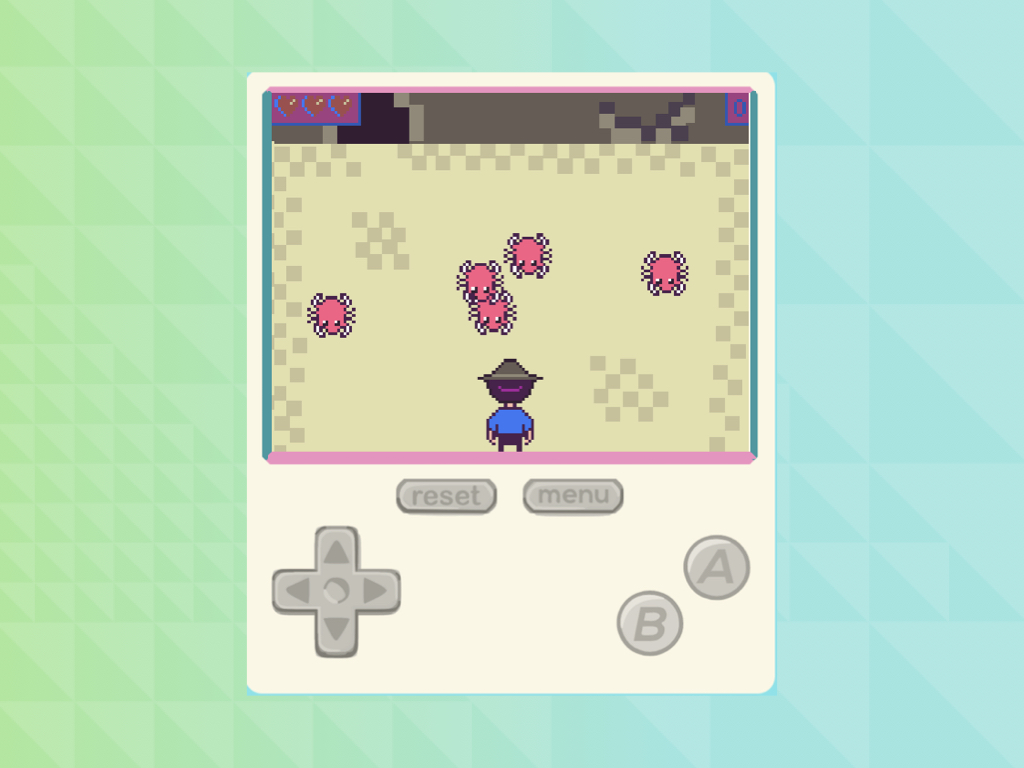
Set the human player's position to x 80 and y 110 so that it starts off at the bottom middle of the screen.
Set this player sprite to stay in screen.
For the enemy sprites to be positioned at random on start, use a for element value of array of sprites of kind Enemy block found under Loops tab.
Add a set value position to x ... y ... block into it.
From Math tab, get out two pick random ... to ... blocks and use them to randomly generate x and y coordinates.
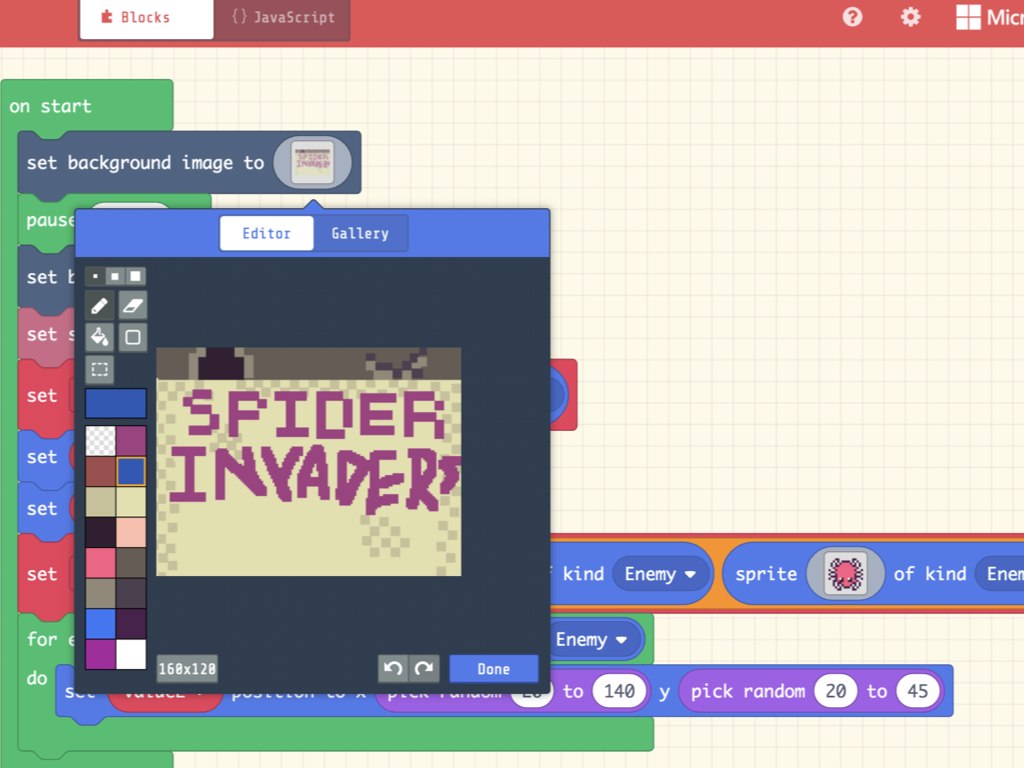
The simplest way to add a splash screen that will play at the start is to add another set background image to ... block. This time, placing it at the very beginning of on start.
Add a pause 1000 ms block under it so that it will play for 1 second before the sprites, score, and game background initialises.
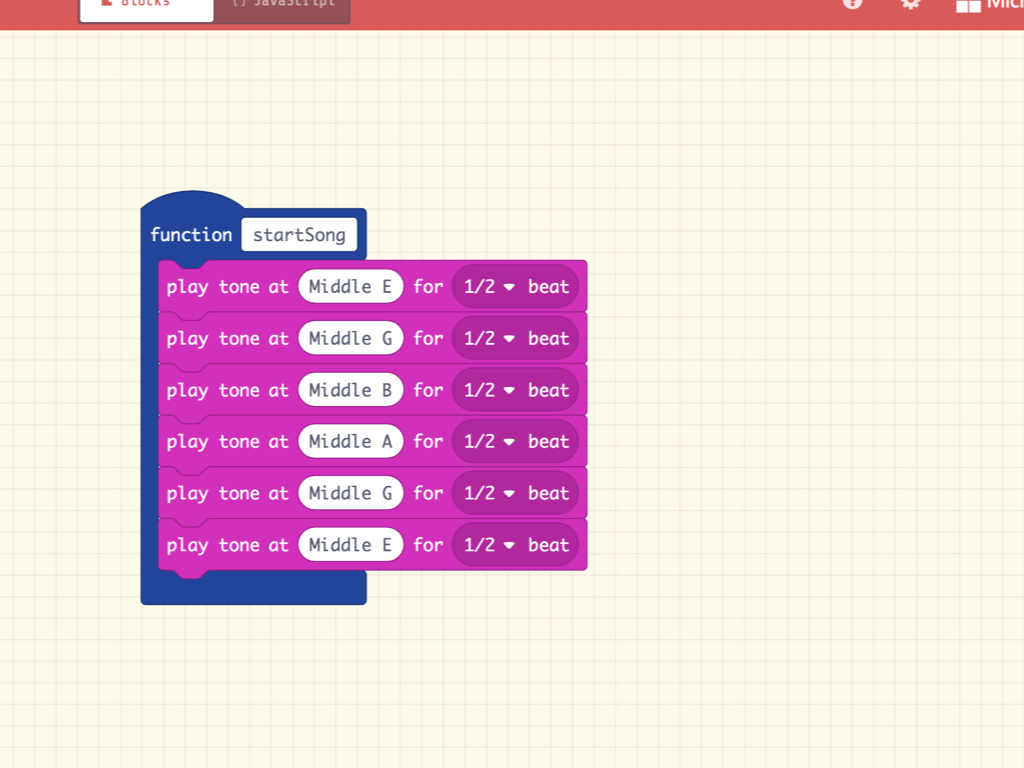
Next, create a start tune to be played on start by first creating a function called startSong.
From the Music tab, drag and drop as many play tone at ... for ... beat blocks as you want. Arrange to create a tune of your making.
After the splash screen, add a call startSong block in on start, found under the Functions tab.

To move toward the left of the screen, the x coordinate of the human sprite will be changed by -5.
To move toward the right of the screen, the x coordinate of the human sprite will be changed by 5.
The player sprite can move in two directions, left or right. Each direction has two button events: 1. when the button is pressed and released, and 2. when the button is held down.

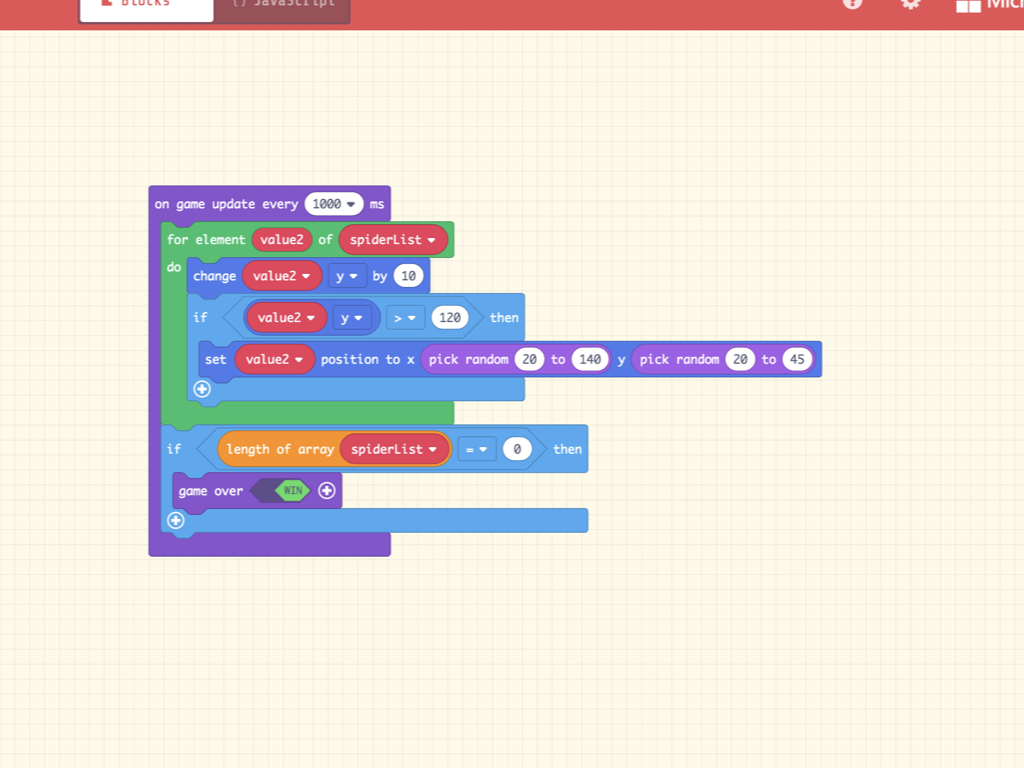
Instead of slowly edging its way to the bottom of the screen, the enemy sprites will continually fall toward the bottom, before re-spawning up the top (if not destroyed). Let's add a on game update every ... ms block. Set this to be 1000ms.
Add a for element value of array of sprites of kind Enemy block within it.
From Sprites tab, get out a change ... x by ... block, then set it to change value y by 10.
Making enemies spawn in random positions is a way that helps with making each play-through unique.
Next, add an if ... then block. This condition checks to see if the y coordinate of each value (the enemy sprite) in the array (spiderList) is less than 120. If y > 120, that means the spider sprite is reached the bottom end, and so will re-spawn at a random x and y location.
To ensure that there is enough reaction time for the player, set the enemy sprites to spawn up the top, at a randomly generated y value that is between 20 to 45.
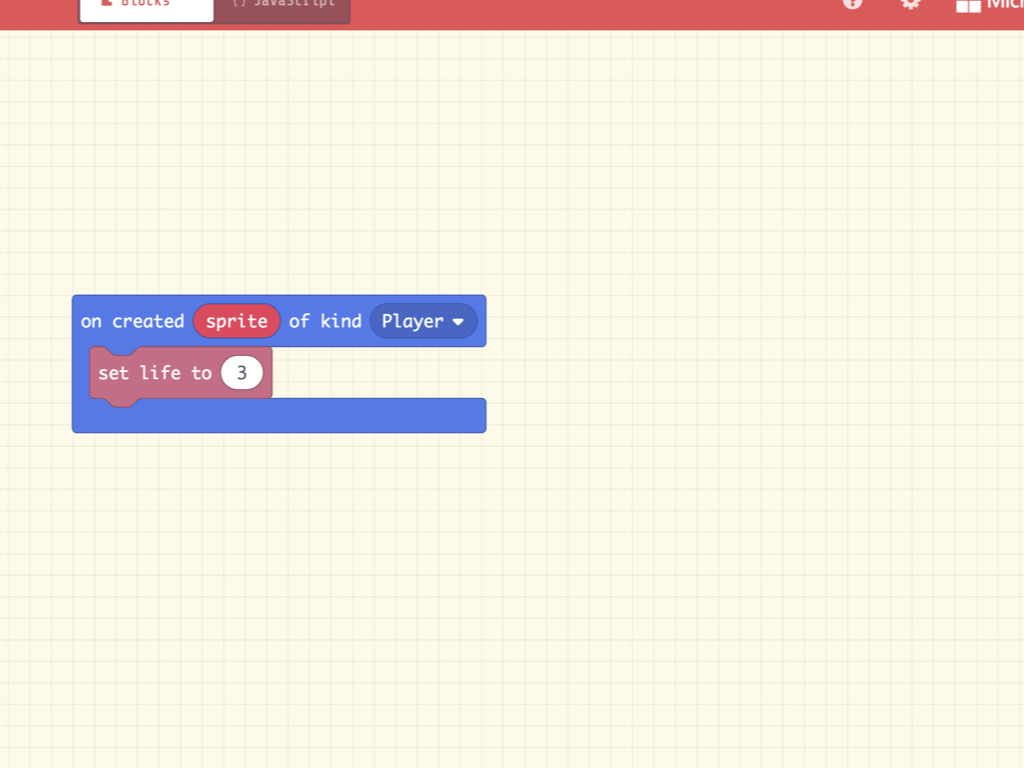
The original Space Invaders gave the player three lives. For your game, you can grant the player as many lives as you want. In this guide, we've set it to 3. Adding lives to the player sprite is easy, simply use a on created sprite of kind Player block. From Info tab, drag and drop a set life to ... block into it.

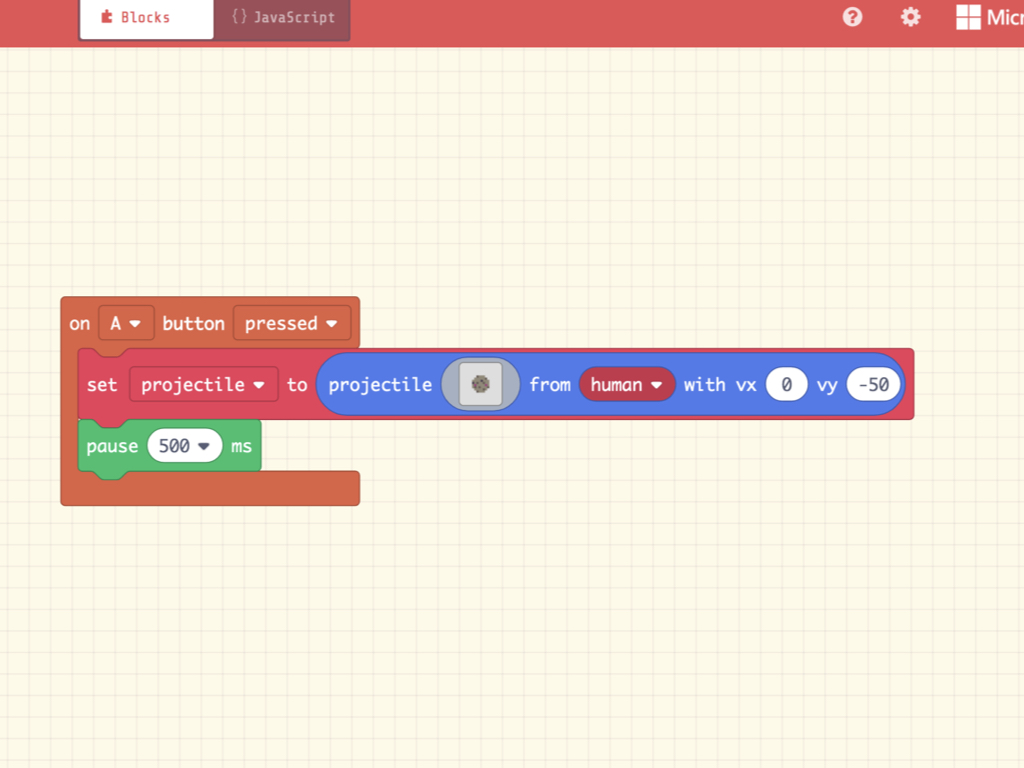
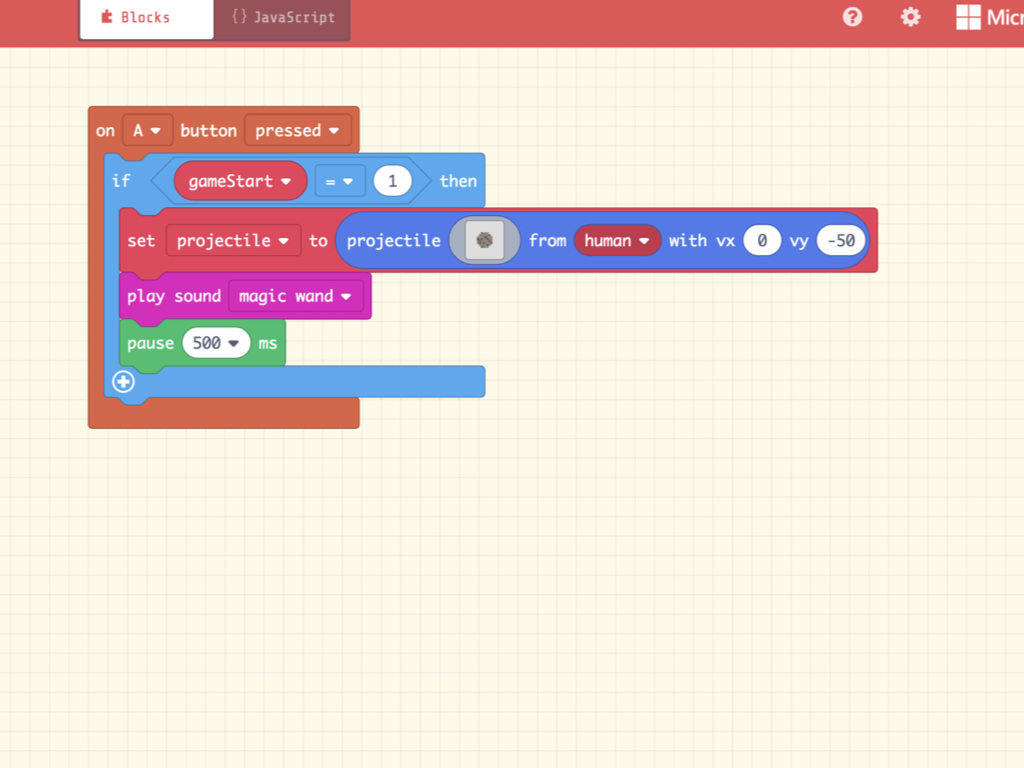
Next, we will create our first projectile! A projectile sprite, specifically, a cookie, will be fired from the human sprite. By setting it with vx 0 and vy -50, these x and y velocity values, the projectile will fire straight ahead from the player sprite.
Right now, the projectile can be fired repeatedly with little pause, this makes the game too easy! So, add a pause 500 ms block.
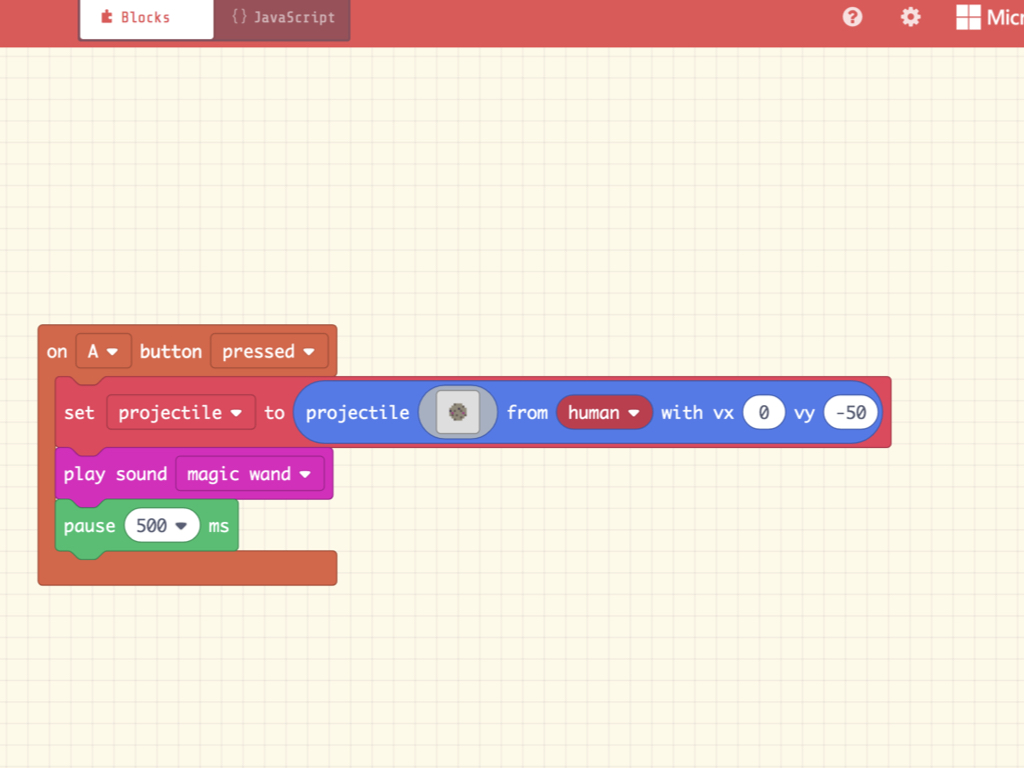
From Music tab, get out a play sound ... block. Add this under the set projectile block.
Set it to play 'magic wand'
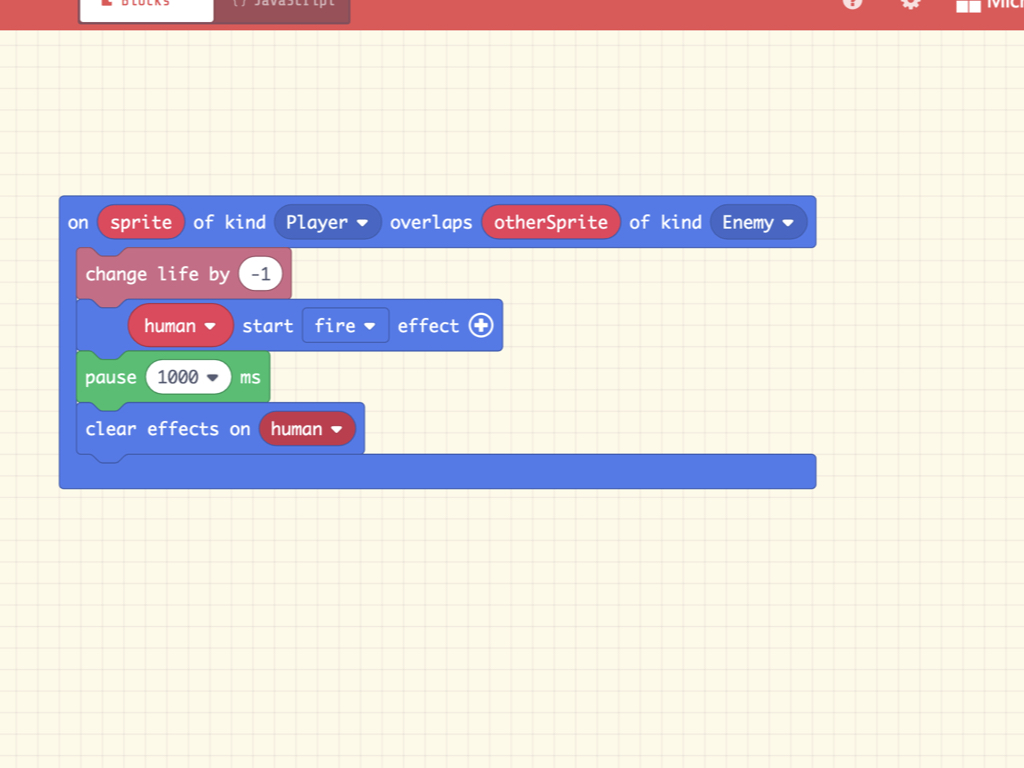
This code is triggered when the player sprite overlaps with any enemy sprite. In this code segment, a life is decremented, and an effect is generated on the human sprite for 1000 ms or 1 second. Then the effects are cleared.
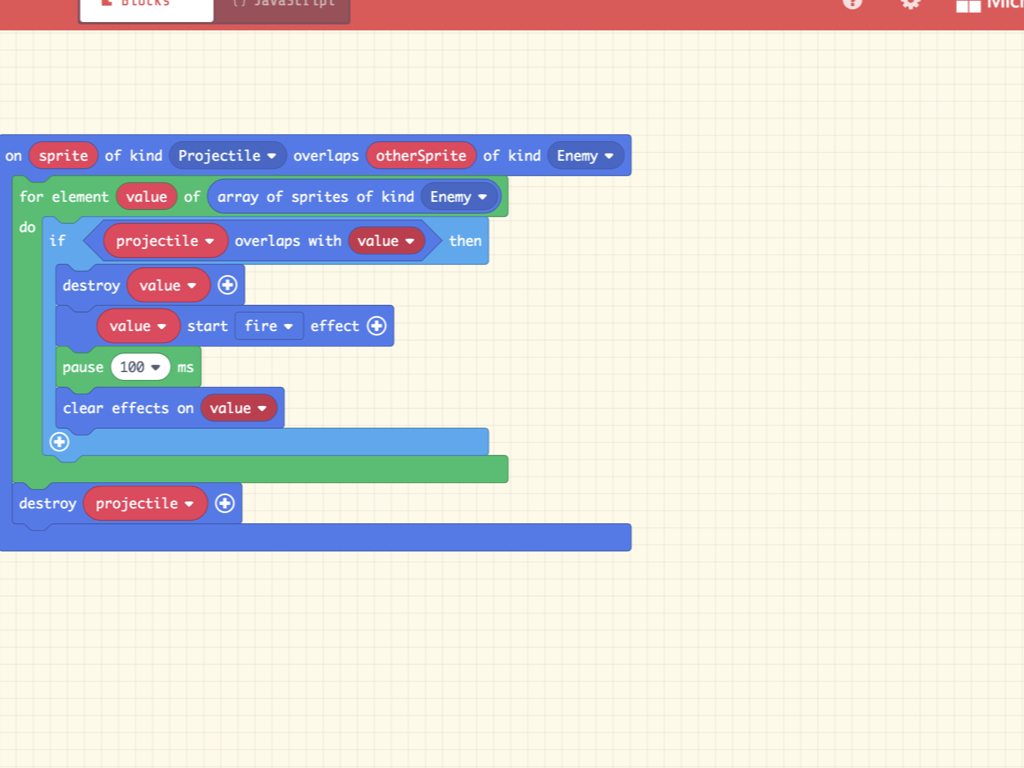
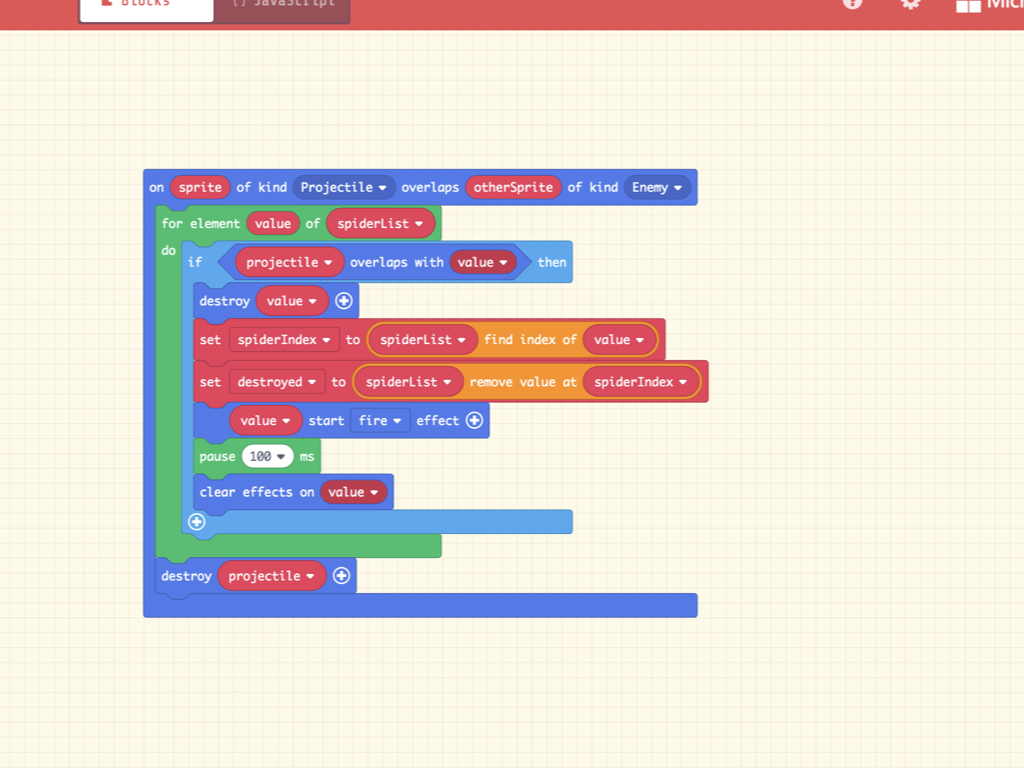
To check if the projectile sprite overlaps any enemy sprite, add the following code blocks. By using a for element value of array of sprites of kind Enemy, this checks to see if any spider sprite has overlapped a projectile sprite. If so, the spider sprite is destroyed, and a fire effect is set to it. A pause of 100 ms then occurs, before the effects are cleared.
Pay careful attention to the destroy projectile block at the end. This ensures that the projectile that overlaps that enemy sprite is also destroyed.
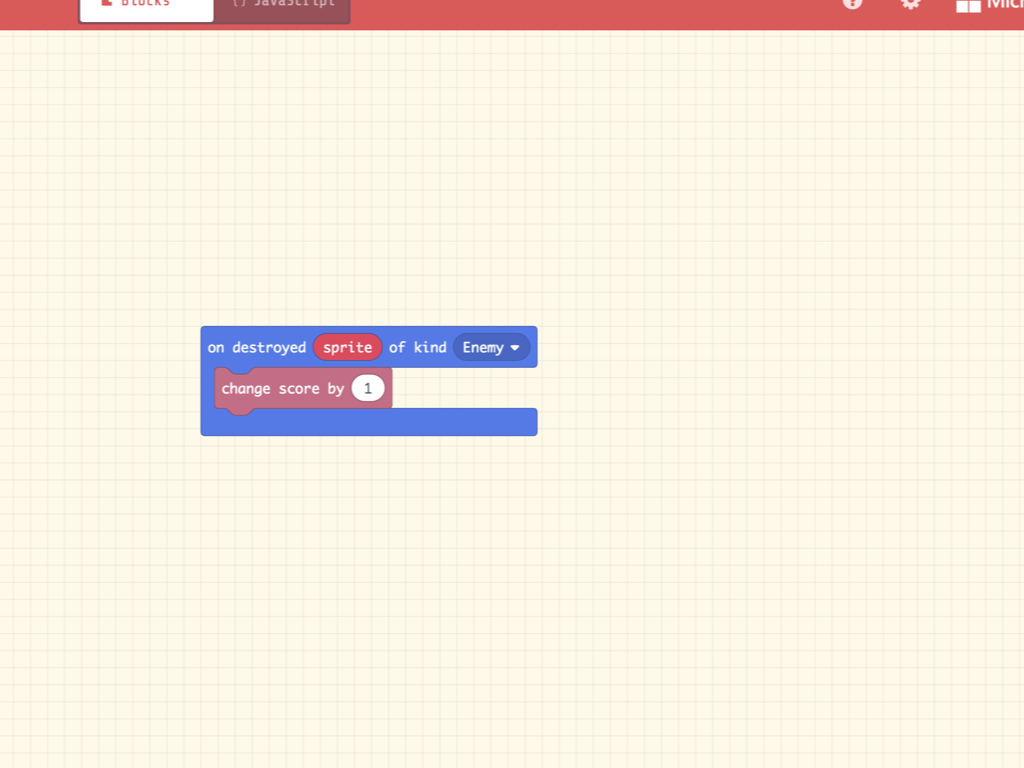
Next, on destruction of an enemy sprite, set the score to be incremented by one.
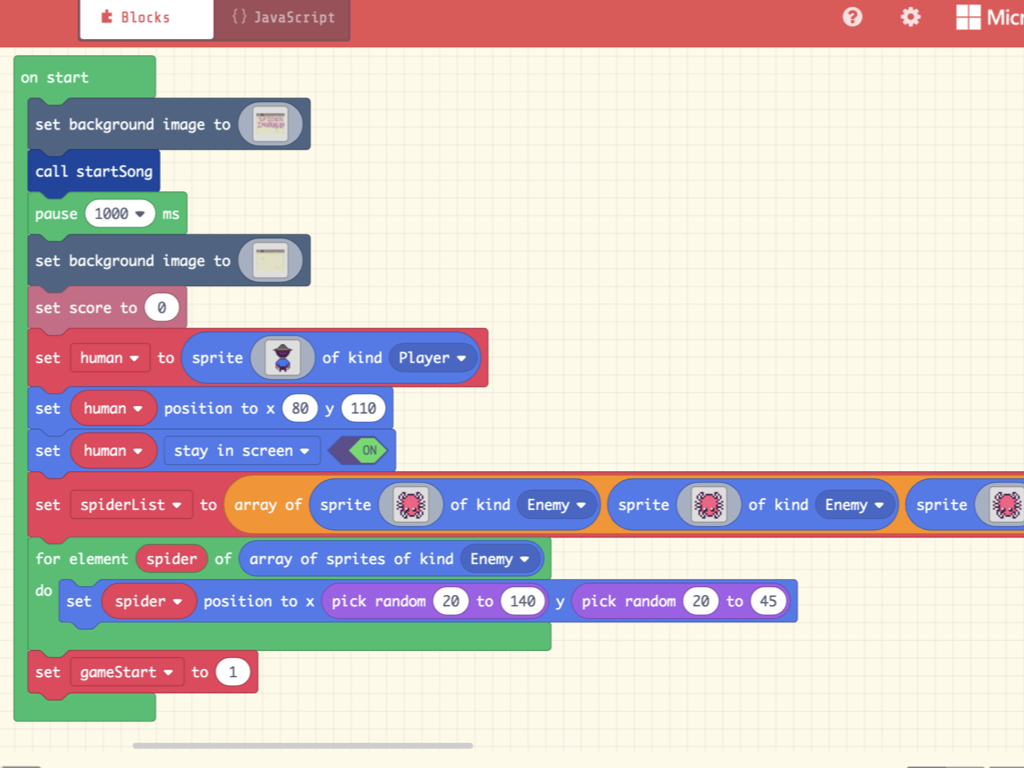
Right now, if you played the preview, projectiles can be fired even during the splash screen. As such, you may run into game errors! To avoid this, create a new variable called gameStart with a value of 0. Add this to the very end in on start block.
By the end of the on start block, set gameStart to 1.
Over in the on A button pressed block, add an if ... then ... block into it. Set this condition such that if gameStart = 1 then ...
Place the existing blocks within this condition.
To win the first level of Spider Invaders, all five spiders must be eliminated. To track whether or not the player has won the game, we will check to see if the spiderList array is empty. With the current code, the sprites are destroyed, but aren't yet removed from the array.
Create a new variable named spiderIndex, then add a ... find index of ... block into it. Set it to spiderList find index of value.
Next, create another variable called destroyed, and add a ... remove value at ... block into it. Set this to spiderList remove value at spiderIndex
Next, add an if ... then ... block into on game update every 1000 ms. Set a condition so that if the length of the spiderList array is zero, the player has won the game.

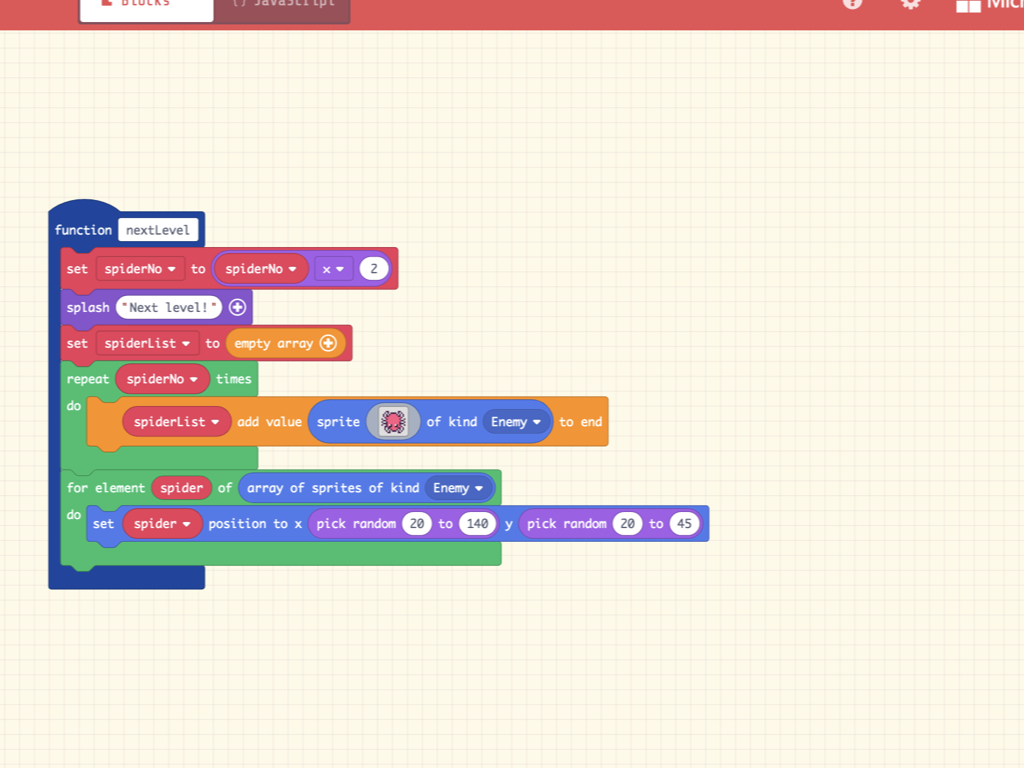
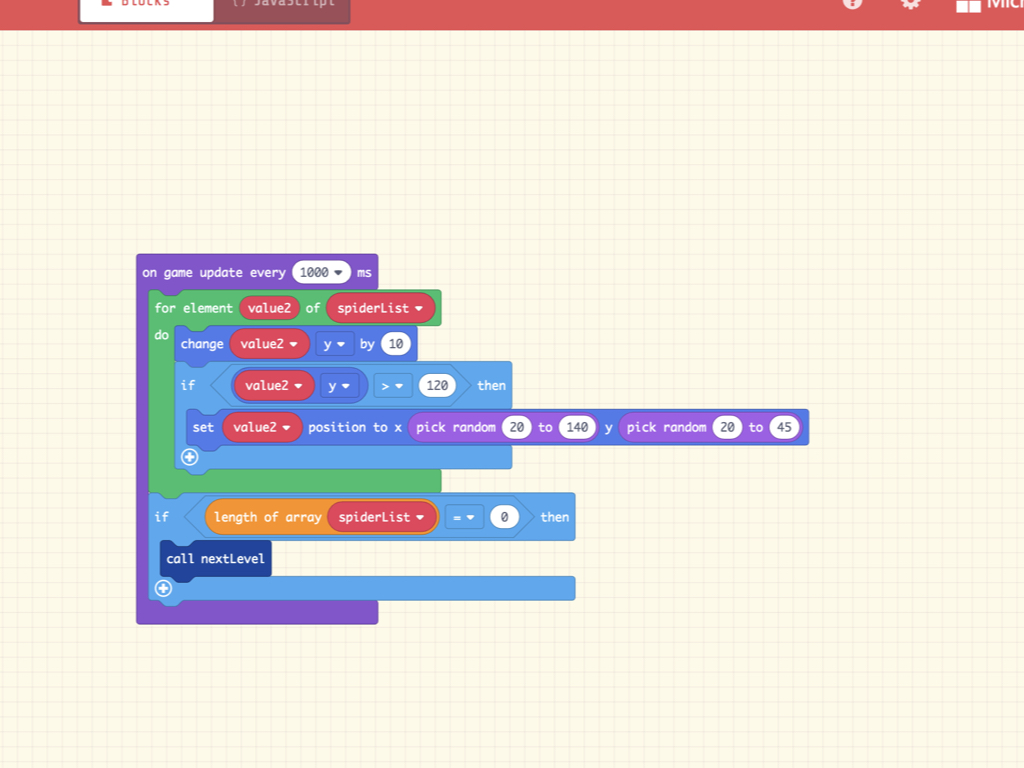
To increase the difficulty and length of the game, let's replace the previous code. Right now, after destroying all five sprites the player automatically wins the game -- which makes it too easy! So let's add some levels. Create a new function called nextLevel.
Over in the on start block, set a new variable spiderNo to 5. This will be the number of spiders that spawn on start.
To increase the difficulty in each level, let's add code that will cause the number of spiders to multiply by two each time the player advances onto the next level. Back in the new function block called nextLevel, set spiderNo to spiderNo multiplied by 2.
Next, add a splash prompt that announces the next level. This block can be accessed from the Game tab under the Prompt section.
Then set spiderList to empty array.
To create twice the number of sprites as before, use a repeat spiderNo times block, then attach a spiderList add value ... to end block. Drag and drop the spider sprite into it.
To randomly generate its position each time nextLevel is called, use a for element spider of array of sprites of kind Enemy do block. As before, set spider position to x pick random 20 to 140 y pick random 20 to 45.
Finally, over in on game update every 1000 ms, remove the game over WIN block and replace it with a call nextLevel block

Click on the Download button
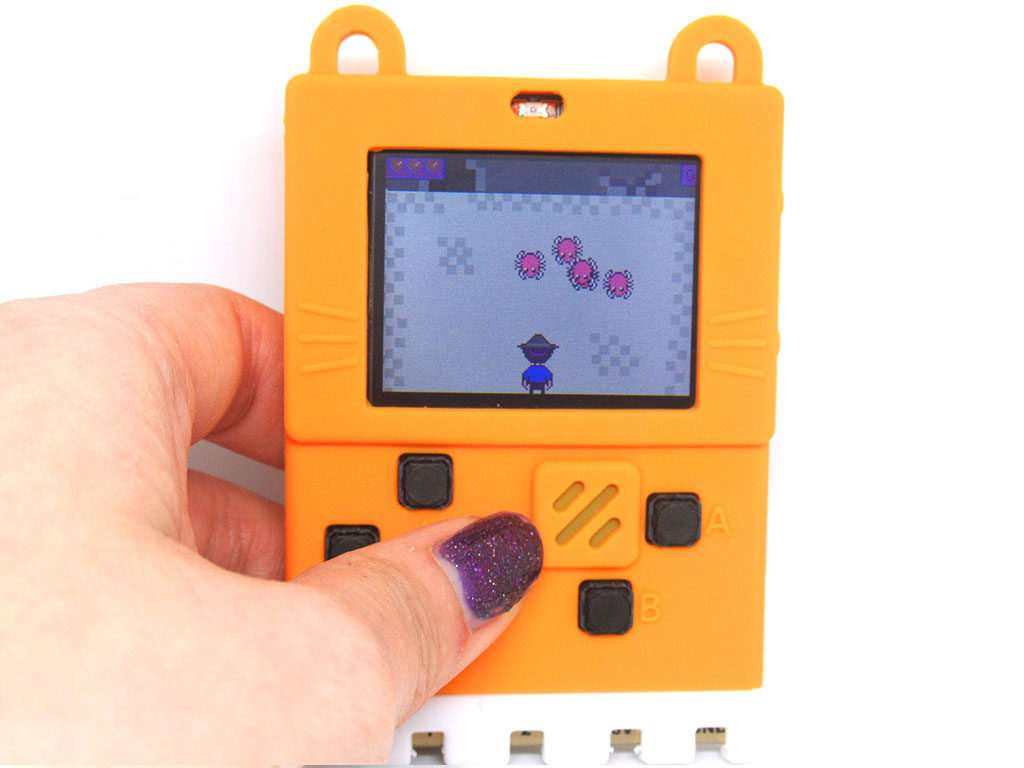
Click on Meowbit
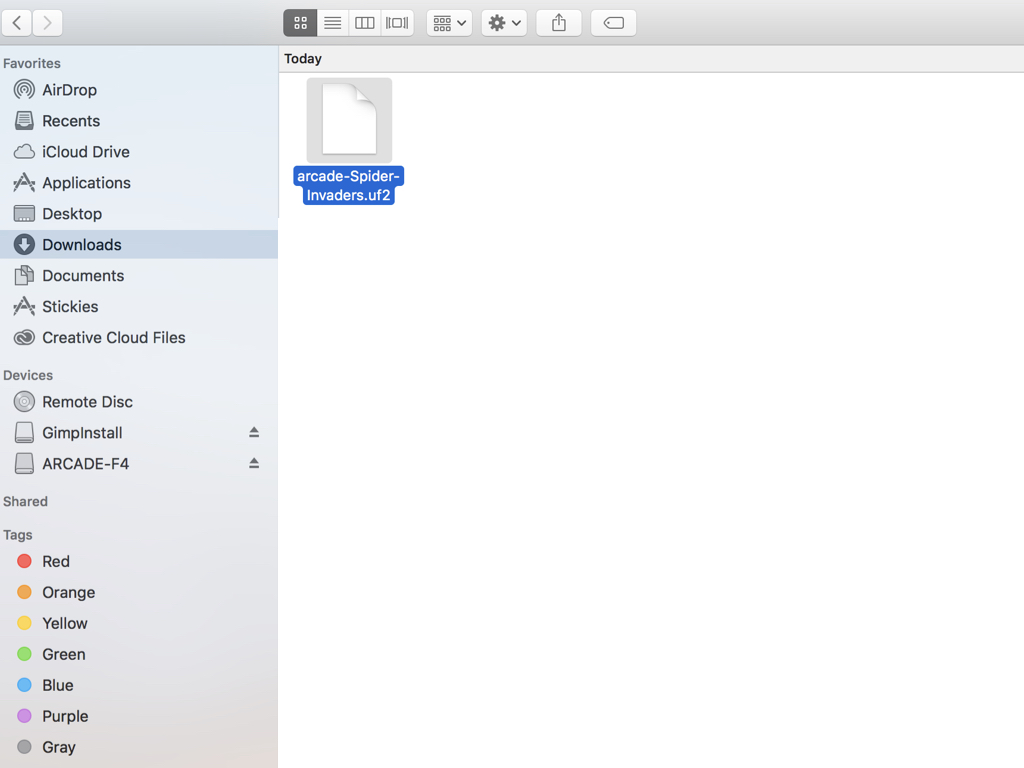
Drag and drop the arcade-Spider-Invaders.uf2 file to ARCADE-F4
Want the guide's .uf2 file? Feel free to download a copy of the game here.
