Keyboard Controlled Robot with Raspberry Pi 4
Build a Build a controllable robot with the Raspberry Pi 4
Written By: Cherie Tan
Difficulty
Medium
Steps
13
Previously, we built a pre-programmed two-wheeled robot and an obstacle-avoidant robot.
In this guide, add a camera to a keyboard-controlled Raspberry Pi robot so you can see where it is heading, and use a Wi-Fi device to view it remotely through VNC!
Complete this guide to build your own keyboard-controlled Raspberry Pi robot using the GPIO Zero library and curses module.
In this guide, add a camera to a keyboard-controlled Raspberry Pi robot so you can see where it is heading, and use a Wi-Fi device to view it remotely through VNC!
Complete this guide to build your own keyboard-controlled Raspberry Pi robot using the GPIO Zero library and curses module.
Previously, we built a pre-programmed 2-wheeled robot and an obstacle-avoidant robot. In this guide, add a camera to a keyboard-controlled Raspberry Pi robot so you can see where it is heading, and use a Wi-Fi device (connected to the same network as the Pi) to view it remotely through VNC!
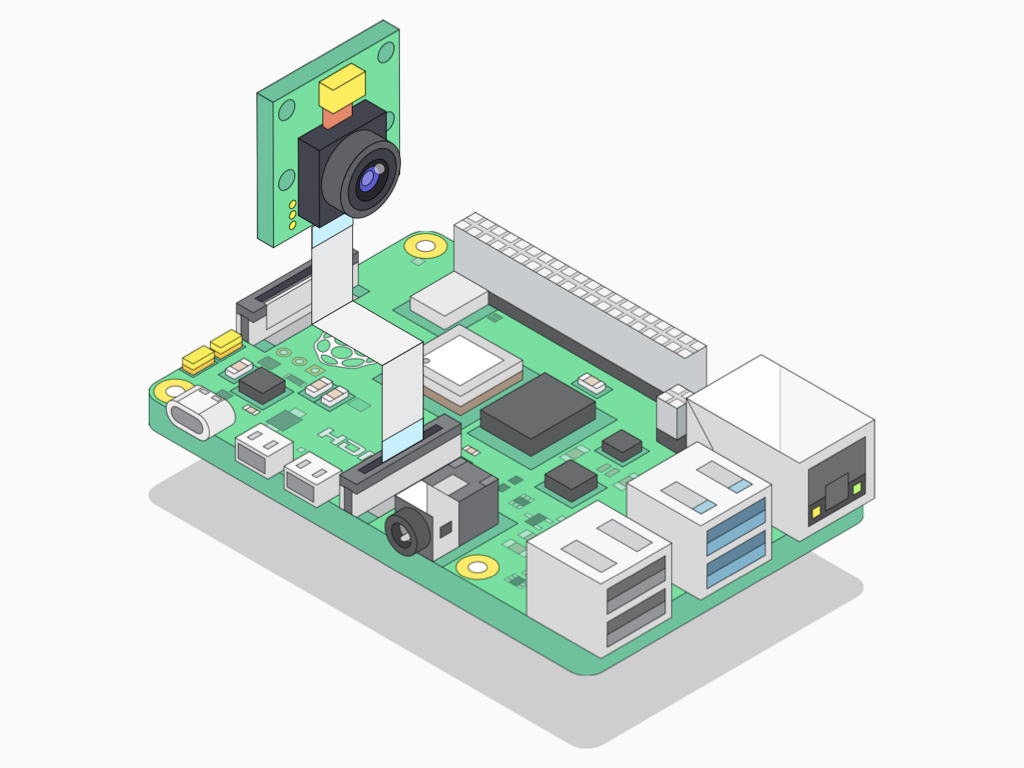
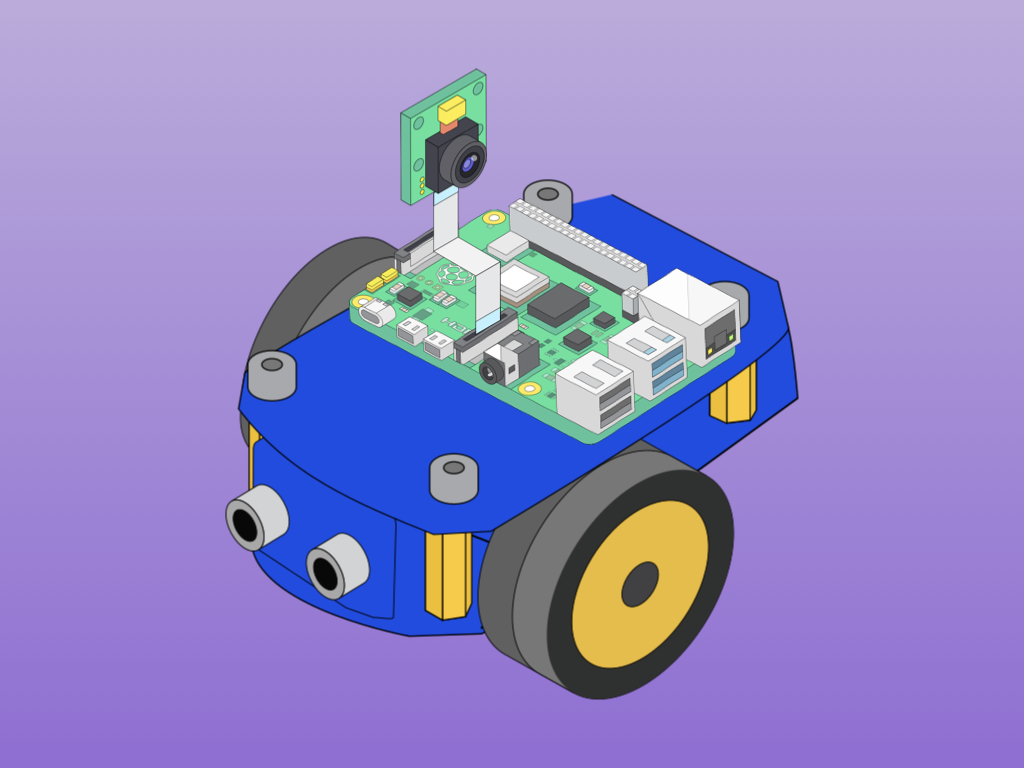
We have used a Raspberry Pi 4 Model B+ which has the same CSI (Camera Serial Interface) port as its predecessor. Insert one end of the Raspberry Pi Camera Ribbon into the CSI slot as shown.
The cable should slot into the CSI port with the cable's silver connectors facing the HDMI port. Using a Raspberry Pi Zero or Zero W? You will need a suitable Raspberry Pi Zero Camera Cable.
The Raspberry Pi Camera V2 board is a high quality 8 megapixel Sony IMX219 image sensor custom designed add-on board for Raspberry Pi, featuring a fixed focus lens. It's capable of 3280 x 2464 pixel static images, and also supports 1080p30, 720p60 and 640x480p60/90 video. For more information, check out our Getting Started with Raspberry Pi Camera V2 guide.
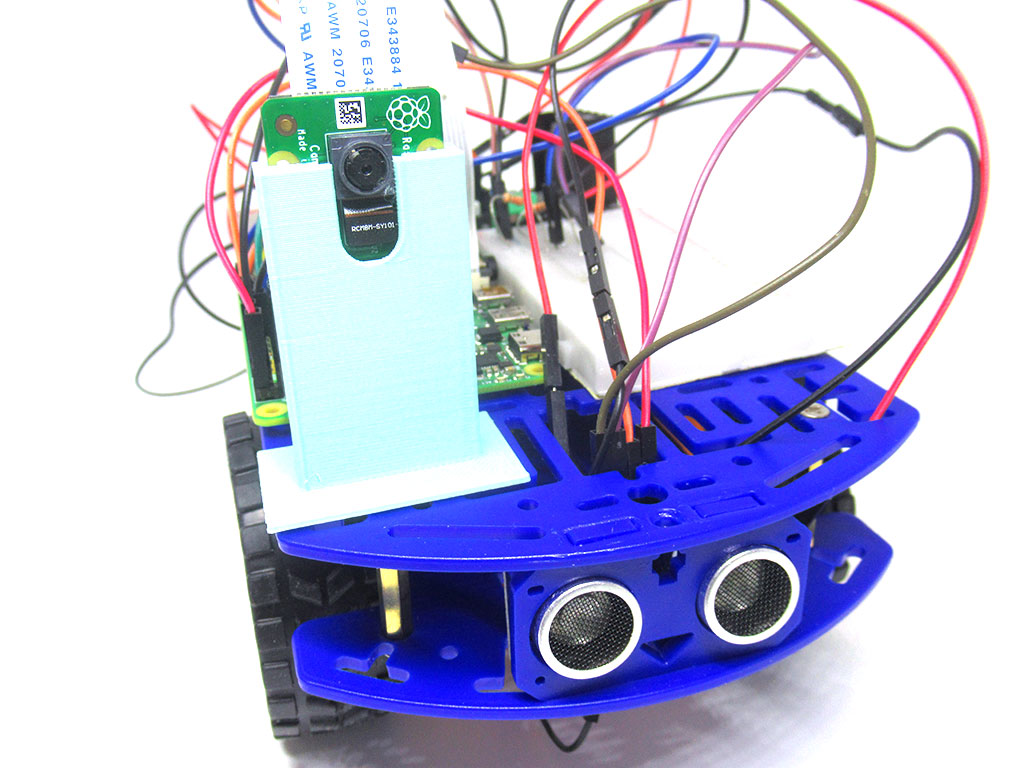
Mounting the camera module to the chassis is simple as there are many holes found on the top plate. In this guide, we have 3D printed a Raspberry Pi Camera Module V 2.1 holder and mounted it to the front of the top plate as shown.
Download this .STL file to print a mountable holder for the Raspberry Pi camera module V2.1.
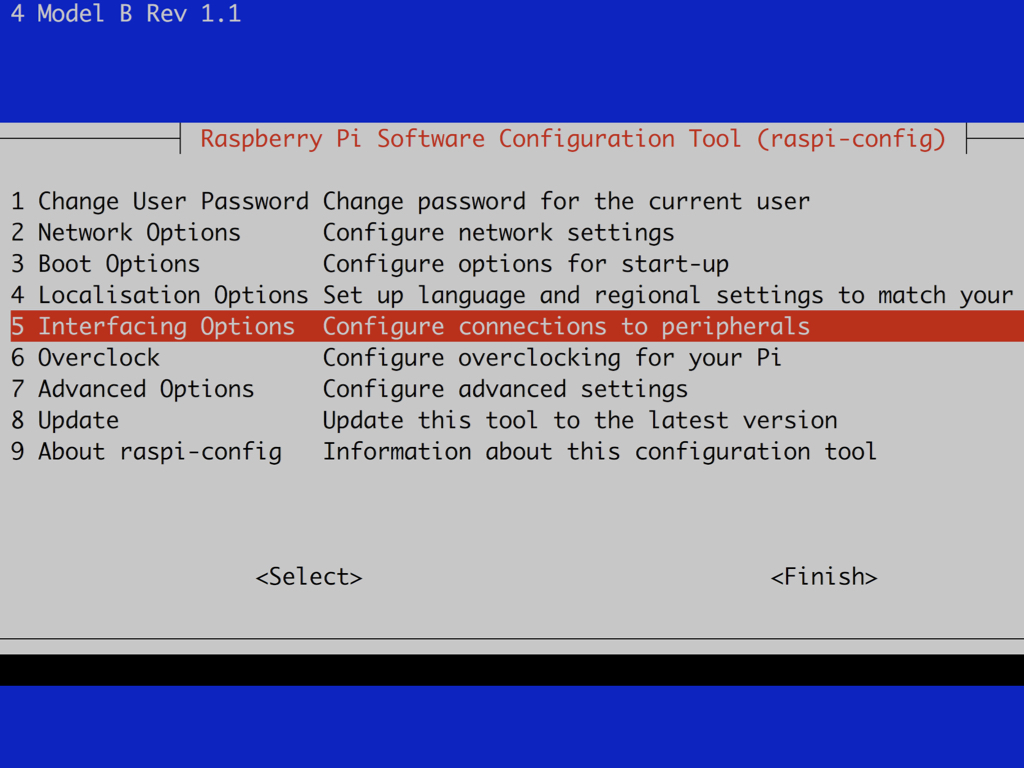
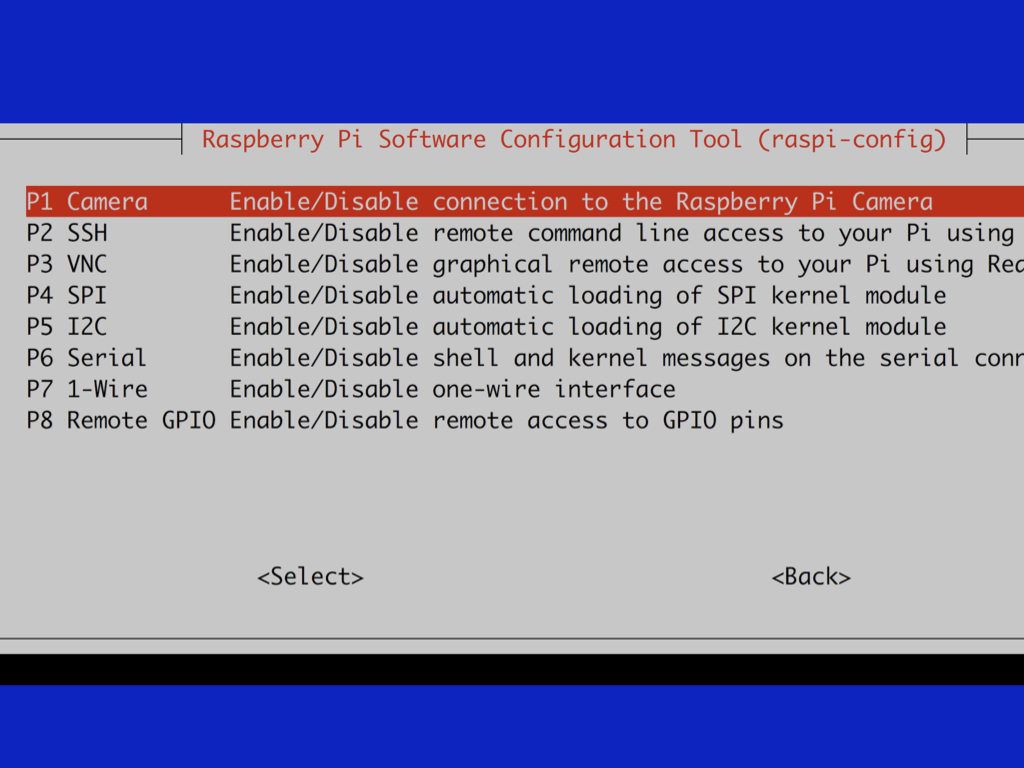
Enter sudo-raspi config into a terminal window
Navigate to 5 Interfacing Options and press enter to select
Navigate to P1 Camera and press enter to select
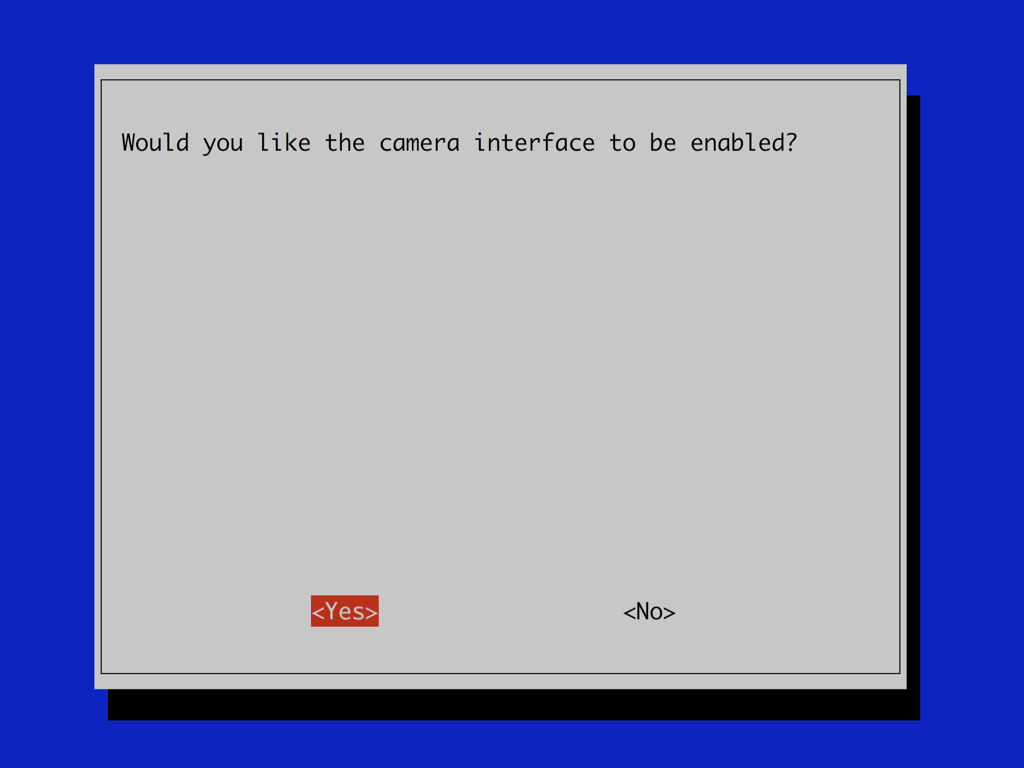
Choose Yes to enable the camera interaface

from picamera import PiCamera
import curses
from gpiozero import Robot
First, import the required libraries at the top of the script.
from picamera import PiCamera
import curses
from gpiozero import Robot

camera = PiCamera()
camera.resolution = (640, 480)
camera.rotation = 180
camera.start_preview()
If the Raspberry Pi is connected to a monitor directly, you can see the camera output in preview mode on the monitor. For it to show on VNC, you will need to enable direct capture mode, which we'll get to in later steps.
In the previous step, we imported the PiCamera class from the picamera module. Now, create an instance of PiCamera with camera = PiCamera()
The Python picamera library provides a number of effects and configurations. To set its resolution to 640 pixels by 480 pixels, simply use the camera.resolution command.
To set its framerate, use the camera.framerate command
Next, use the start_preview() method to start live display of the camera’s input.
from picamera import PiCamera
import curses
from gpiozero import Robot

robot = Robot(left = (27, 17), right = (22,23))
camera = PiCamera()
camera.resolution = (640, 480)
camera.rotation = 180
camera.start_preview()
Next, create a Robot object. This object is a 2-tuple containing the robot's left and right motor values; these values would be the GPIO pins they are connected to.
from picamera import PiCamera
import curses
from gpiozero import Robot

robot = Robot(left = (27, 17), right = (22,23))
camera = PiCamera()
camera.resolution = (640, 480)
camera.rotation = 180
camera.start_preview()

actions = {
    curses.KEY_UP:    robot.forward,
    curses.KEY_DOWN:  robot.backward,
    curses.KEY_LEFT:  robot.left,
    curses.KEY_RIGHT: robot.right,
    }


def main(window):
    next_key = None
    while True:
        curses.halfdelay(1)
        if next_key is None:
            key = window.getch()
        else:
            key = next_key
            next_key = None
        if key != -1:
            # KEY DOWN
            curses.halfdelay(3)
            action = actions.get(key)
            if action is not None:
                action()
            next_key = key
            while next_key == key:
                next_key = window.getch()
            # KEY UP
            robot.stop()
curses.wrapper(main)
Create a dictionary called actions with four key-value pairs. Using it with the curses module, we can incorporate simple keyboard input mechanisms to the robot. The getch() method refreshes the screen and then waits for the user to hit a key. It will also display the key if echo() has been called earlier. It returns an integer and if it is between 0 and 255, then it represents the ASCII code of the key pressed. If it returns a value that is greater then 255, then that would represent special keys such as Page Up.

Don't have VNC set up? See here for information on how to set up VNC on the Raspberry Pi.
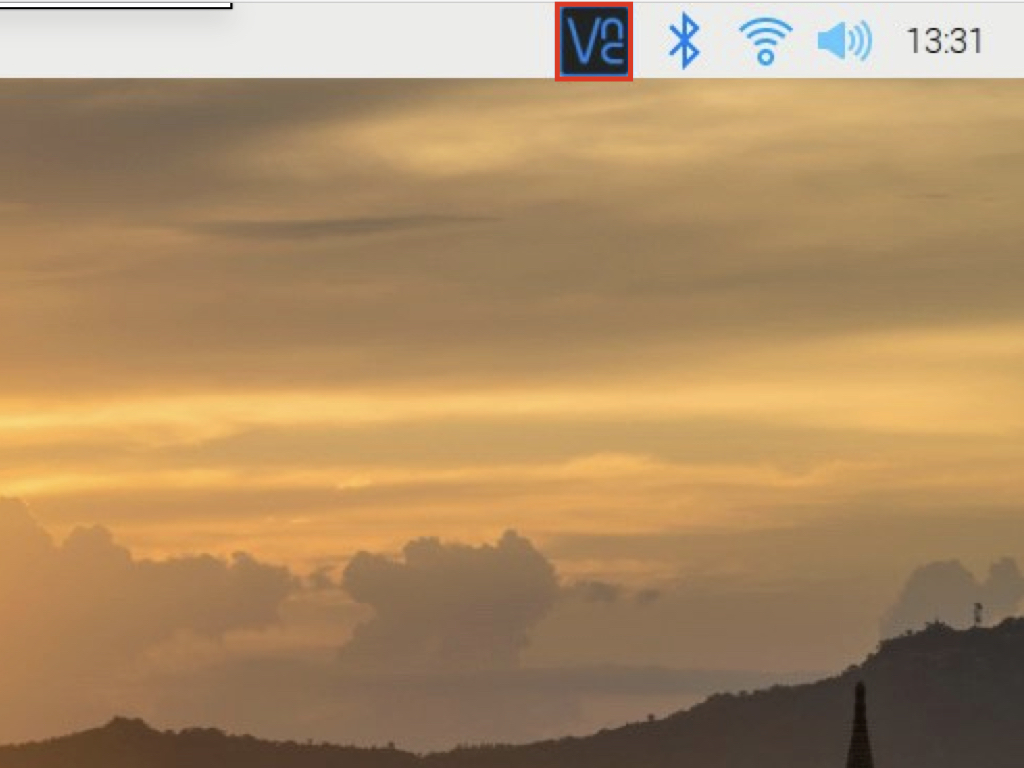
Click on the VNC Viewer icon on the top right-hand corner.
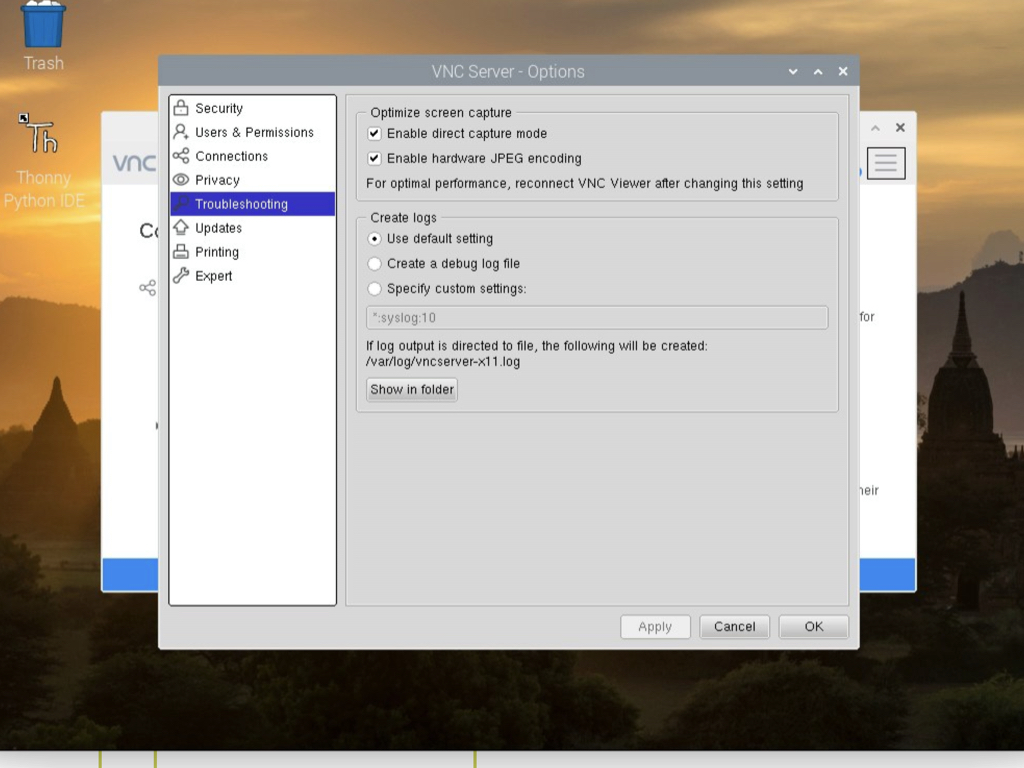
Click on the hamburger menu icon.
Click on Options
Click on Troubleshooting
Check the box for Enable direct capture mode


