Introduction to Python with Raspberry Pi
Learn about the Thonny IDE and basic data types
Written By: Cherie Tan

Difficulty
Easy
Steps
17
The Raspberry Pi made physical computing and programming accessible to many -- it is relatively inexpensive, and almost anyone could simply connect a monitor, keyboard, and mouse to get started. Python is an easy to start with high-level language, and it is an integral part of the Raspberry Pi's operating system.
In this guide, we'll show you how to get started with the Thonny IDE, learn about basic data types and control flow statements that are readily used when working with sensors and actuators on the Raspberry Pi.
Complete this guide to get started with Python programming on the Raspberry Pi.
In this guide, we'll show you how to get started with the Thonny IDE, learn about basic data types and control flow statements that are readily used when working with sensors and actuators on the Raspberry Pi.
Complete this guide to get started with Python programming on the Raspberry Pi.
The Raspberry Pi was created so that computing could be more accessible for everyone -- it is relatively inexpensive, and anyone could simply connect a monitor, keyboard, and mouse to get started. As sensors, actuators and other devices can be easily attached to it via its handy General purpose Input Output (GPIO) connector, it also serves as a gentle introduction into physical computing. The other impetus was to make programming more accessible, especially for beginners and kids. That's why Python is an integral part of the Raspberry Pi's operating system!
In this guide, we'll show you how to get started with programming in Python on the Pi. We'll also briefly talk about the commonly used data types.
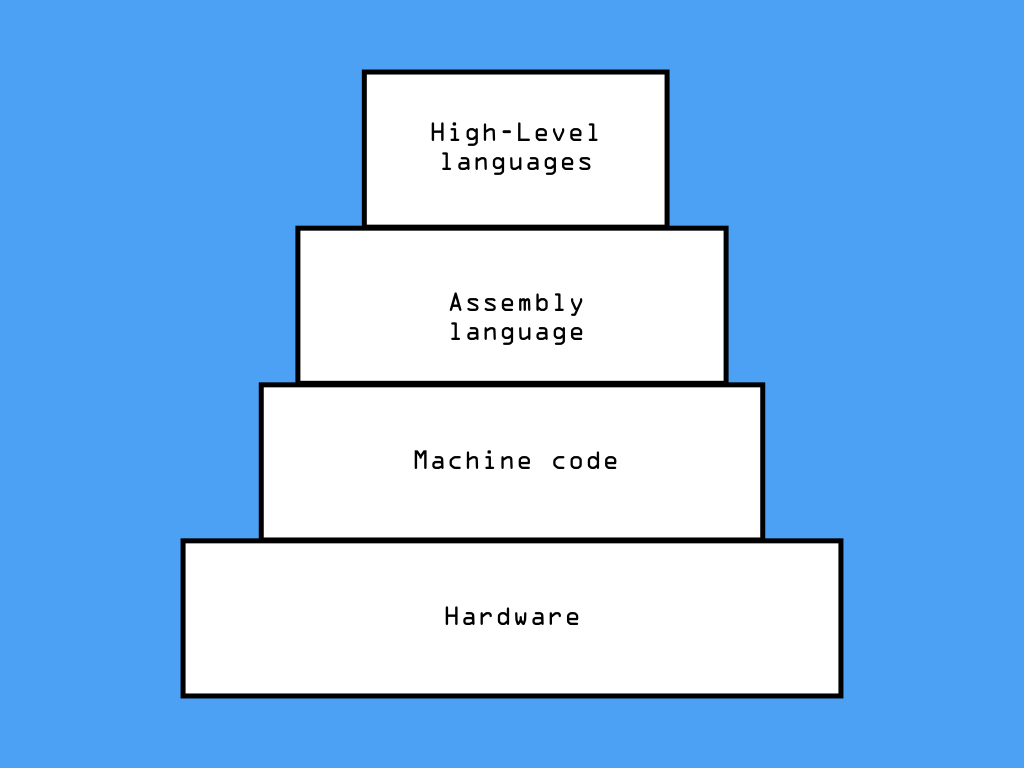
To communicate with a computer, we require the use of programming languages. A programming language is a language engineered to communicate instructions to a machine which understands machine code.
Machine language or machine code is a lower-level form that is read and executed by the computer. This language is comprised of binary, 0's and 1's. In this machine code, all instructions, memory locations, numbers, and characters are represented in 0's and 1's.
Assembly language implements a symbolic representation of machine code, that is to say, it replaces replaces the 0's and 1's with alphanumeric symbols in order to make it easier to remember and work with.
While they can run and execute fast, the main disadvantage is that it is tedious for humans to use, maintain, or debug. Enter high-level languages, these are languages that seem a lot more like our human language, enabling us to focus on problem-solving.
Still, programming languages such as Java or C++ require the use of a compiler, which is a program that converts human-readable instructions or code, into machine code, and is then executed and run.
On the other hand, a programming language such as Python is executed directly using an interpreter, rather than needing to go through a compiler. The code is read one at a time, where each statement is translated into machine language and then executed.
While a compiler scans the entire program and translates it as a whole into machine code, an interpreter translates the program one statement at a time.
One of the challenges when beginning to use Python is the need to install Python and other related software. Thankfully, all this is already set up for you in the latest version of Raspbian with PIXEL desktop, specifically Raspbian Buster at this time of writing.
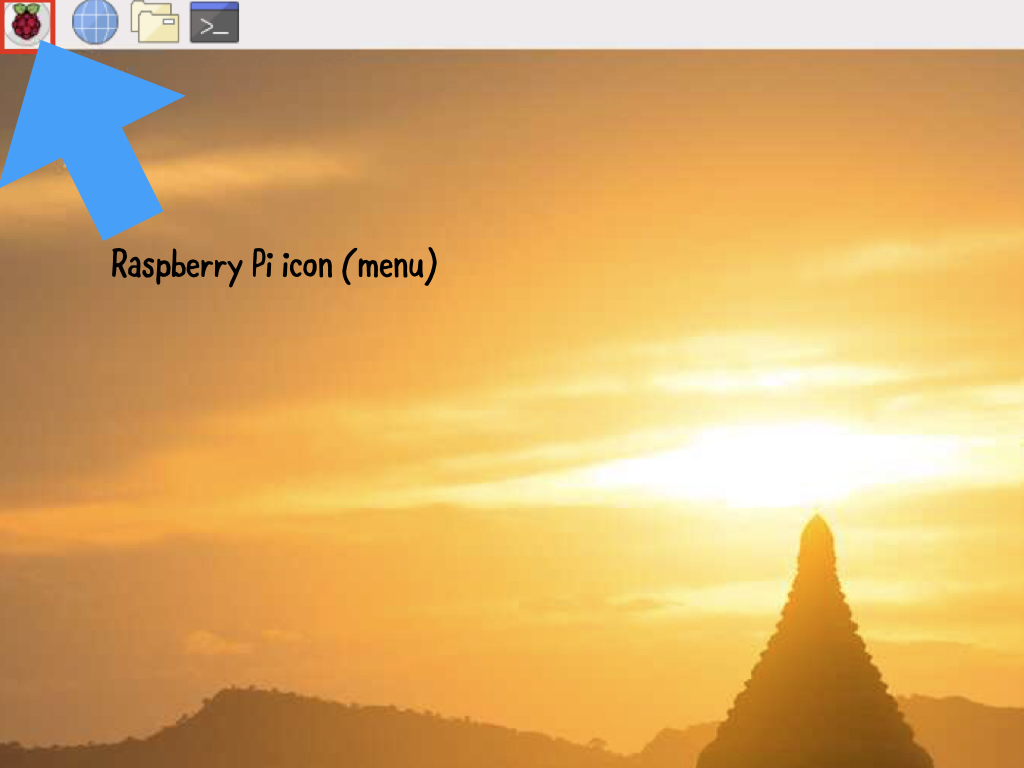
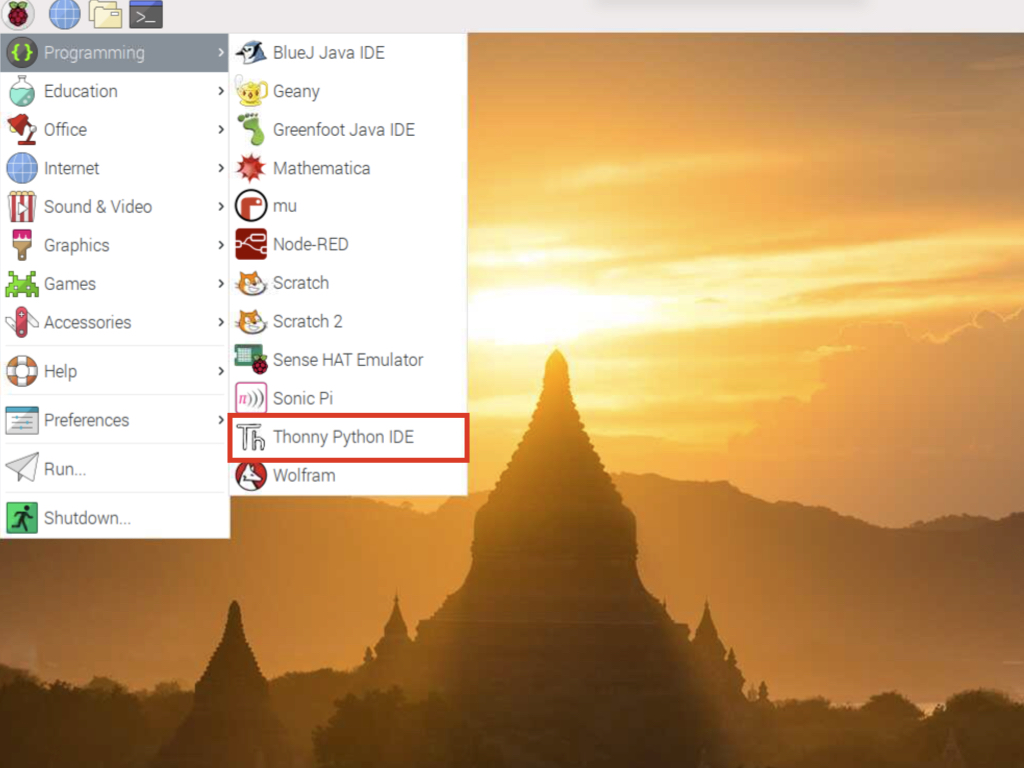
The easiest way to get started is to use Thonny, a new IDE (integrated development environment) that can be easily accessed by navigating to Raspberry Pi icon (menu) > Programming > Thonny Python IDE
The easiest way to get started is to use Thonny, a new IDE (integrated development environment) that can be easily accessed by navigating to Raspberry Pi icon (menu) > Programming > Thonny Python IDE
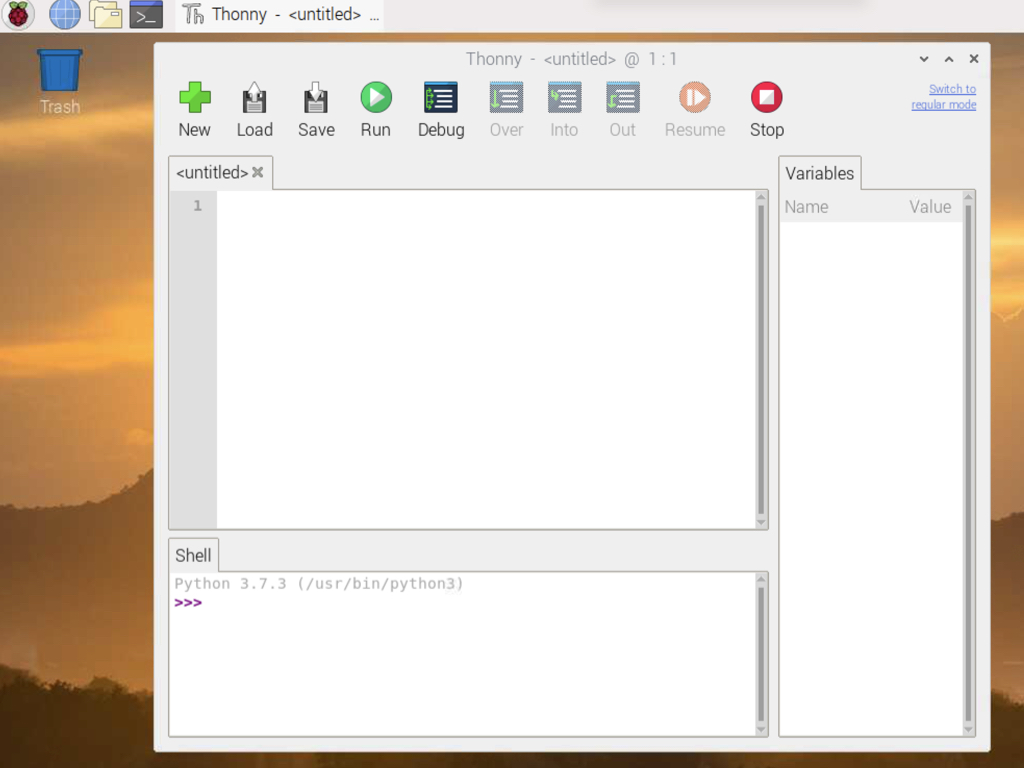
You will see a script editor and a shell, you enter a program in the script editor and run it in the shell. Let's write our first program!
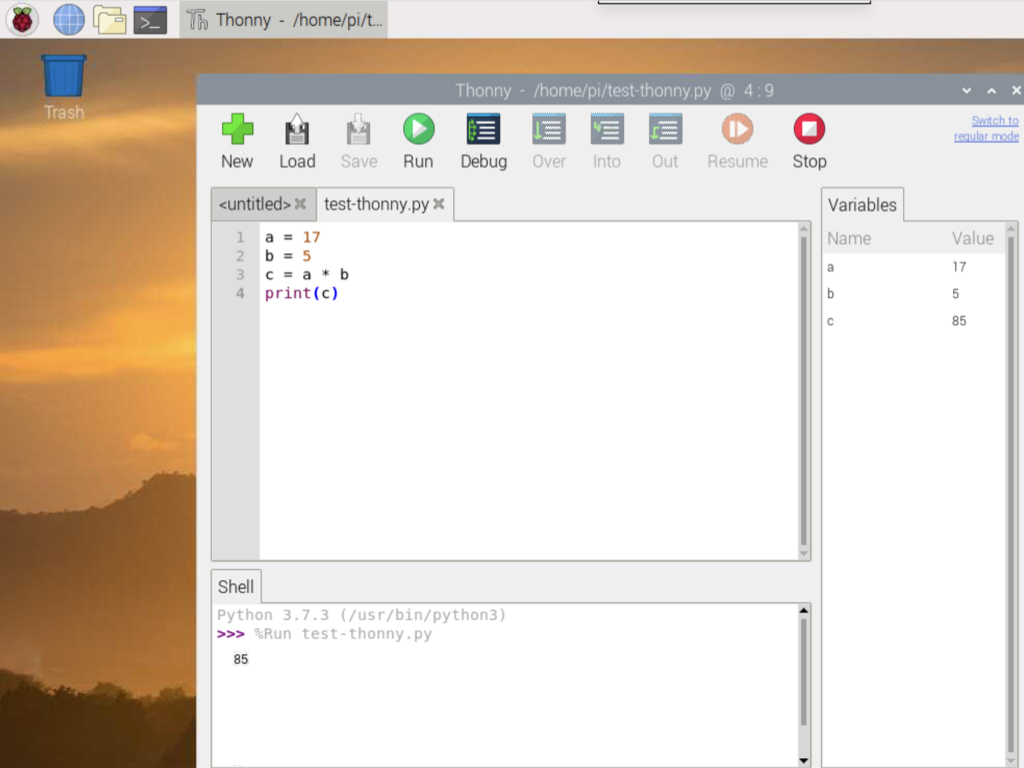
Enter the following code into the IDE.
Click on Save
Name this file and click OK
Click on Run
Down the bottom in the IDE, you will see the output here.

Another way to write and run python programs is through the terminal. To access the terminal, click on the terminal icon up the top left-hand corner.
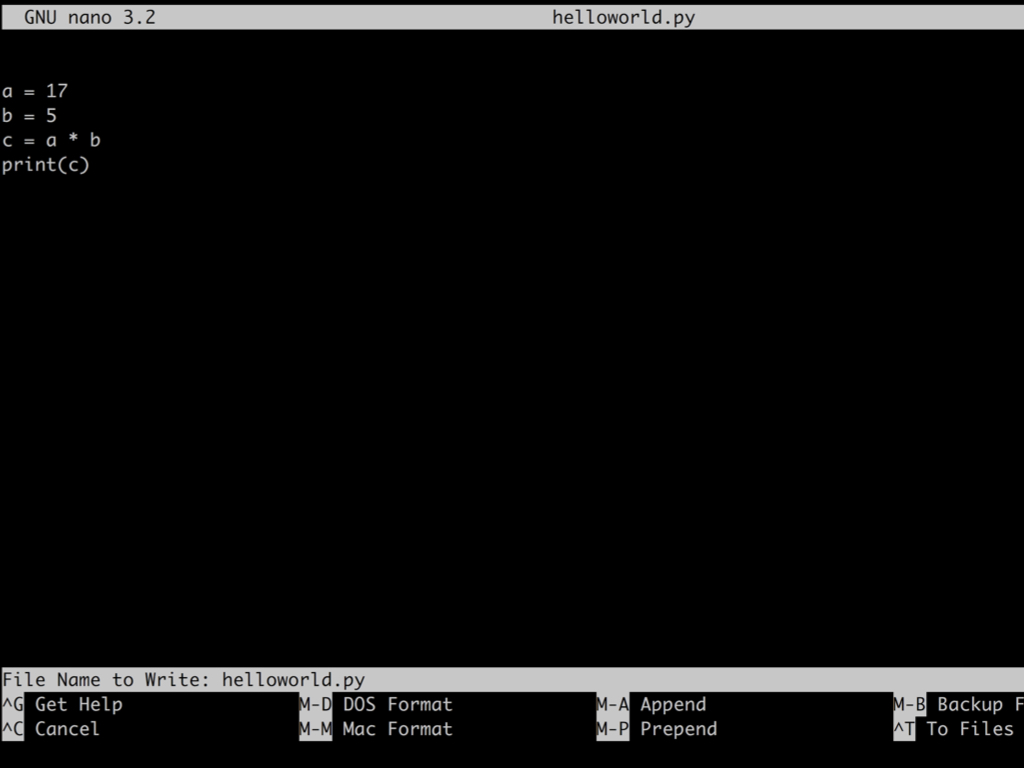
Type the following command: nano helloworld.py
Enter the following code
Press CTRL+O to save
Press CTRL+X to exit
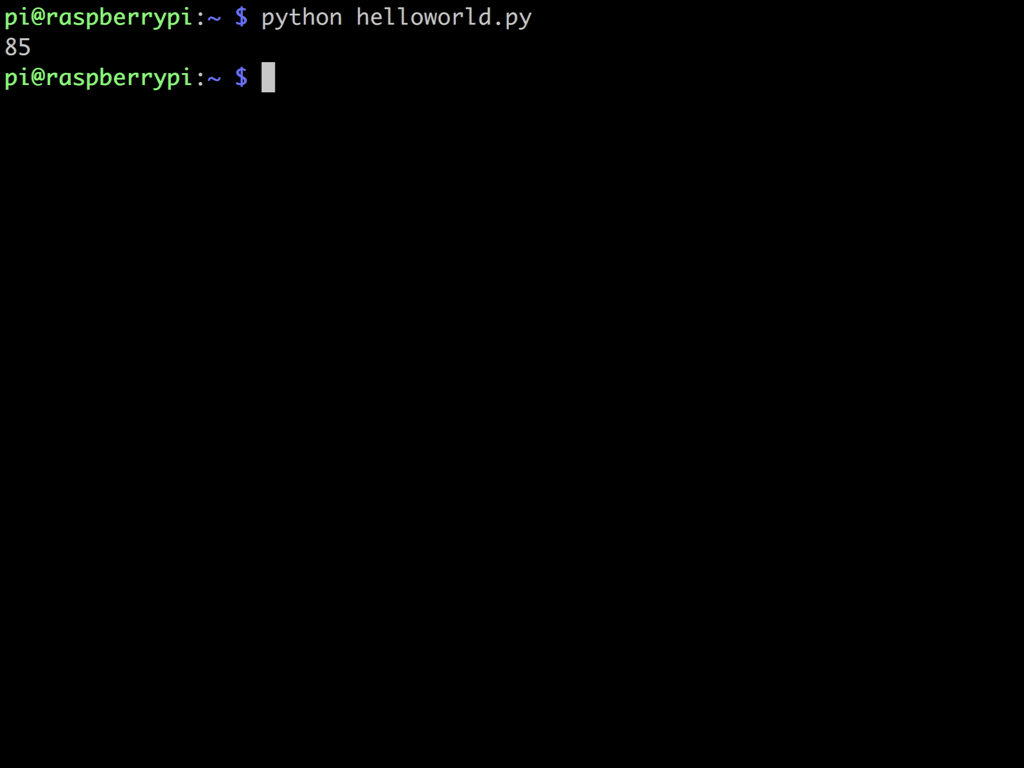
Now you can run the saved script by using the command: python helloworld.py
You should see the program output in the terminal window.
You should see the program output in the terminal window.
You can also write Python programs remotely via SSH. If you haven't yet, check out our guide on how to enable SSH on your Raspberry Pi.
One useful feature of a programming language, is the ability to manipulate variables. A variable can be thought of as a container, or a name, that holds a value.
So far, in our test-thonny program, we've seen the integer data type (falls under the Numbers category) being used i.e. a = 17. The equal symbol here is an assignment operator, this assigns a value to a variable; We declared a variable, a, with an integer value of 17.
Integers can be positive or negative whole numbers.
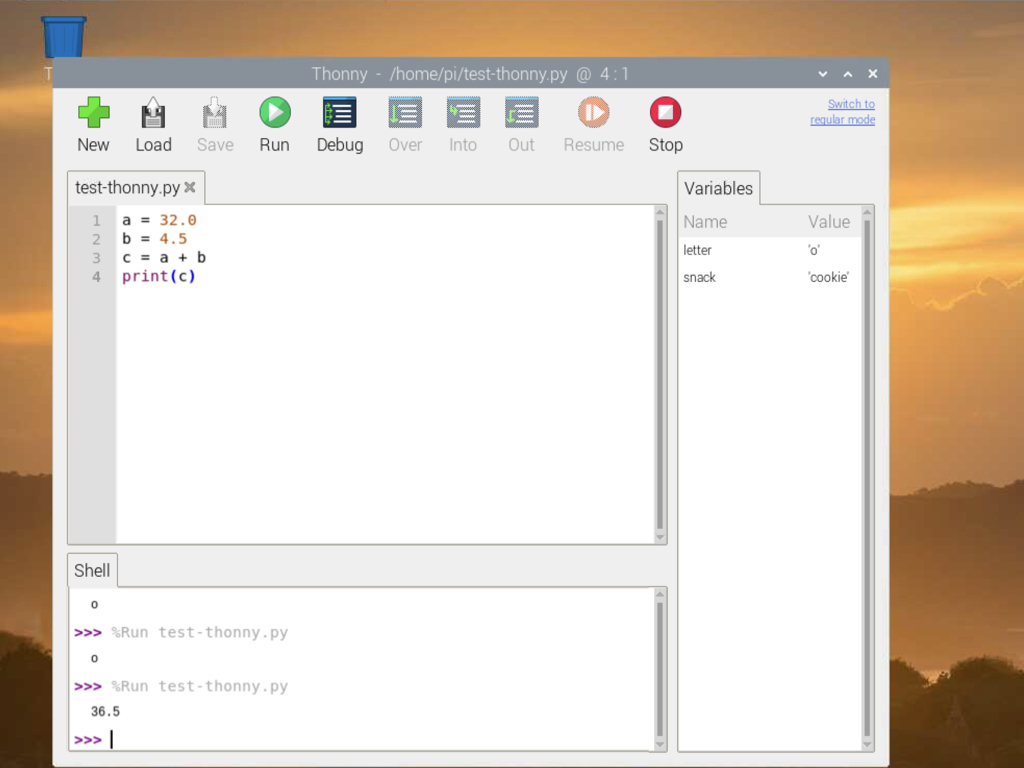
Another commonly used Numbers data type is the floating point number. These are values with a decimal point or scientific notation such as 32.0 or 4.5. This divides whole numbers into fractional parts.
For example, 32 is an integer, and 32.0 is a floating point number.
For example, 32 is an integer, and 32.0 is a floating point number.
Then there's the long or long integers, which are integers of infinite size. They look like integers but are followed by the letter 'L'
For example: 150L is a long integer.
For example: 150L is a long integer.
Occasionally you may also come across complex numbers. They have applications related to mathematics and are represented by the formula x + yi
Aside from integer numbers, there are other data types that we can use in our program. The first we'll take a quick look at is the string data type.
A string is a sequence of characters, meaning that it is an ordered sequence of other values.
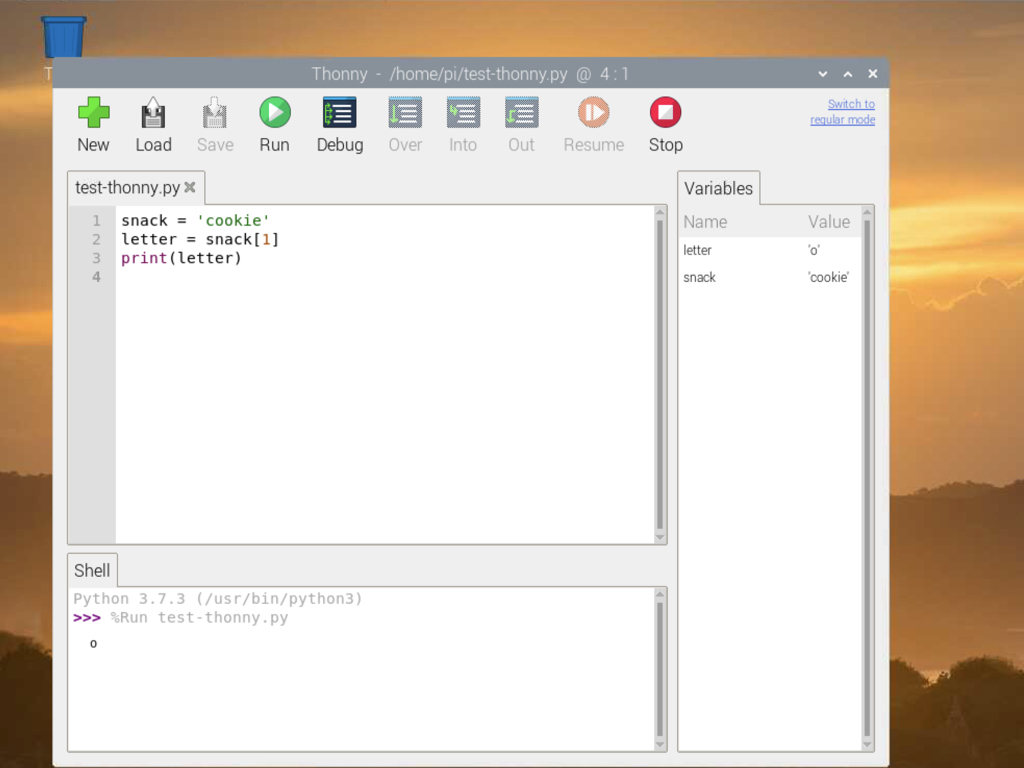
Try entering this into the editor:
snack = 'cookie'
letter = snack[1]
print(letter)
A string is a sequence of characters, meaning that it is an ordered sequence of other values.
Try entering this into the editor:
snack = 'cookie'
letter = snack[1]
print(letter)
The first statement is a sequence of characters that make up the word cookie. The second statement selects character number 1 from snack and assigns it to letter.
What are those brackets? The expression in these brackets is called an index, this indicates which character in the sequence you are trying to access.
The index begins at 0, hence snack[1] will output 'o' instead of 'c'.
What are those brackets? The expression in these brackets is called an index, this indicates which character in the sequence you are trying to access.
The index begins at 0, hence snack[1] will output 'o' instead of 'c'.
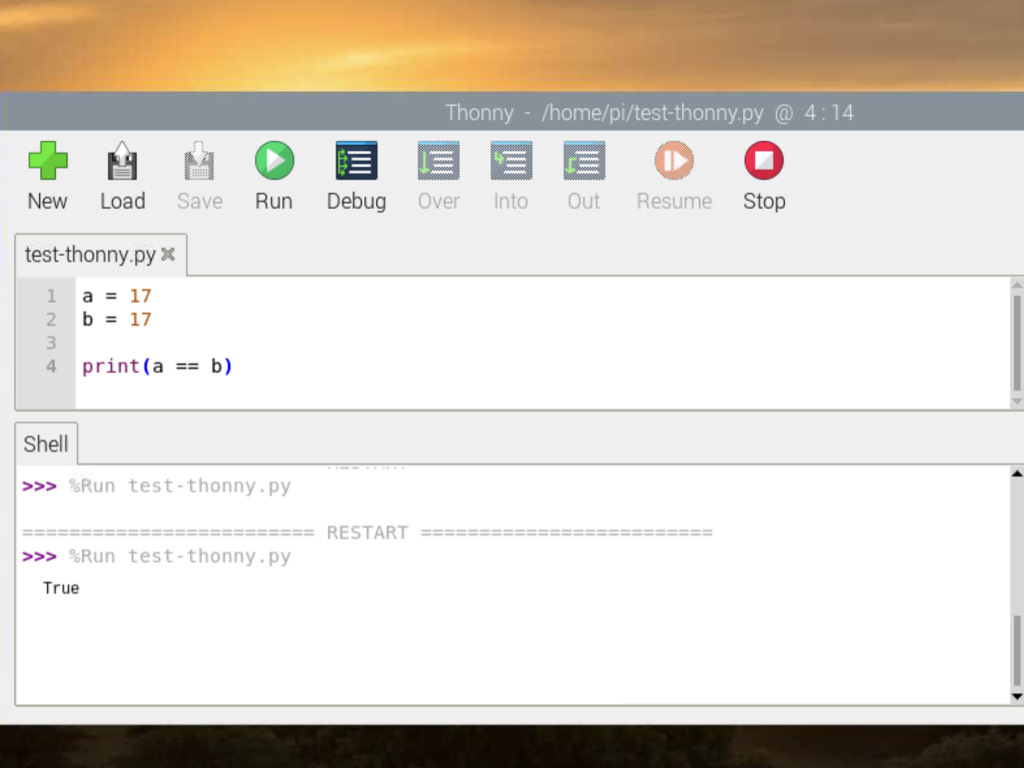
Python also allows the use of boolean data types. These are values that can either be True or False.
The example here uses the == operator which compares two operands, and produces True if they are equal. Otherwise, it produces False.
The example here uses the == operator which compares two operands, and produces True if they are equal. Otherwise, it produces False.
The == operator is one of the relational operators. Others include:
a != b #a is not equal to b
a > b #a is greater than b
a < b #a is less than b
a >= b # a is greater than or equal to b
a <= b # a is less than or equal to b
a != b #a is not equal to b
a > b #a is greater than b
a < b #a is less than b
a >= b # a is greater than or equal to b
a <= b # a is less than or equal to b

Sometimes, you may want a variable to hold a collection of values rather than just a single value. For that, there's the list data type, which can hold a collection of other data types. To create a list, simply use the [ and ] to contain its contents, for example:
snack = ['cookie', 'candy', 'chips', 'nuggets']
snack = ['cookie', 'candy', 'chips', 'nuggets']
Try printing the value at index 3:
print(snack[3])
print(snack[3])
When you want to access a collection of values, and you know where just it is placed, then you'd want to use a dictionary.
Dictionaries are an alternative to lists for storing collections of data. The difference is that a dictionary stores a key and value pair. As such, you can use the key to retrieve the value without needing to search through the entire collection.
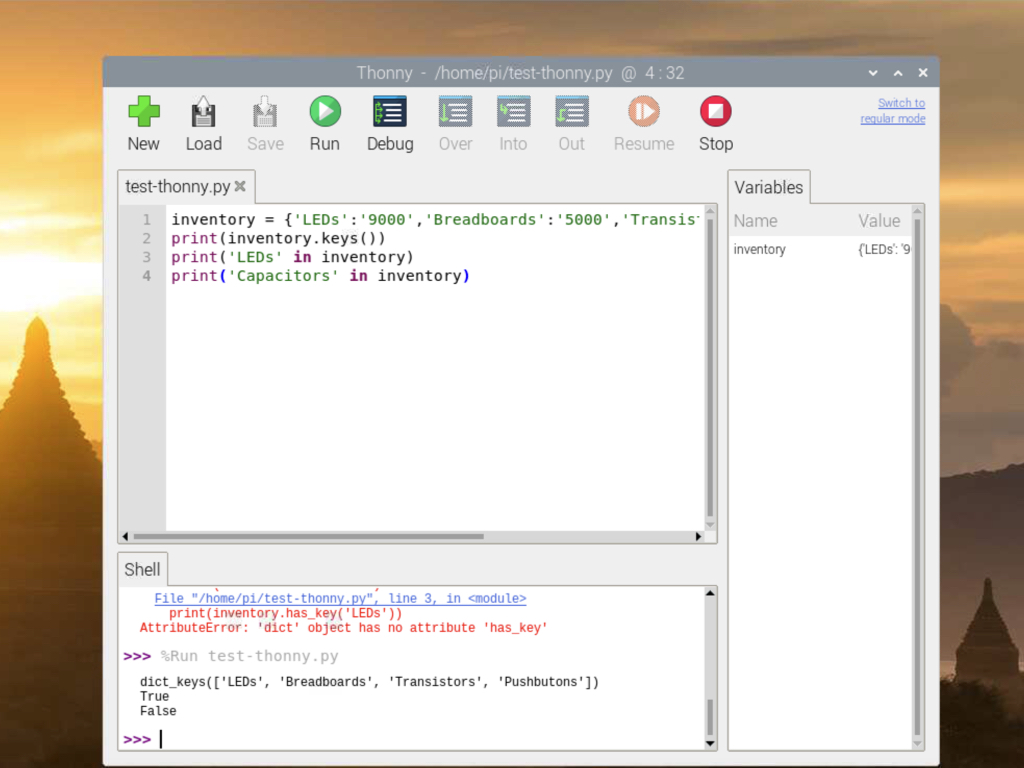
To create a dictionary, use the { } notation.
For example:
inventory = {'LEDs' : '9000', 'Breadboards' : '5000', 'Transistors' = '6700', Pushbuttons = '6755’}
Dictionaries are an alternative to lists for storing collections of data. The difference is that a dictionary stores a key and value pair. As such, you can use the key to retrieve the value without needing to search through the entire collection.
To create a dictionary, use the { } notation.
For example:
inventory = {'LEDs' : '9000', 'Breadboards' : '5000', 'Transistors' = '6700', Pushbuttons = '6755’}
Commonly used methods with the dictionary data type include the keys() method which will state all the keys in the dictionary.
The values() method retrieves all the values in the dictionary.
Please note that dictionary.has_key('keyname') has been deprecated. Instead, you should use 'keyname' in dictionary
This will return true if the keyname is found in the dictionary, otherwise it will return false.
This will return true if the keyname is found in the dictionary, otherwise it will return false.
Tuples are like lists, in which it is a collection of values, but they are immutable which means its order cannot be changed. So they are especially useful in cases where the value cannot be modified.
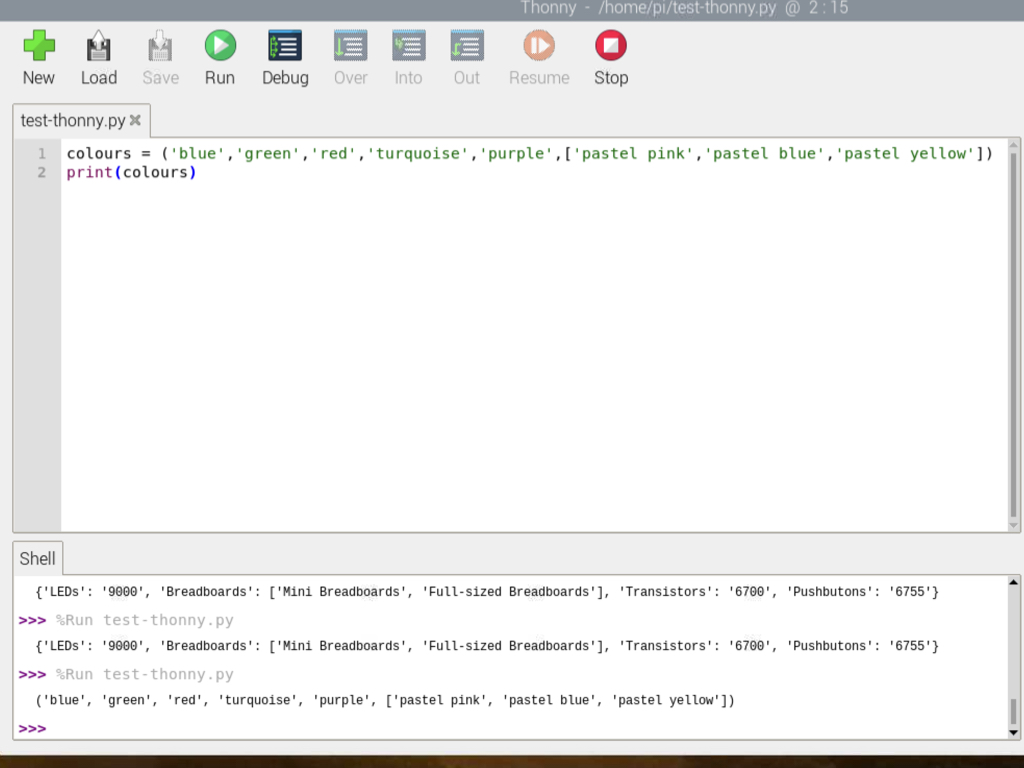
They are separated by a comma, written in parentheses instead of square brackets, can be created as follows:
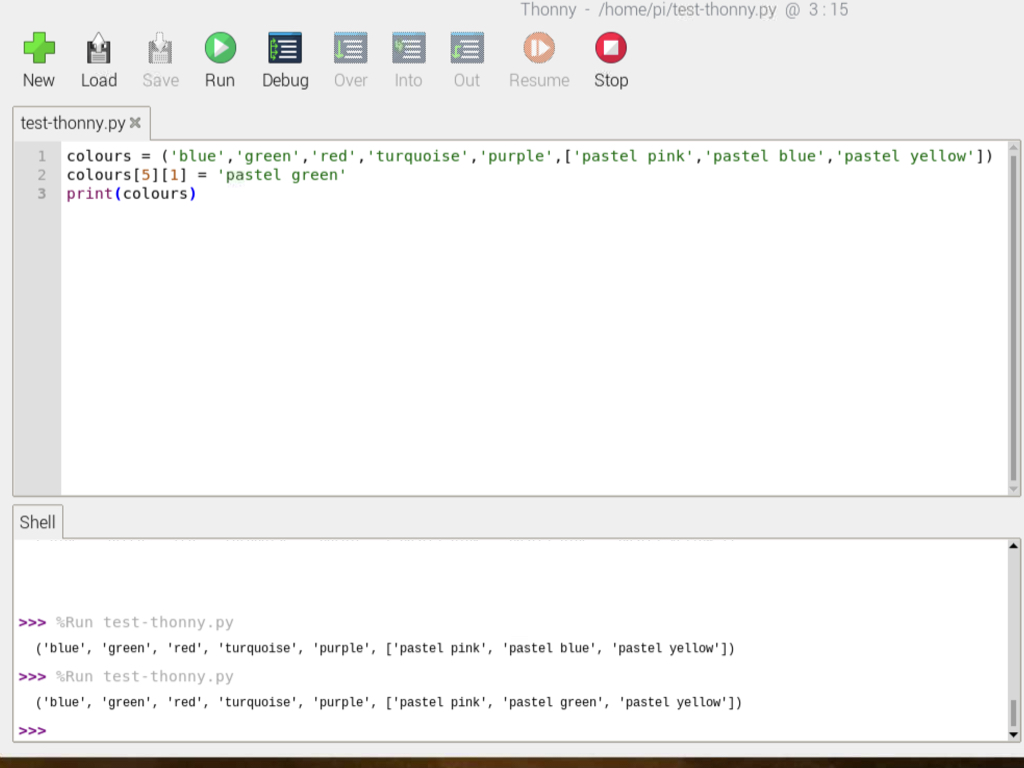
colours = ('blue', 'green', 'red', 'turquoise', 'purple', ['pastel pink', 'pastel blue', 'pastel yellow'])
In this example, colours contains five strings and one list.
They are separated by a comma, written in parentheses instead of square brackets, can be created as follows:
colours = ('blue', 'green', 'red', 'turquoise', 'purple', ['pastel pink', 'pastel blue', 'pastel yellow'])
In this example, colours contains five strings and one list.
Since lists are mutable, if the tuple contains a list, then it can be modified:
colours[5][1] = 'pastel green'
Here, 'pastel blue' will be replaced with 'pastel green’
colours[5][1] = 'pastel green'
Here, 'pastel blue' will be replaced with 'pastel green’
a = 15
if a > 20:
    print("a is larger than 20")
Notice the leading whitespaces, or indentation? Python uses indentation to figure out what statements belong together. Consider the following example:
a = 15
if a > 20:
print("a is larger than 20")
The indented print statement will let Python know if it should be executed if the statement returns True.
a = 15
if a > 20:
print("a is larger than 20")
The indented print statement will let Python know if it should be executed if the statement returns True.
You may use 4 consecutive spaces for a level of indentation.
import RPi.GPIO as GPIO
import Adafruit_DHT

sensor = Adafruit_DHT.DHT11
LED=40

GPIO.setmode(GPIO.BOARD)

GPIO.setup(LED,GPIO.OUT) #Red LED
GPIO.output(LED,GPIO.LOW)

humidity, temperature = Adafruit_DHT.read_retry(sensor, gpio)

if humidity is not None and temperature is not None:
    print('Temp={0:0.1f}*C  Humidity={1:0.1f}%'.format(temperature, humidity))
else:
    print('Failed to get reading. Try again!')

if temperature > 30:
    GPIO.output(LED, GPIO.HIGH)
else:
    GPIO.output(LED, GPIO.LOW)

GPIO.cleanup()
Usually, a program is executed from top to bottom, line by line. This would be all fine if the program's purpose was to say, make a simple one-off calculation as we did in test-thonny.py
What if you wanted an LED to light up when the temperature goes beyond a threshold? For that kind of program, you may need to include control flow statements. These include conditional statements which are used to determine whether or not a specific condition has been met, this is done through testing whether a condition is true or false.
What if you wanted an LED to light up when the temperature goes beyond a threshold? For that kind of program, you may need to include control flow statements. These include conditional statements which are used to determine whether or not a specific condition has been met, this is done through testing whether a condition is true or false.
Imagine we had a DHT11 temperature and humidity sensor, as well as a 3mm Red LED connected up to the Raspberry Pi's GPIO pins. The pseudo code can be as follows:
if temperature > 30:
turn LED to ON
else:
turn LED to OFF
if temperature > 30:
turn LED to ON
else:
turn LED to OFF
The actual code may look like the one on the left. As you can see, it follows the logic of:
if condition_is_true:
do something()
else:
do something else()
if condition_is_true:
do something()
else:
do something else()
As mentioned in the previous step, it is important to note the indentation determines whether a block of code needs to be executed when a specific condition is met. Try modifying the indentation in your code, and note what happens to the program execution
for x in range (0, 5):
    print "hello"
The for statement can be used when there is a block of code which you want to repeat a number of times. For example, say you wanted to print 'hello' five times
import RPi.GPIO as GPIO
import time
LED = 18

GPIO.setmode(GPIO.BCM)
GPIO.setup(LED, GPIO.OUT)

while (True):
    GPIO.output(LED, True)
    time.sleep(1)
    GPIO.output(LED, False)
    time.sleep(1)
The while statement can be used to repeat blocks of code over and over again. They are controlled by a conditional expression. For example, say you wanted an LED to blink on and off repeatedly, you could use the following code.
import RPi.GPIO as GPIO
import time
LED = 18

GPIO.setmode(GPIO.BCM)
GPIO.setup(LED, GPIO.OUT)

i = 0
while (True):
    print("Value of i is now ", i)
    GPIO.output(LED, True)
    time.sleep(1)
    GPIO.output(LED, False)
    time.sleep(1)
    i += 1
    if i > 10:
        break
After i is larger than 10, the LED will stop flashing altogether.
To break out of a loop, you can use an if statement with break as such.
We've walked you through the basics on Python programming using the Thonny IDE as well as with the terminal. We've also briefly looked at the different data types and control flow statements that you will usually find when working on the Pi!
In the next few guides, we'll take a closer look at how you can apply these concepts when working with various sensors and actuators together with the Raspberry Pi!
Then, you will be introduced to functions and again on how to apply these concepts to your physical computing projects.
In the next few guides, we'll take a closer look at how you can apply these concepts when working with various sensors and actuators together with the Raspberry Pi!
Then, you will be introduced to functions and again on how to apply these concepts to your physical computing projects.